
Hello,
Our Metod has been standing around for a while now... eventually, we need to close the gaps.
Our kitchen is arranged in a U-shape. The long side of course never matches the exact measurement to be completely filled with cabinets. So, there’s always a gap somewhere where a filler strip (I think that’s what it’s called in the planner) should go.
But where can I get one? Ideally, it should be the same color as the cabinet fronts.
And how do I attach it?
Best regards
Spanni
Our Metod has been standing around for a while now... eventually, we need to close the gaps.
Our kitchen is arranged in a U-shape. The long side of course never matches the exact measurement to be completely filled with cabinets. So, there’s always a gap somewhere where a filler strip (I think that’s what it’s called in the planner) should go.
But where can I get one? Ideally, it should be the same color as the cabinet fronts.
And how do I attach it?
Best regards
Spanni
R
robi_aus_ffm6 Nov 2015 12:19Hello,
instead of filling the small gap, wouldn’t it be better to remove the element on the right and insert a correspondingly larger piece?
By the way, there is a trim strip for covering saw edges, but I can’t recall the name right now...
Best regards, robi_aus_ffm
I found it:
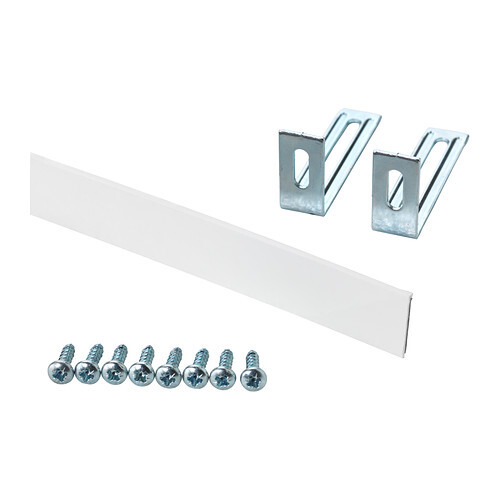
Förbättra
Cover strip and fitting, white
instead of filling the small gap, wouldn’t it be better to remove the element on the right and insert a correspondingly larger piece?
By the way, there is a trim strip for covering saw edges, but I can’t recall the name right now...
Best regards, robi_aus_ffm
I found it:
Förbättra
Cover strip and fitting, white
I
IKEA-Experte6 Nov 2015 13:11Unfavorable position of the gap. It would have been better if the cabinet had been placed directly next to the corner cabinet, and a gap with a cover panel would be left between the cabinet and the wall at the other end.
At IKEA, shadow panels are generally used instead of filler panels. A shadow panel aligns with the cabinet carcass, not the front. In this case, the cut edges are less problematic.
I assume that at this point you don’t really want a shadow panel but rather a filler panel that is flush with the fronts. Then the cut edge should be neatly finished. If I’m correct, you are working with a Ringhult cream-colored front and black carcasses.
Finding the right edge banding to cover the cut edge will be difficult, especially if you want to iron it on yourself. I am not sure if this type of high-gloss edge band even exists. Also, it is not a standard color tone, so it will have to be something as similar as possible. This usually requires direct comparison. I would suggest contacting Ostermann to ask if they can tell you who has samples of the complete 20,000 decors, or if there is another way to find a suitable match.
To ensure the filler panel is at the same height as the doors, it must be screwed onto a wooden strip painted to match the carcasses. The strip should be mounted so that 1.5 mm (approximately 0.06 inches) remains visible to achieve a consistent joint appearance. The filler panel can then be attached to the carcass using this strip. It would likely be beneficial to attach a second strip to the opposite carcass as well.
At IKEA, shadow panels are generally used instead of filler panels. A shadow panel aligns with the cabinet carcass, not the front. In this case, the cut edges are less problematic.
I assume that at this point you don’t really want a shadow panel but rather a filler panel that is flush with the fronts. Then the cut edge should be neatly finished. If I’m correct, you are working with a Ringhult cream-colored front and black carcasses.
Finding the right edge banding to cover the cut edge will be difficult, especially if you want to iron it on yourself. I am not sure if this type of high-gloss edge band even exists. Also, it is not a standard color tone, so it will have to be something as similar as possible. This usually requires direct comparison. I would suggest contacting Ostermann to ask if they can tell you who has samples of the complete 20,000 decors, or if there is another way to find a suitable match.
To ensure the filler panel is at the same height as the doors, it must be screwed onto a wooden strip painted to match the carcasses. The strip should be mounted so that 1.5 mm (approximately 0.06 inches) remains visible to achieve a consistent joint appearance. The filler panel can then be attached to the carcass using this strip. It would likely be beneficial to attach a second strip to the opposite carcass as well.
The whole setup was done exactly as the IKEA planner suggested.
Pushing the corner cabinet forward to close the gap isn’t an option either—it looks awkward when the countertop on the right is 10 cm (4 inches) lower than on the left… besides, the countertop is custom-sized from IKEA, which wasn’t cheap.
Adding a dark strip underneath wouldn’t be a problem; I could buy a shelf board, cut it to size, and screw it in or attach it with a magnetic system, or even glue it. But a cream-colored panel like in the planner would definitely look nicer.
I find it quite frustrating that IKEA doesn’t offer a solution for this, even though the planner produces this layout. As a customer, it feels a bit like being misled…
By the way: Who or what is Ostermann?
Best regards
Spanni
Pushing the corner cabinet forward to close the gap isn’t an option either—it looks awkward when the countertop on the right is 10 cm (4 inches) lower than on the left… besides, the countertop is custom-sized from IKEA, which wasn’t cheap.
Adding a dark strip underneath wouldn’t be a problem; I could buy a shelf board, cut it to size, and screw it in or attach it with a magnetic system, or even glue it. But a cream-colored panel like in the planner would definitely look nicer.
I find it quite frustrating that IKEA doesn’t offer a solution for this, even though the planner produces this layout. As a customer, it feels a bit like being misled…
By the way: Who or what is Ostermann?
Best regards
Spanni
Similar topics