
ᐅ Building a Sauna Yourself with a Sloped Ceiling – Suggestions, Tips, and Planning Advice
Created on: 24 Nov 2020 10:14
M
matte
Hello! [IMG alt=" 🙂"]https://saunabauen.de/forum/images/smilies/icon_smile.gif[/IMG]
I’d like to start this thread to get help and feedback on my plan to build a sauna myself. Of course, this thread can also be used for any topics related to sauna construction.
We decided to get a sauna, and since a prefabricated kit was not an option and a custom build was too expensive, I decided to take matters into my own hands.
When we built our house three years ago, we reserved space for a sauna at the top near the roof terrace. Unfortunately, instead of a planned flat roof, we had to install a sloped roof to get the building permit / planning permission.
This results in a roof slope with knee wall height of 1.81m (5 ft 11 in) clear height.
There is a floor area of 2.10m (83 inches) wide and 1.91m (75 inches) deep available.
The height is additionally limited by a fresh air vent on the higher side. The bottom edge of the vent is located at 2.05m (6 ft 9 in) above the finished floor level.
My idea is to build the sauna ceiling at 2.05m (6 ft 9 in) height to still be able to access this vent if necessary. According to my plan, the clear interior height inside the sauna would then be about 1.995m (6 ft 6.5 in).
The sauna will be surrounded on three sides by exterior walls (Poroton T9 masonry).
The ceiling is attached directly to the beams and vapor barrier, without counter battens. This was necessary because otherwise the terrace door would not be able to open. The architect missed that... : [IMG alt=":roll:"]https://saunabauen.de/forum/images/smilies/icon_rolleyes.gif[/IMG]
The floor is fine stoneware tiles on a screed layer with underfloor heating.
We have a three-phase power supply with 5x2.5mm² cable and a cable length of about 20m (66 ft). According to an electrician, this line should not restrict the project.
Since space is quite tight, I want to keep the wall construction as thin as possible.
Planned wall build-up:
1. Masonry with plaster
2. Vertical battens (24x48mm / 1x2 inches) with 24mm (1 inch) air gap for ventilation
3. OSB boards 15mm (0.6 inch)
4. KVH timber beams 40x60mm (1.5x2.5 inches), positioned so the 40mm (1.5 inch) side accommodates insulation
5. 40mm (1.5 inch) wood fiber insulation inside
6. No vapor barrier
7. 15mm (0.6 inch) profiled battens mounted horizontally
Now my questions:
1. Is my wall build-up feasible, or am I trying to save too much space? This would leave an interior floor dimension of nearly 1.92m x 1.75m (6 ft 3.5 in x 5 ft 9 in).
I’m 1.84m (6 ft 0.5 in) tall, so I should still have enough room to lie down comfortably.
2. We want to install a full glass door with a side panel to enjoy the outdoor view.
We plan to use 8mm (0.3 inch) tempered safety glass (ESG). Is that okay, or can this cause issues near the heater?
3. How do you connect the glass wall to the sauna structure? I thought about routing a groove around the KVH timber to set the glass in. Is that a good approach?
For the floor, I read that someone placed the glass on a silicone mat which was then trimmed flush. That sounds like a good solution to me.
3. The sauna floor area is 3.34m² (36 ft²) with an interior height of 1.995m (6 ft 6.5 in). Ignoring the slope, that gives a volume of 6.66m³ (235 ft³).
I read that for a glass door you add 1.5m³ (53 ft³) and for a glass wall the area (1.5m² / 16 ft²) multiplied by 1.2 as additional volume.
So, I’d end up with a total volume of 9.66m³ (341 ft³) and chose a 9kW heater accordingly. Does that sound right or oversized? I’m currently leaning towards the "Harvia The Wall" with external control.
4. Due to the heater’s position, there is essentially no room for a heater guard between the glass wall and heater. Is a guard necessary in a private sauna? I’m not too worried about it, but my wife is concerned.
The alternative would be to shift the lower bench slightly under the upper bench and move the heater, which would create space for a guard.
Alternatively, there is a glass protective shield with integrated lighting available that mounts in front of the heater. Would that be enough? I’m not too keen on wooden guards though... [IMG alt=";)"]https://saunabauen.de/forum/images/smilies/icon_wink.gif[/IMG]
5. A coworker recommended bench heights of 60cm and 120cm (24 and 47 inches). That would cause problems with the sauna height. I was thinking about 45cm and 90cm (18 and 35 inches) instead. Since we don’t want it very hot anyway, I see no reason for higher benches.
6. To avoid further reducing the roof slope height, I considered skipping the OSB boards there and mounting the KVH beams directly at a 24mm (1 inch) gap (batten distance) from the ceiling. Any issues with that?
7. We prefer the look of horizontally mounted profiled battens. Any objections? Given the tight space, I would skip additional rear ventilation. From what I’ve read, that’s not strictly necessary.
8. In my case, would it be better to use a different insulation material with a vapor barrier instead of wood fiber insulation?
9. The left wall with the glass door will be clad on the outside with profiled wood boards as well. This way I could install an access panel above the sauna to reach the fresh air vent if needed. Also, I could place the electronics for lighting and audio on the ceiling, making them accessible.
Can I mount the cladding boards directly on the KVH beams, or is an additional counter batten or similar required?
I want the wall to finish flush with the terrace door frame. To prevent the terrace door (especially the handle) from hitting the wall, I plan to install a stopper mounted on the KVH timber there.
That’s it for now. I’m curious what you think about my plan. I hope my post is not too long... [IMG alt=":?"]https://saunabauen.de/forum/images/smilies/icon_confused.gif[/IMG]
I’m attaching some pictures to show the current planning status. If you need more info, just ask.
Looking forward to any feedback [IMG alt=";)"]https://saunabauen.de/forum/images/smilies/icon_wink.gif[/IMG]
Thanks in advance!
Best regards
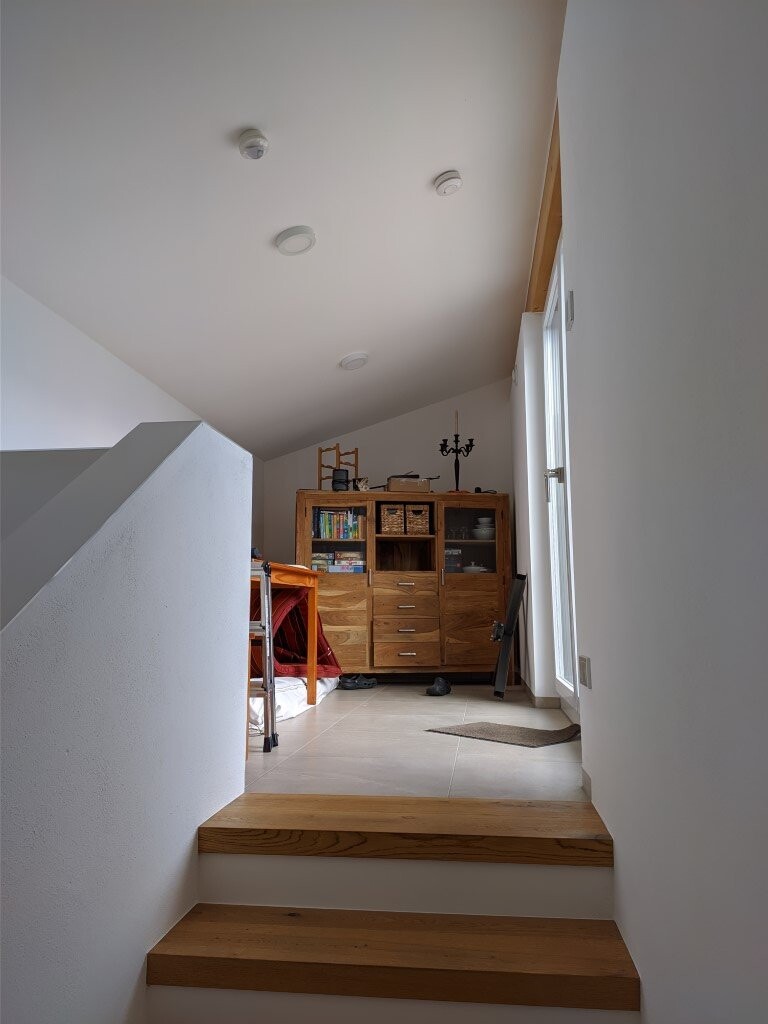
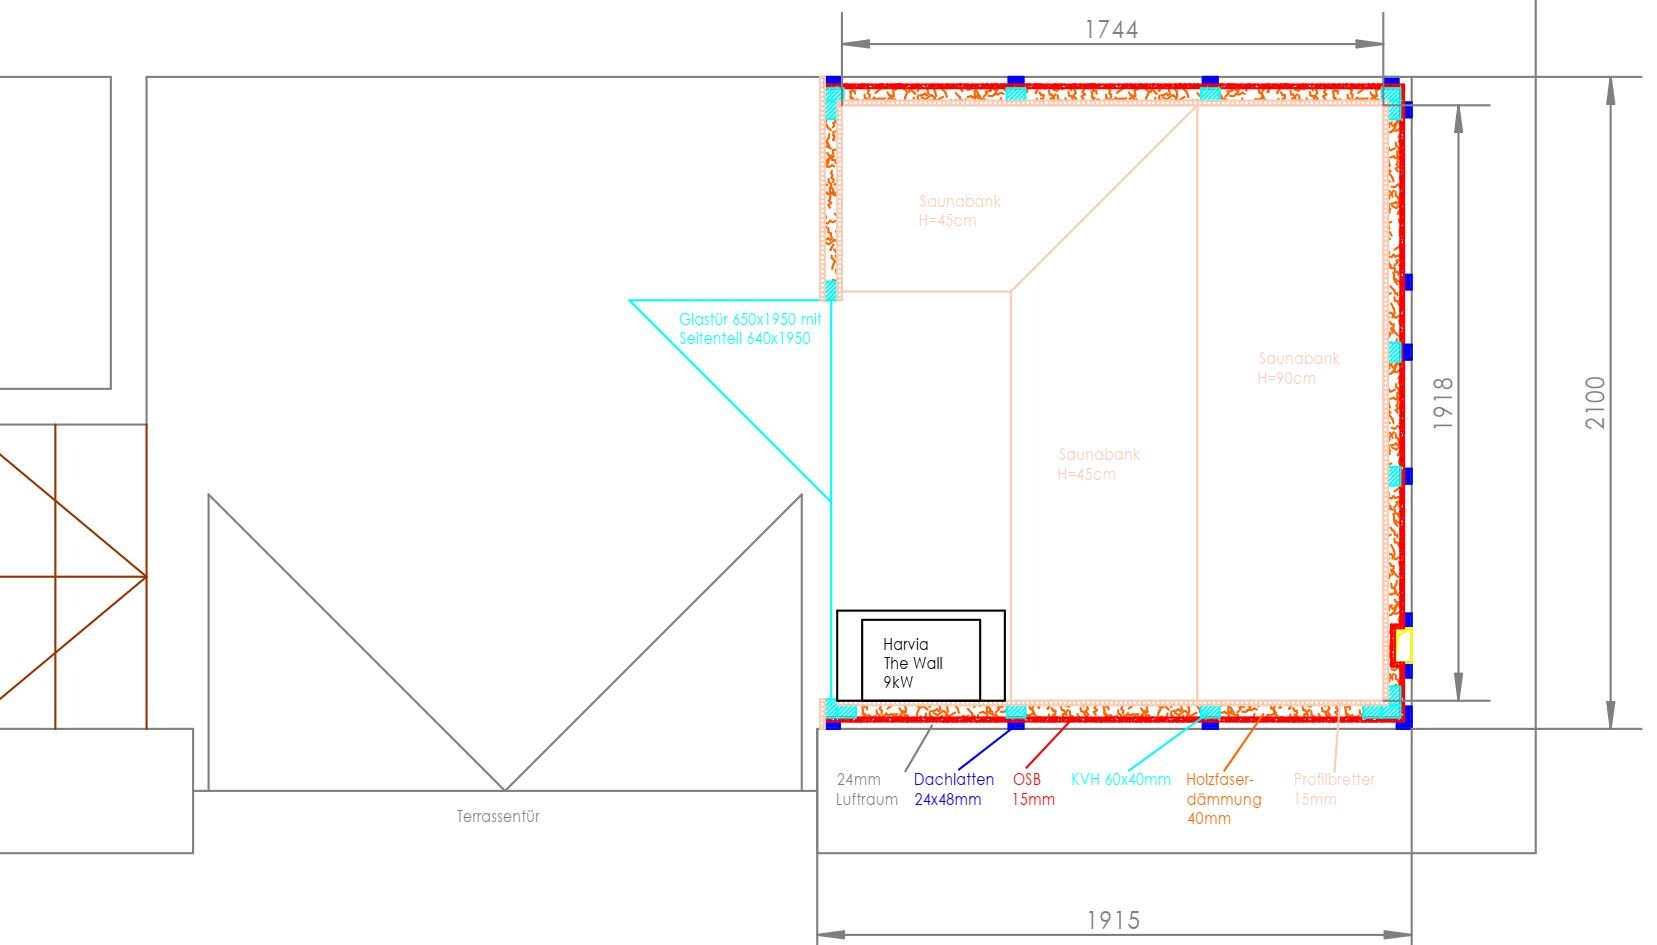
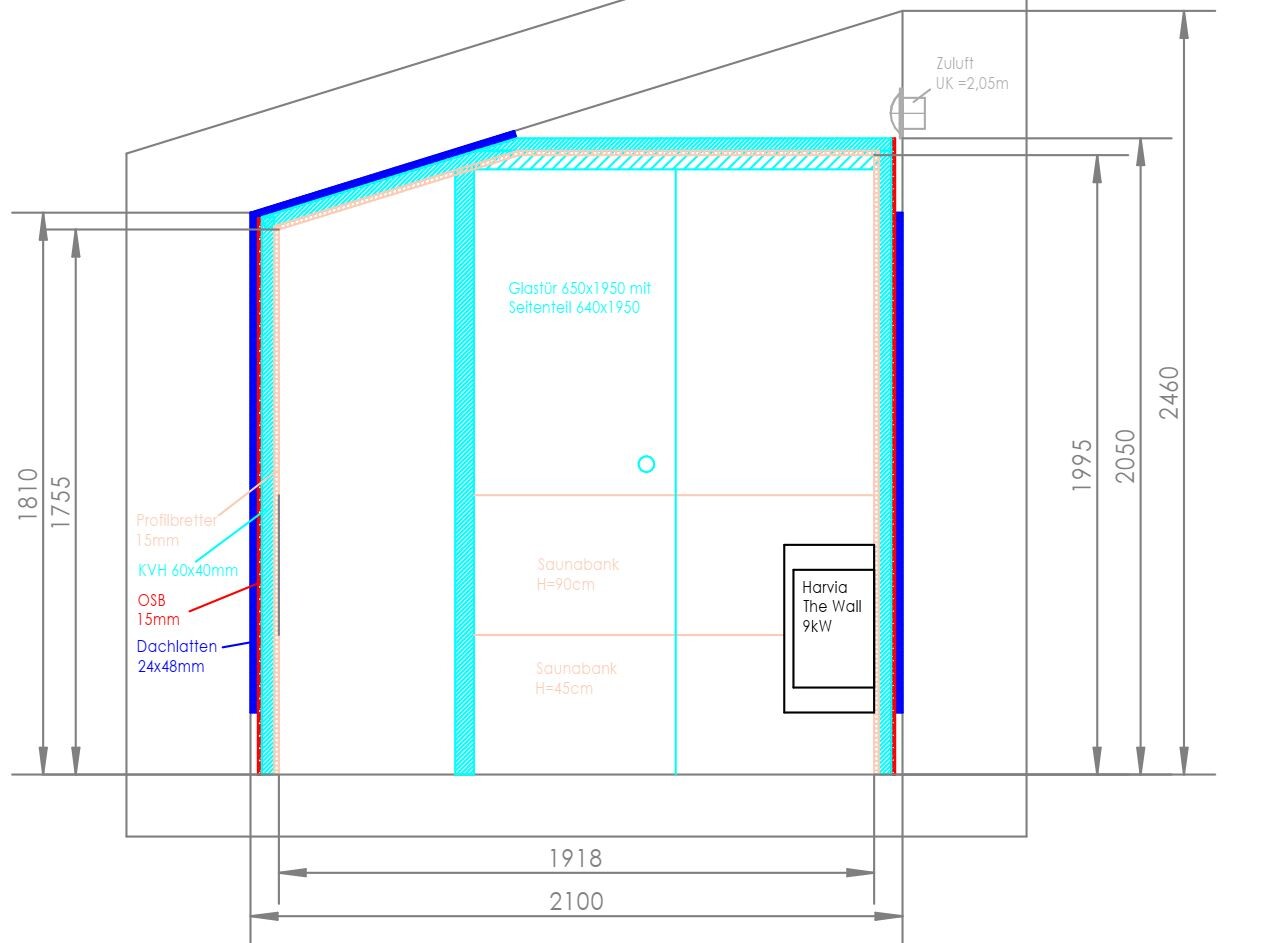
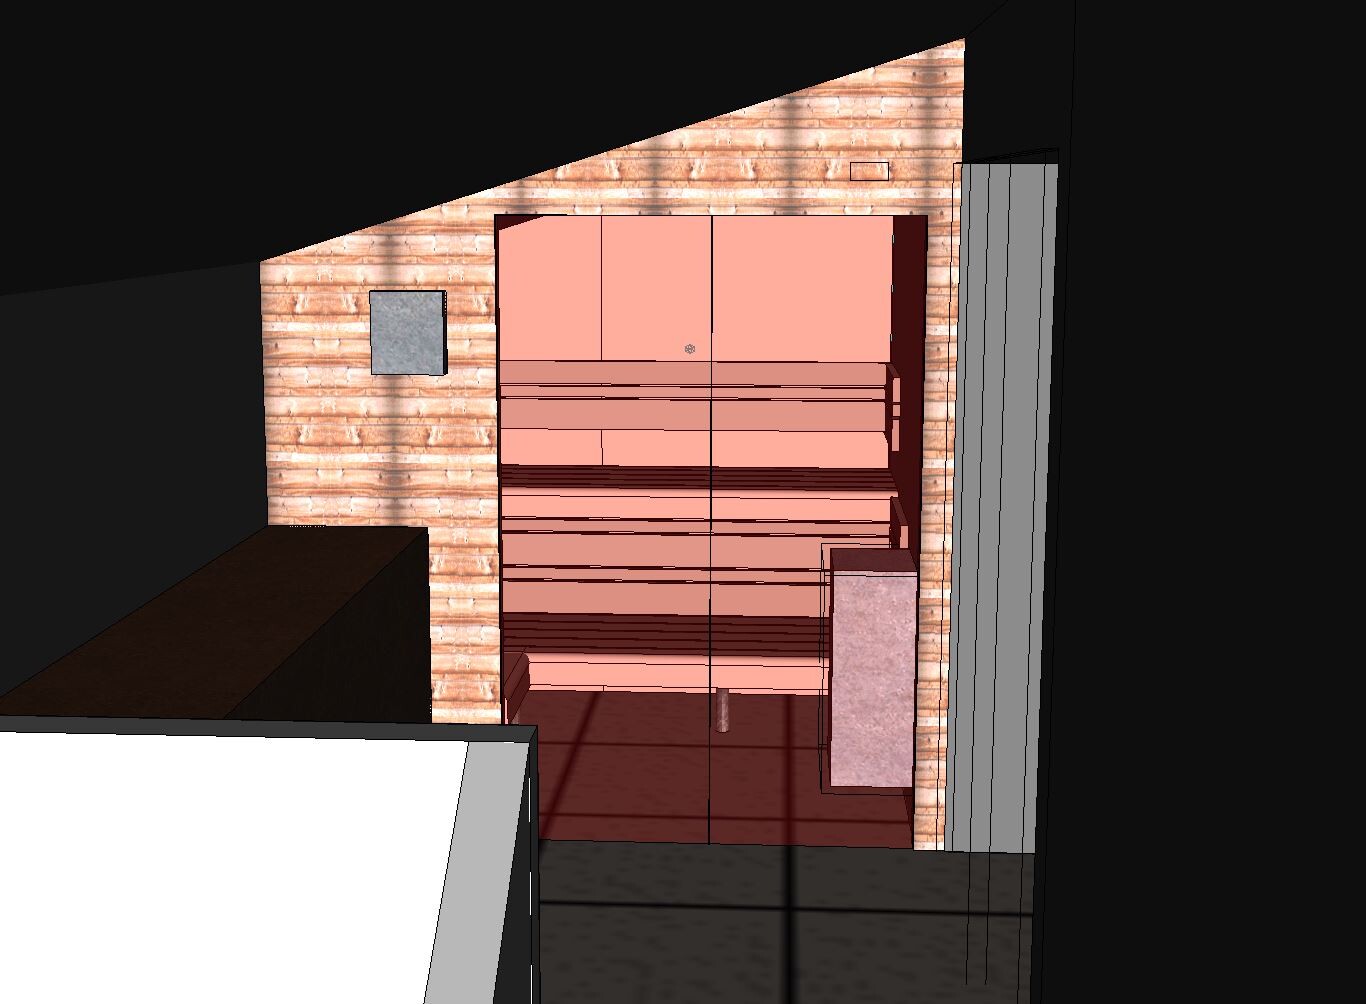
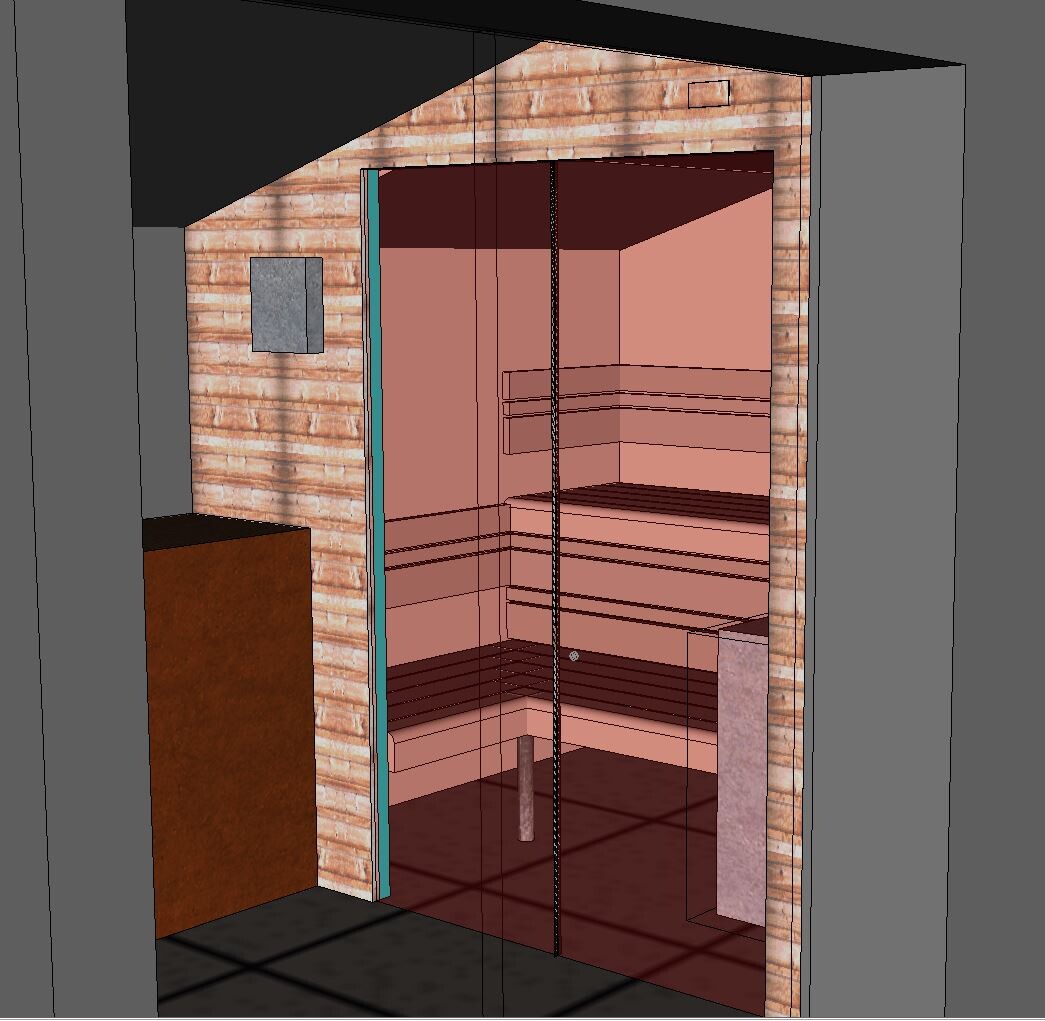
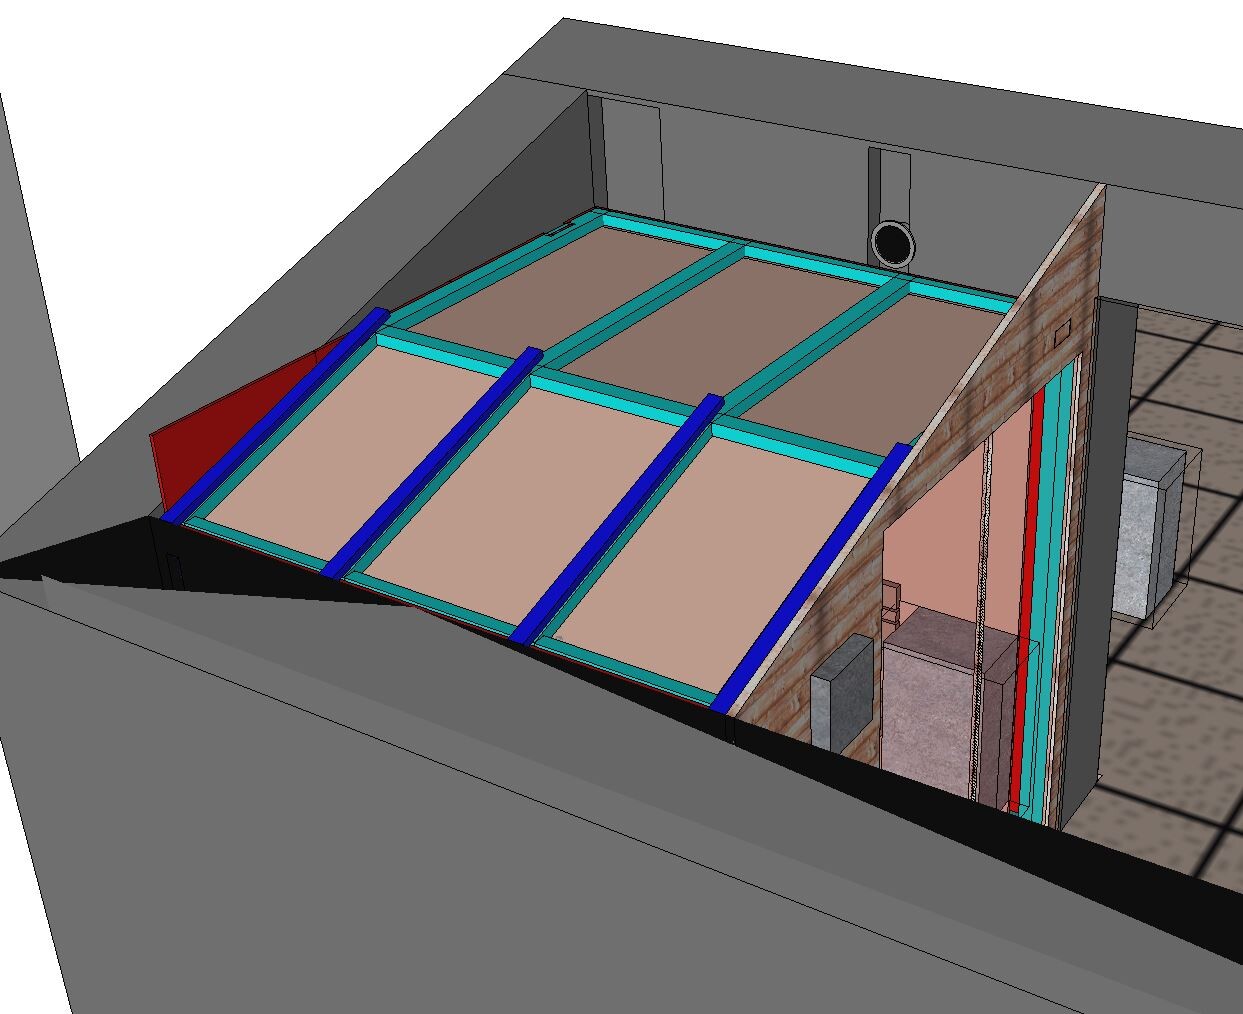
I’d like to start this thread to get help and feedback on my plan to build a sauna myself. Of course, this thread can also be used for any topics related to sauna construction.
We decided to get a sauna, and since a prefabricated kit was not an option and a custom build was too expensive, I decided to take matters into my own hands.
When we built our house three years ago, we reserved space for a sauna at the top near the roof terrace. Unfortunately, instead of a planned flat roof, we had to install a sloped roof to get the building permit / planning permission.
This results in a roof slope with knee wall height of 1.81m (5 ft 11 in) clear height.
There is a floor area of 2.10m (83 inches) wide and 1.91m (75 inches) deep available.
The height is additionally limited by a fresh air vent on the higher side. The bottom edge of the vent is located at 2.05m (6 ft 9 in) above the finished floor level.
My idea is to build the sauna ceiling at 2.05m (6 ft 9 in) height to still be able to access this vent if necessary. According to my plan, the clear interior height inside the sauna would then be about 1.995m (6 ft 6.5 in).
The sauna will be surrounded on three sides by exterior walls (Poroton T9 masonry).
The ceiling is attached directly to the beams and vapor barrier, without counter battens. This was necessary because otherwise the terrace door would not be able to open. The architect missed that... : [IMG alt=":roll:"]https://saunabauen.de/forum/images/smilies/icon_rolleyes.gif[/IMG]
The floor is fine stoneware tiles on a screed layer with underfloor heating.
We have a three-phase power supply with 5x2.5mm² cable and a cable length of about 20m (66 ft). According to an electrician, this line should not restrict the project.
Since space is quite tight, I want to keep the wall construction as thin as possible.
Planned wall build-up:
1. Masonry with plaster
2. Vertical battens (24x48mm / 1x2 inches) with 24mm (1 inch) air gap for ventilation
3. OSB boards 15mm (0.6 inch)
4. KVH timber beams 40x60mm (1.5x2.5 inches), positioned so the 40mm (1.5 inch) side accommodates insulation
5. 40mm (1.5 inch) wood fiber insulation inside
6. No vapor barrier
7. 15mm (0.6 inch) profiled battens mounted horizontally
Now my questions:
1. Is my wall build-up feasible, or am I trying to save too much space? This would leave an interior floor dimension of nearly 1.92m x 1.75m (6 ft 3.5 in x 5 ft 9 in).
I’m 1.84m (6 ft 0.5 in) tall, so I should still have enough room to lie down comfortably.
2. We want to install a full glass door with a side panel to enjoy the outdoor view.
We plan to use 8mm (0.3 inch) tempered safety glass (ESG). Is that okay, or can this cause issues near the heater?
3. How do you connect the glass wall to the sauna structure? I thought about routing a groove around the KVH timber to set the glass in. Is that a good approach?
For the floor, I read that someone placed the glass on a silicone mat which was then trimmed flush. That sounds like a good solution to me.
3. The sauna floor area is 3.34m² (36 ft²) with an interior height of 1.995m (6 ft 6.5 in). Ignoring the slope, that gives a volume of 6.66m³ (235 ft³).
I read that for a glass door you add 1.5m³ (53 ft³) and for a glass wall the area (1.5m² / 16 ft²) multiplied by 1.2 as additional volume.
So, I’d end up with a total volume of 9.66m³ (341 ft³) and chose a 9kW heater accordingly. Does that sound right or oversized? I’m currently leaning towards the "Harvia The Wall" with external control.
4. Due to the heater’s position, there is essentially no room for a heater guard between the glass wall and heater. Is a guard necessary in a private sauna? I’m not too worried about it, but my wife is concerned.
The alternative would be to shift the lower bench slightly under the upper bench and move the heater, which would create space for a guard.
Alternatively, there is a glass protective shield with integrated lighting available that mounts in front of the heater. Would that be enough? I’m not too keen on wooden guards though... [IMG alt=";)"]https://saunabauen.de/forum/images/smilies/icon_wink.gif[/IMG]
5. A coworker recommended bench heights of 60cm and 120cm (24 and 47 inches). That would cause problems with the sauna height. I was thinking about 45cm and 90cm (18 and 35 inches) instead. Since we don’t want it very hot anyway, I see no reason for higher benches.
6. To avoid further reducing the roof slope height, I considered skipping the OSB boards there and mounting the KVH beams directly at a 24mm (1 inch) gap (batten distance) from the ceiling. Any issues with that?
7. We prefer the look of horizontally mounted profiled battens. Any objections? Given the tight space, I would skip additional rear ventilation. From what I’ve read, that’s not strictly necessary.
8. In my case, would it be better to use a different insulation material with a vapor barrier instead of wood fiber insulation?
9. The left wall with the glass door will be clad on the outside with profiled wood boards as well. This way I could install an access panel above the sauna to reach the fresh air vent if needed. Also, I could place the electronics for lighting and audio on the ceiling, making them accessible.
Can I mount the cladding boards directly on the KVH beams, or is an additional counter batten or similar required?
I want the wall to finish flush with the terrace door frame. To prevent the terrace door (especially the handle) from hitting the wall, I plan to install a stopper mounted on the KVH timber there.
That’s it for now. I’m curious what you think about my plan. I hope my post is not too long... [IMG alt=":?"]https://saunabauen.de/forum/images/smilies/icon_confused.gif[/IMG]
I’m attaching some pictures to show the current planning status. If you need more info, just ask.
Looking forward to any feedback [IMG alt=";)"]https://saunabauen.de/forum/images/smilies/icon_wink.gif[/IMG]
Thanks in advance!
Best regards
P
pagoni202026 Nov 2020 16:00That sounds really good. If you want, you could also choose any other exterior cladding instead of wood, for example, plaster or something similar.
I think you made a good choice with the combination stove. At least I would always sit inside and wonder how it would be if… but that might just be my own quirk.
A nice, private sauna is a wonderful thing! I’m already looking forward to building my own soon.
I think you made a good choice with the combination stove. At least I would always sit inside and wonder how it would be if… but that might just be my own quirk.
A nice, private sauna is a wonderful thing! I’m already looking forward to building my own soon.
How is the height handled for a glass door without a threshold?
I’m now ready to contact the glazier for a quote.
I found custom-made glass fronts on sauna websites that can also be ordered in special sizes.
The specifications indicate that the dimensions should refer to the clear opening size, and a standard 50mm (2 inches) gap is planned at the bottom. That seems a bit much to me.
I thought 10mm (0.4 inches) would be enough.
Supply and exhaust air for the stove will be managed separately anyway.
I’m now ready to contact the glazier for a quote.
I found custom-made glass fronts on sauna websites that can also be ordered in special sizes.
The specifications indicate that the dimensions should refer to the clear opening size, and a standard 50mm (2 inches) gap is planned at the bottom. That seems a bit much to me.
I thought 10mm (0.4 inches) would be enough.
Supply and exhaust air for the stove will be managed separately anyway.

A glass door like that doesn’t close completely, that’s correct. We don’t have any separate supply or exhaust air, as far as I can see. So the gap is probably sufficient – although ours is 15mm (about 0.6 inches, I just measured again). And we have the handle cut-out in the door, so air also passes through there.
I would consider looking for a local glazier – they usually do this kind of work and might even come by to take measurements.
I would consider looking for a local glazier – they usually do this kind of work and might even come by to take measurements.
P
pagoni202027 Nov 2020 11:23So, you don’t need that for air supply. 50mm (2 inches) is too much for me. I would use just enough to fit the door and prevent it from dragging on the floor, even if it shifts slightly.
There isn’t any hot air at the bottom of the door anyway, so only a small amount would escape there.
There isn’t any hot air at the bottom of the door anyway, so only a small amount would escape there.
Thank you.
I have now contacted two online shops, as well as a local glazier by phone. Additionally, I will reach out to another glazier through an acquaintance, from whom I expect the best prices... 😉
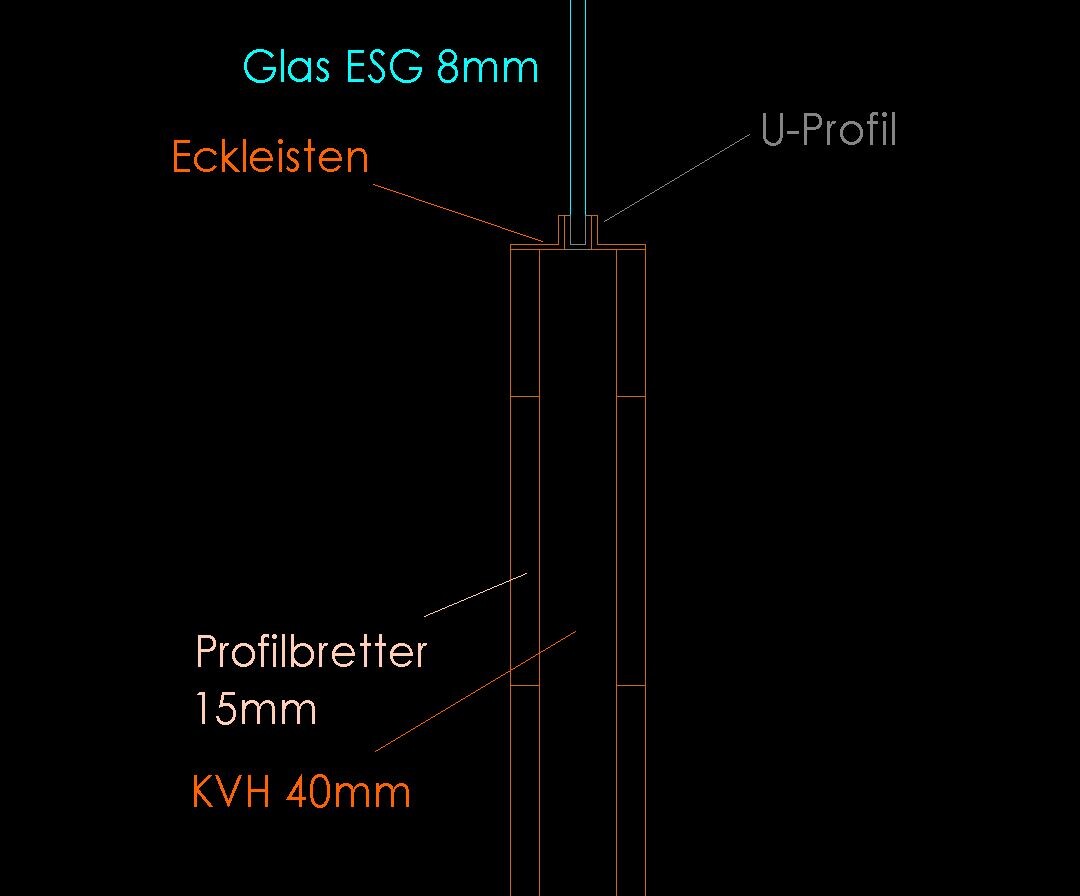
After considering how to finish the glass edges, my idea is to first cover the reveals with a suitable spruce board that aligns flush on both sides with the profile timber. The board would be 15mm (0.6 inches) thick, the same as the profile timber, allowing me to extend the window glass on the right side up to the vertical sauna wall.
Now I am wondering:
1. How can I mount the reveal boards invisibly?
2. Will the boards warp over time?
The alternative would be to mount the glass directly onto the KVH (sawn and planed structural timber), but then the KVH and the profile cladding would always be visible, which I don’t find particularly attractive. In that case, corner trims would need to be used, which brings me back to the question of how to mount them invisibly. 😀
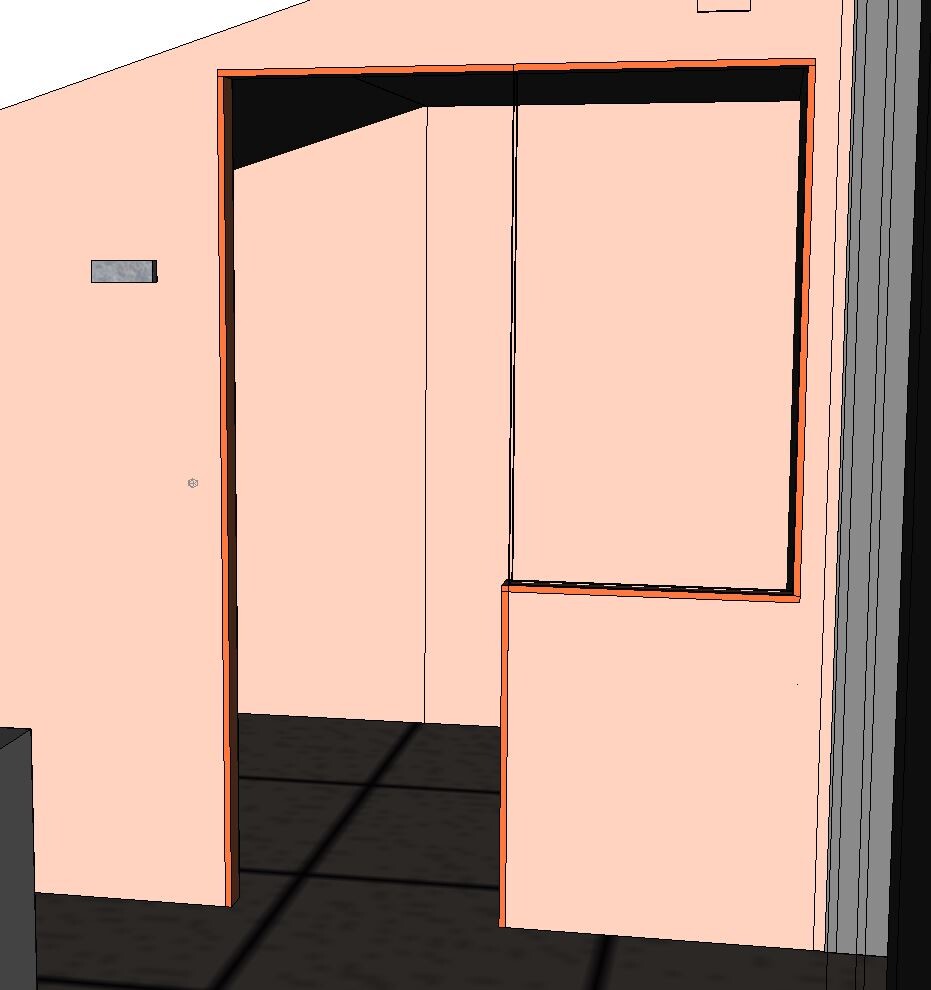
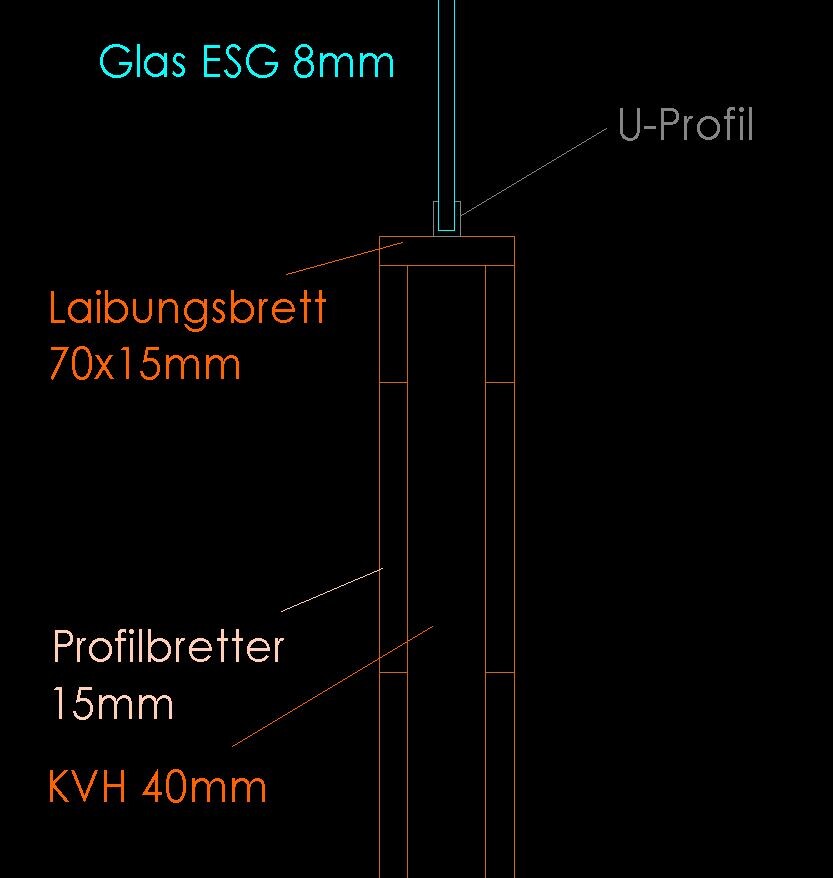
I have now contacted two online shops, as well as a local glazier by phone. Additionally, I will reach out to another glazier through an acquaintance, from whom I expect the best prices... 😉
After considering how to finish the glass edges, my idea is to first cover the reveals with a suitable spruce board that aligns flush on both sides with the profile timber. The board would be 15mm (0.6 inches) thick, the same as the profile timber, allowing me to extend the window glass on the right side up to the vertical sauna wall.
Now I am wondering:
1. How can I mount the reveal boards invisibly?
2. Will the boards warp over time?
The alternative would be to mount the glass directly onto the KVH (sawn and planed structural timber), but then the KVH and the profile cladding would always be visible, which I don’t find particularly attractive. In that case, corner trims would need to be used, which brings me back to the question of how to mount them invisibly. 😀
B
borderpuschl27 Nov 2020 13:52How do you install the other profile boards for the cladding? (with clips in the groove?)
If you don't want screws to be visible at the top near the glass, you could also glue the board, but use PU adhesive.
If you don't want screws to be visible at the top near the glass, you could also glue the board, but use PU adhesive.
Similar topics