
ᐅ Conduits on the Property – Any Ideas? – It’s Not Too Late Yet :)
Created on: 24 Apr 2019 13:15
E
EdStark
Hello house building enthusiasts,
My civil engineer is starting the groundwork now (gravel slab for the house and garage). Since he is making the gravel slab up to the property boundary, I’m concerned it might be tight for running electrical cable to the front and back gardens. Additionally, I’m planning an irrigation system, and the water hoses will need to be routed accordingly.
Would it make sense to have the civil engineer install conduits directly, so I can later lay underground electrical cables and PE water pipes without having to dig again? I’m thinking especially about areas without topsoil cover, like the garage and driveway.
Do you have any other tips on what I could implement at this stage?
The house is built without a basement, and the garage has strip foundations without a slab.
Thank you all.
My civil engineer is starting the groundwork now (gravel slab for the house and garage). Since he is making the gravel slab up to the property boundary, I’m concerned it might be tight for running electrical cable to the front and back gardens. Additionally, I’m planning an irrigation system, and the water hoses will need to be routed accordingly.
Would it make sense to have the civil engineer install conduits directly, so I can later lay underground electrical cables and PE water pipes without having to dig again? I’m thinking especially about areas without topsoil cover, like the garage and driveway.
Do you have any other tips on what I could implement at this stage?
The house is built without a basement, and the garage has strip foundations without a slab.
Thank you all.

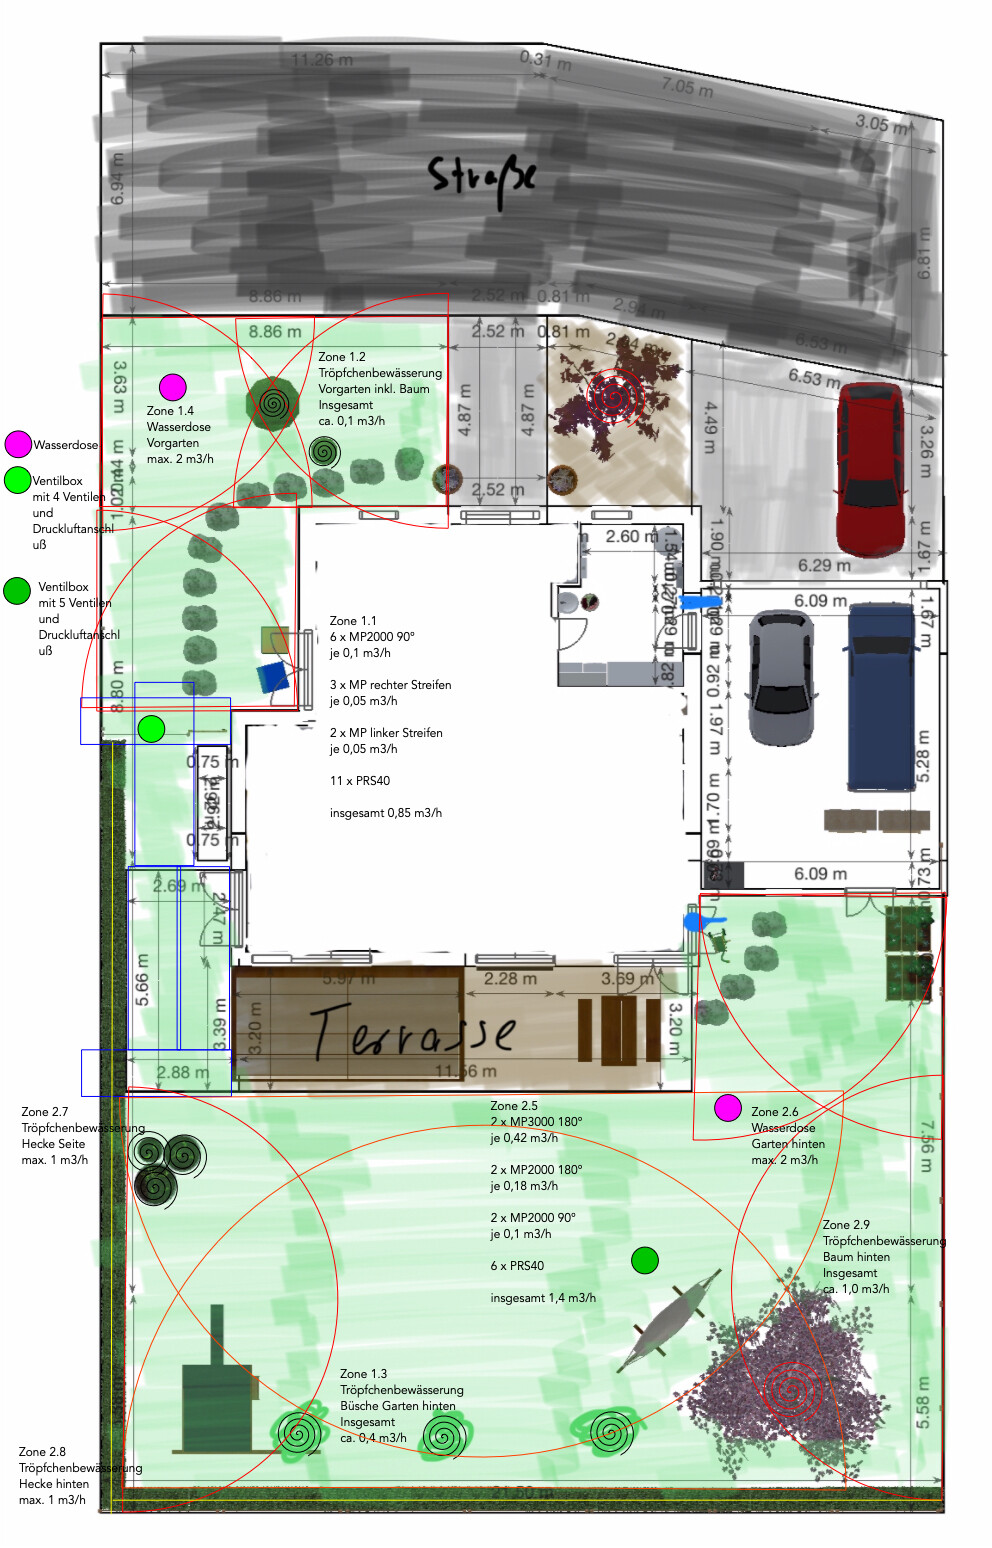
So, I quickly put together the plan.
1 x valve box with 4 valves and compressed air connection
1 x valve box with 5 valves and compressed air connection
17 x PRS40 housings
10 x MP2000 90°–210°
2 x MP3000 90°–210°
3 x MP right strip
2 x MP left strip
2 x water outlets
approximately 150 meters (490 feet) of drip irrigation line
Additionally, fittings and pipes to the boxes and to the sprinklers/drip lines are needed.
All zones have enough spare capacity to connect one or two more sprinklers (depending on the type) in case the garden changes.
If you omit the water outlets, you would have one valve free each. The tree at the back has a separate irrigation because it likely has a significantly different water requirement than the shrubs. A root irrigation system could also be used here.
The rotators can be adjusted to reduce their spray distance by 25%. So don’t be misled by the illustration showing the house being watered. You probably also have an eaves strip.
1 x valve box with 4 valves and compressed air connection
1 x valve box with 5 valves and compressed air connection
17 x PRS40 housings
10 x MP2000 90°–210°
2 x MP3000 90°–210°
3 x MP right strip
2 x MP left strip
2 x water outlets
approximately 150 meters (490 feet) of drip irrigation line
Additionally, fittings and pipes to the boxes and to the sprinklers/drip lines are needed.
All zones have enough spare capacity to connect one or two more sprinklers (depending on the type) in case the garden changes.
If you omit the water outlets, you would have one valve free each. The tree at the back has a separate irrigation because it likely has a significantly different water requirement than the shrubs. A root irrigation system could also be used here.
The rotators can be adjusted to reduce their spray distance by 25%. So don’t be misled by the illustration showing the house being watered. You probably also have an eaves strip.
rick2018 schrieb:
So I quickly put together the plan.
1 x valve box with 4 valves and air pressure connection
1 x valve box with 5 valves and air pressure connection
17 x PRS40 housings
10 x MP2000 90°–210°
2 x MP3000 90°–210°
3 x MP right strip
2 x MP left strip
2 x water outlets
approx. 150 meters (490 feet) drip irrigation tubing (dripline)
Also include the fittings and the pipes to the boxes and to the sprinklers/drip lines
All zones have enough capacity to add one or two more sprinklers (depending on the type) in case the garden changes.
If you skip the water outlets, you would have one valve left over. The tree at the back has a separate irrigation since it probably has a significantly different water requirement than the shrubs. Here, a root watering system could also be used.
You can reduce the rotators’ throw distance by 25%. So don’t be misled by the image showing the house getting wet. You probably also have a drip edge.
... How awesome are you?
Thank you so much for this!
- Water outlets are great. Perfectly positioned in the front garden. Probably more practical further back since there’s a faucet about 4 meters (13 feet) away.
- Why is the 5-valve box located in the middle of the garden? Wouldn’t it make more sense to hide it? I understand that from a pressure perspective having it in the middle makes the most sense, but how do you bury it so you can still access it?
- What are the blue boxes on the left?
- Regarding the air pressure connection: I’ll use a compressor in autumn to blow through the system once, right?
- How would you recommend supplying water to the 4-valve box? An outdoor faucet on that side as well?
- Any estimate on how much the whole setup will cost in total? I’m going to make a shopping list tomorrow.
You’re welcome.
You can place the water outlets wherever you want. You’ll only be running a DN25 (1 inch) pipe from the distribution box to each outlet. If you already have a water tap there, you could skip the outlet and go with a 4-valve box instead. Or stay with a 5-valve box and keep a spare circuit, for example, for watering buckets on the terrace.
The position of the valve box is not fixed. But given the irrigation zones, the current position is quite good.
For the boxes, you dig a hole, fill it with gravel, place the box’s grid base in it, then put the box on top. The whole thing should be flush with the ground or slightly recessed. The box has a removable lid so you can access all the valves and the compressed air connection. The lid is green. After a year, you won’t even notice it if there’s grass around it.
The blue boxes are the rectangular sprinklers – MP right strip and MP left strip.
The two large semicircle zones by the terrace and opposite are MP3000.
The rest are MP2000.
Winterizing as you described. Close the main valve at the box. Connect the compressor and then blow out each zone one by one, just like for normal irrigation but without water.
I would connect the boxes directly with DN25 (1 inch) pipes. So from the house underground straight to the boxes. In theory, you could also run from one box to another, but that’s longer than running under the house. Since the zones are conservatively sized, that’s an option though — from the rear box, run a DN25 pipe to the front box.
In any case, I wouldn’t branch off from an outdoor faucet. It always looks awkward when a pipe runs along the wall into the ground. Did you plan to connect directly at the faucet or branch off somewhere?
Another question is how large the pipe to the faucet is. Often outdoor faucets are only ½ inch.
Better to run a dedicated pipe. The pipe itself is cheap anyway.
In my list, I also forgot the two control cables (one 5-core and one 6-core).
You now have a shopping list you can use to fill your cart at the retailers.
Add some meters of DN25 pipe, fittings, and possibly sprinkler connectors. There are fully pre-assembled sets available (expensive) or individual parts — same as with the valve boxes.
You’ll also need adjustment keys for the rotors and a pipe cutter.
Without calculating exactly, maybe about 1,500€ (1,500 euros).
You can place the water outlets wherever you want. You’ll only be running a DN25 (1 inch) pipe from the distribution box to each outlet. If you already have a water tap there, you could skip the outlet and go with a 4-valve box instead. Or stay with a 5-valve box and keep a spare circuit, for example, for watering buckets on the terrace.
The position of the valve box is not fixed. But given the irrigation zones, the current position is quite good.
For the boxes, you dig a hole, fill it with gravel, place the box’s grid base in it, then put the box on top. The whole thing should be flush with the ground or slightly recessed. The box has a removable lid so you can access all the valves and the compressed air connection. The lid is green. After a year, you won’t even notice it if there’s grass around it.
The blue boxes are the rectangular sprinklers – MP right strip and MP left strip.
The two large semicircle zones by the terrace and opposite are MP3000.
The rest are MP2000.
Winterizing as you described. Close the main valve at the box. Connect the compressor and then blow out each zone one by one, just like for normal irrigation but without water.
I would connect the boxes directly with DN25 (1 inch) pipes. So from the house underground straight to the boxes. In theory, you could also run from one box to another, but that’s longer than running under the house. Since the zones are conservatively sized, that’s an option though — from the rear box, run a DN25 pipe to the front box.
In any case, I wouldn’t branch off from an outdoor faucet. It always looks awkward when a pipe runs along the wall into the ground. Did you plan to connect directly at the faucet or branch off somewhere?
Another question is how large the pipe to the faucet is. Often outdoor faucets are only ½ inch.
Better to run a dedicated pipe. The pipe itself is cheap anyway.
In my list, I also forgot the two control cables (one 5-core and one 6-core).
You now have a shopping list you can use to fill your cart at the retailers.
Add some meters of DN25 pipe, fittings, and possibly sprinkler connectors. There are fully pre-assembled sets available (expensive) or individual parts — same as with the valve boxes.
You’ll also need adjustment keys for the rotors and a pipe cutter.
Without calculating exactly, maybe about 1,500€ (1,500 euros).
@rick2018
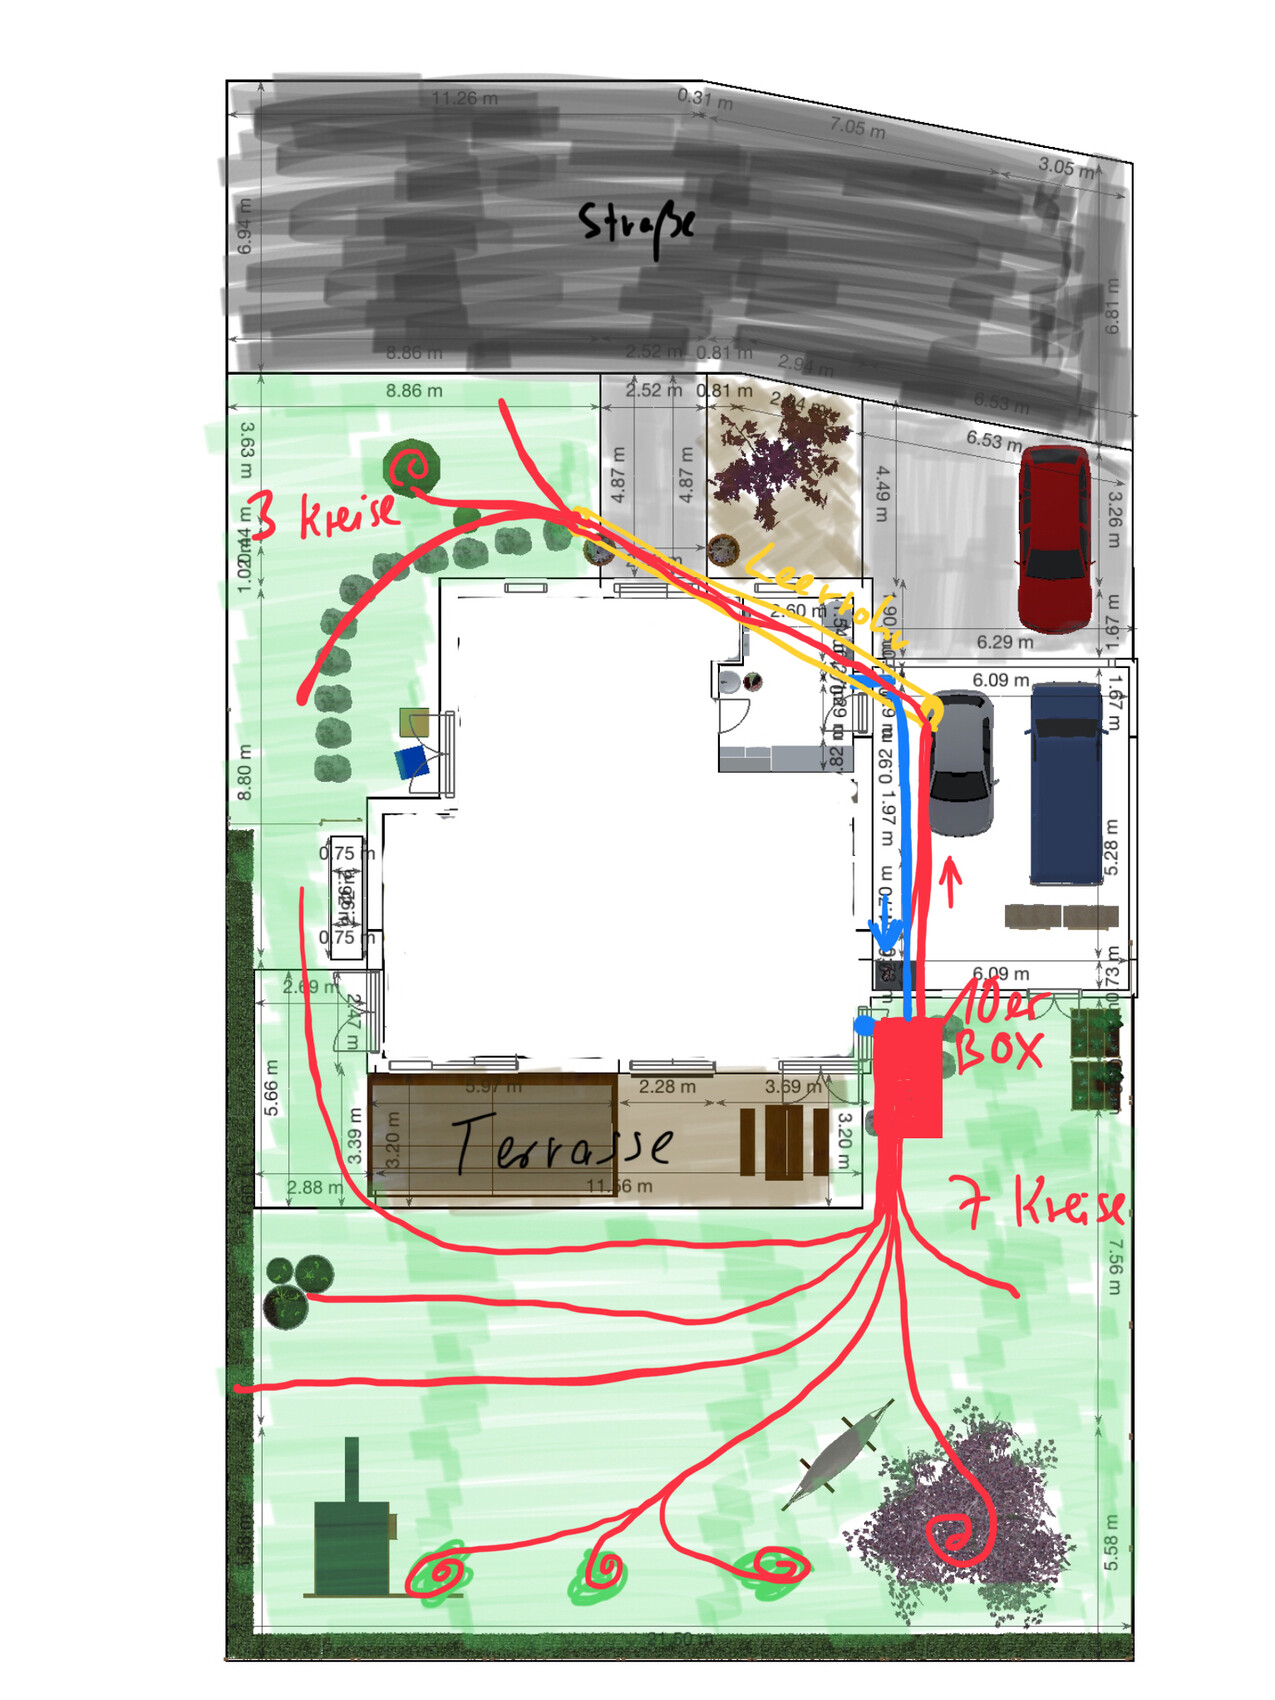
Is there any reason against the following solution?
- A 10-way valve box costs 710,-. In comparison, a 4-way and 5-way together cost 1010,- and even have one water circuit less.
- With this, I could branch off the pipe in the utility room that leads to the outdoor faucet and route it through the garage to the 10-way valve box (otherwise I would have to branch twice for two pipes).
- The yellow conduit could already be installed by the civil engineer now (100mm (4 inch) KG pipe), so I could lay the 3x 25mm (1 inch) PE pipes there.
- Ölflex control cable from the garage distribution cabinet to the valve box would not be far either. Din rail power supply Comatec 24V AC also in the garage distribution cabinet + Opensprinkler controller or KNX switching actuator, we’ll see.
Is there any reason against the following solution?
- A 10-way valve box costs 710,-. In comparison, a 4-way and 5-way together cost 1010,- and even have one water circuit less.
- With this, I could branch off the pipe in the utility room that leads to the outdoor faucet and route it through the garage to the 10-way valve box (otherwise I would have to branch twice for two pipes).
- The yellow conduit could already be installed by the civil engineer now (100mm (4 inch) KG pipe), so I could lay the 3x 25mm (1 inch) PE pipes there.
- Ölflex control cable from the garage distribution cabinet to the valve box would not be far either. Din rail power supply Comatec 24V AC also in the garage distribution cabinet + Opensprinkler controller or KNX switching actuator, we’ll see.
Similar topics