
ᐅ Building a Sauna Yourself with a Sloped Ceiling – Suggestions, Tips, and Planning Advice
Created on: 24 Nov 2020 10:14
M
matte
Hello! [IMG alt=" 🙂"]https://saunabauen.de/forum/images/smilies/icon_smile.gif[/IMG]
I’d like to start this thread to get help and feedback on my plan to build a sauna myself. Of course, this thread can also be used for any topics related to sauna construction.
We decided to get a sauna, and since a prefabricated kit was not an option and a custom build was too expensive, I decided to take matters into my own hands.
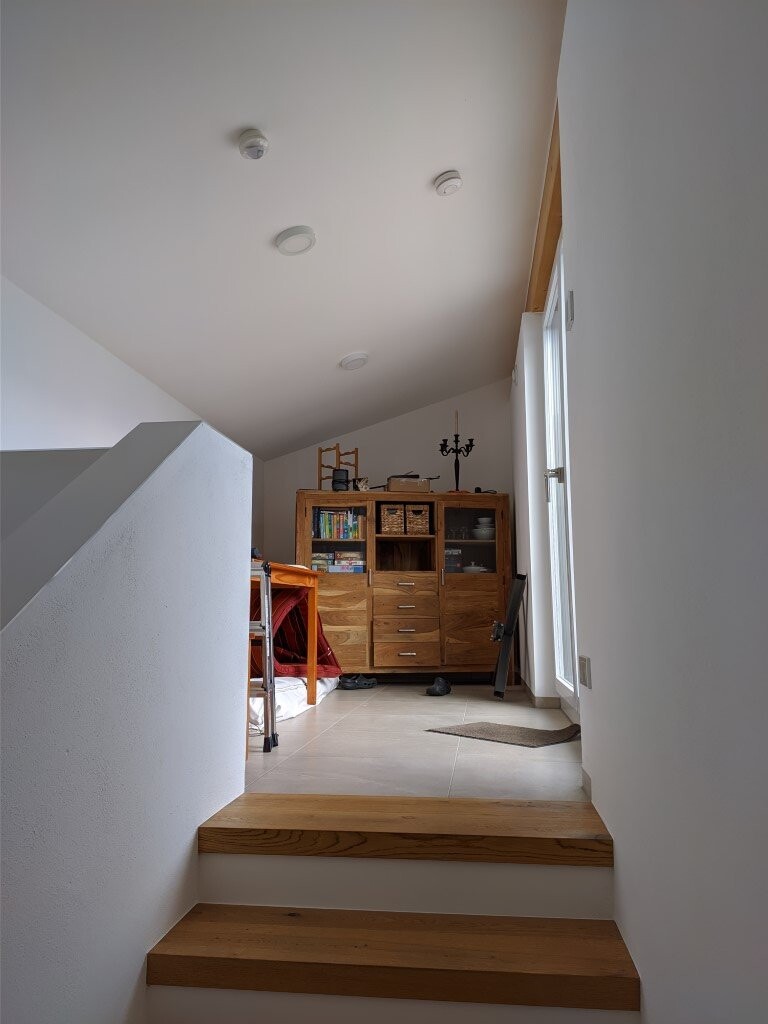
When we built our house three years ago, we reserved space for a sauna at the top near the roof terrace. Unfortunately, instead of a planned flat roof, we had to install a sloped roof to get the building permit / planning permission.
This results in a roof slope with knee wall height of 1.81m (5 ft 11 in) clear height.
There is a floor area of 2.10m (83 inches) wide and 1.91m (75 inches) deep available.
The height is additionally limited by a fresh air vent on the higher side. The bottom edge of the vent is located at 2.05m (6 ft 9 in) above the finished floor level.
My idea is to build the sauna ceiling at 2.05m (6 ft 9 in) height to still be able to access this vent if necessary. According to my plan, the clear interior height inside the sauna would then be about 1.995m (6 ft 6.5 in).
The sauna will be surrounded on three sides by exterior walls (Poroton T9 masonry).
The ceiling is attached directly to the beams and vapor barrier, without counter battens. This was necessary because otherwise the terrace door would not be able to open. The architect missed that... : [IMG alt=":roll:"]https://saunabauen.de/forum/images/smilies/icon_rolleyes.gif[/IMG]
The floor is fine stoneware tiles on a screed layer with underfloor heating.
We have a three-phase power supply with 5x2.5mm² cable and a cable length of about 20m (66 ft). According to an electrician, this line should not restrict the project.
Since space is quite tight, I want to keep the wall construction as thin as possible.
Planned wall build-up:
1. Masonry with plaster
2. Vertical battens (24x48mm / 1x2 inches) with 24mm (1 inch) air gap for ventilation
3. OSB boards 15mm (0.6 inch)
4. KVH timber beams 40x60mm (1.5x2.5 inches), positioned so the 40mm (1.5 inch) side accommodates insulation
5. 40mm (1.5 inch) wood fiber insulation inside
6. No vapor barrier
7. 15mm (0.6 inch) profiled battens mounted horizontally
Now my questions:
1. Is my wall build-up feasible, or am I trying to save too much space? This would leave an interior floor dimension of nearly 1.92m x 1.75m (6 ft 3.5 in x 5 ft 9 in).
I’m 1.84m (6 ft 0.5 in) tall, so I should still have enough room to lie down comfortably.
2. We want to install a full glass door with a side panel to enjoy the outdoor view.
We plan to use 8mm (0.3 inch) tempered safety glass (ESG). Is that okay, or can this cause issues near the heater?
3. How do you connect the glass wall to the sauna structure? I thought about routing a groove around the KVH timber to set the glass in. Is that a good approach?
For the floor, I read that someone placed the glass on a silicone mat which was then trimmed flush. That sounds like a good solution to me.
3. The sauna floor area is 3.34m² (36 ft²) with an interior height of 1.995m (6 ft 6.5 in). Ignoring the slope, that gives a volume of 6.66m³ (235 ft³).
I read that for a glass door you add 1.5m³ (53 ft³) and for a glass wall the area (1.5m² / 16 ft²) multiplied by 1.2 as additional volume.
So, I’d end up with a total volume of 9.66m³ (341 ft³) and chose a 9kW heater accordingly. Does that sound right or oversized? I’m currently leaning towards the "Harvia The Wall" with external control.
4. Due to the heater’s position, there is essentially no room for a heater guard between the glass wall and heater. Is a guard necessary in a private sauna? I’m not too worried about it, but my wife is concerned.
The alternative would be to shift the lower bench slightly under the upper bench and move the heater, which would create space for a guard.
Alternatively, there is a glass protective shield with integrated lighting available that mounts in front of the heater. Would that be enough? I’m not too keen on wooden guards though... [IMG alt=";)"]https://saunabauen.de/forum/images/smilies/icon_wink.gif[/IMG]
5. A coworker recommended bench heights of 60cm and 120cm (24 and 47 inches). That would cause problems with the sauna height. I was thinking about 45cm and 90cm (18 and 35 inches) instead. Since we don’t want it very hot anyway, I see no reason for higher benches.
6. To avoid further reducing the roof slope height, I considered skipping the OSB boards there and mounting the KVH beams directly at a 24mm (1 inch) gap (batten distance) from the ceiling. Any issues with that?
7. We prefer the look of horizontally mounted profiled battens. Any objections? Given the tight space, I would skip additional rear ventilation. From what I’ve read, that’s not strictly necessary.
8. In my case, would it be better to use a different insulation material with a vapor barrier instead of wood fiber insulation?
9. The left wall with the glass door will be clad on the outside with profiled wood boards as well. This way I could install an access panel above the sauna to reach the fresh air vent if needed. Also, I could place the electronics for lighting and audio on the ceiling, making them accessible.
Can I mount the cladding boards directly on the KVH beams, or is an additional counter batten or similar required?
I want the wall to finish flush with the terrace door frame. To prevent the terrace door (especially the handle) from hitting the wall, I plan to install a stopper mounted on the KVH timber there.
That’s it for now. I’m curious what you think about my plan. I hope my post is not too long... [IMG alt=":?"]https://saunabauen.de/forum/images/smilies/icon_confused.gif[/IMG]
I’m attaching some pictures to show the current planning status. If you need more info, just ask.
Looking forward to any feedback [IMG alt=";)"]https://saunabauen.de/forum/images/smilies/icon_wink.gif[/IMG]
Thanks in advance!
Best regards
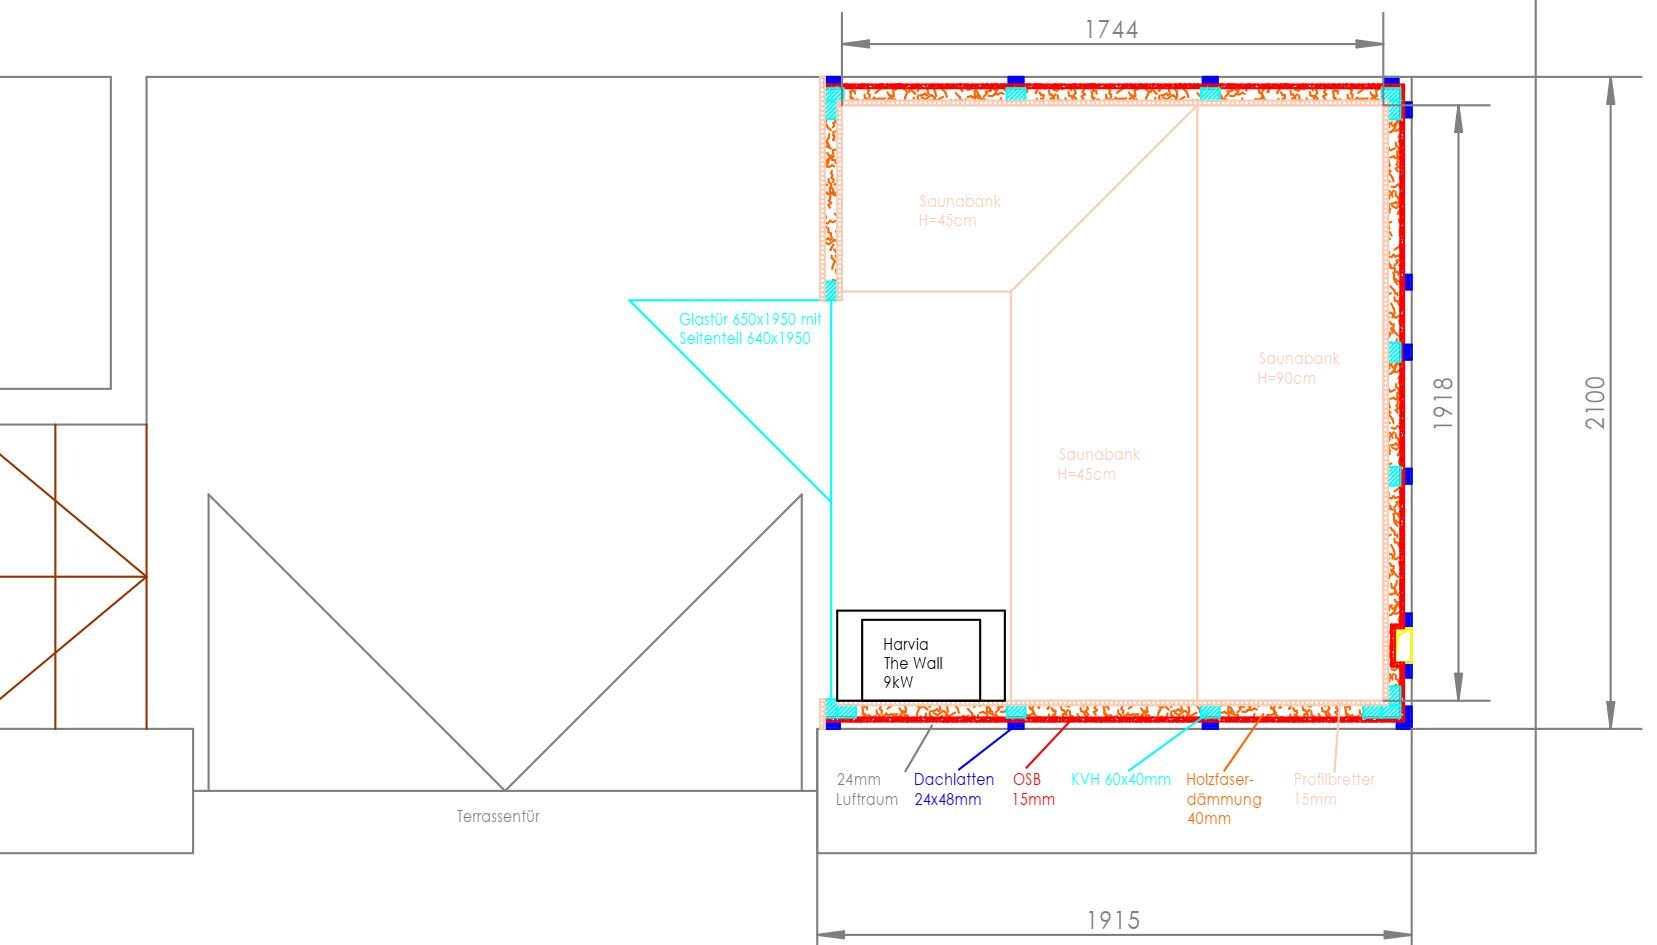
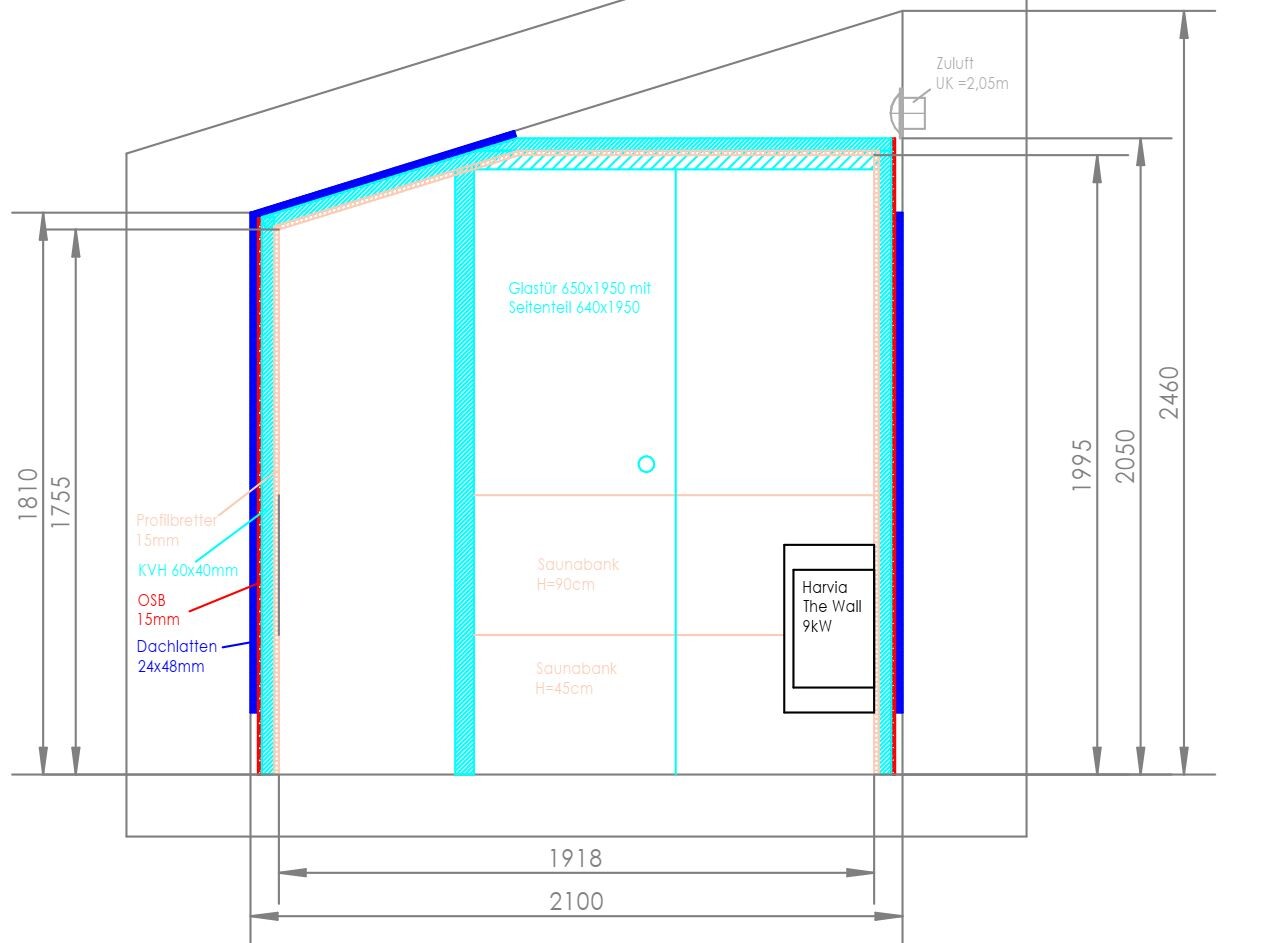
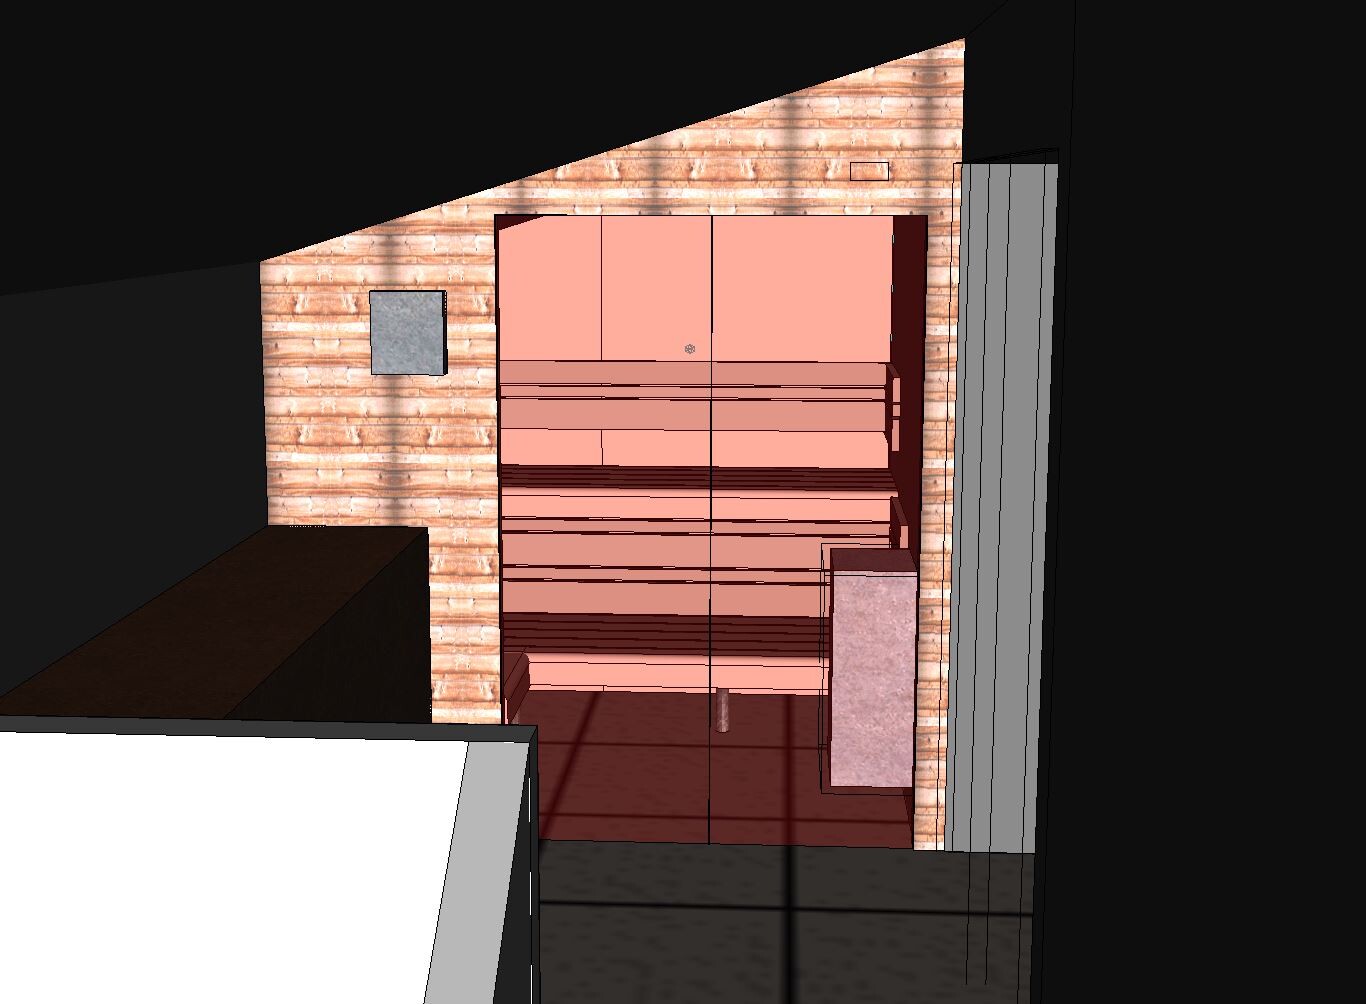
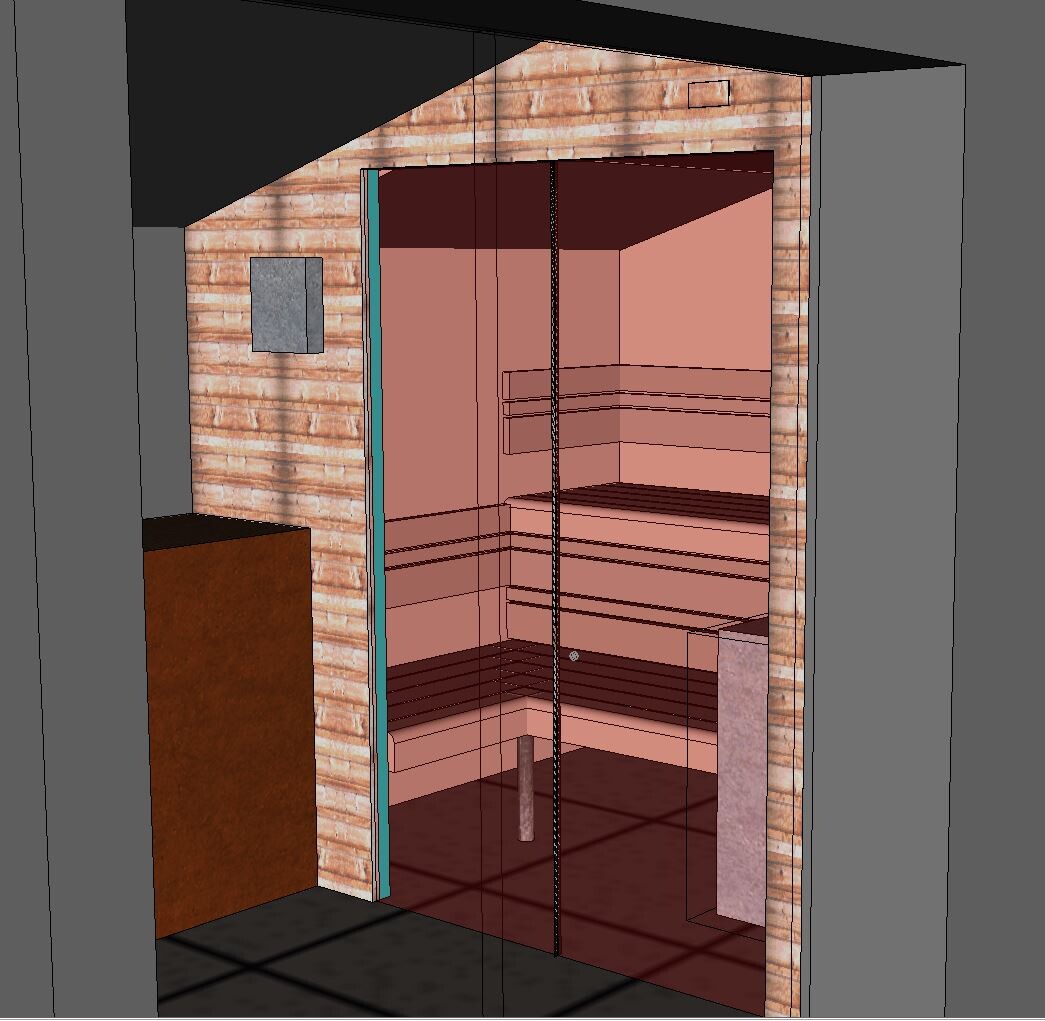
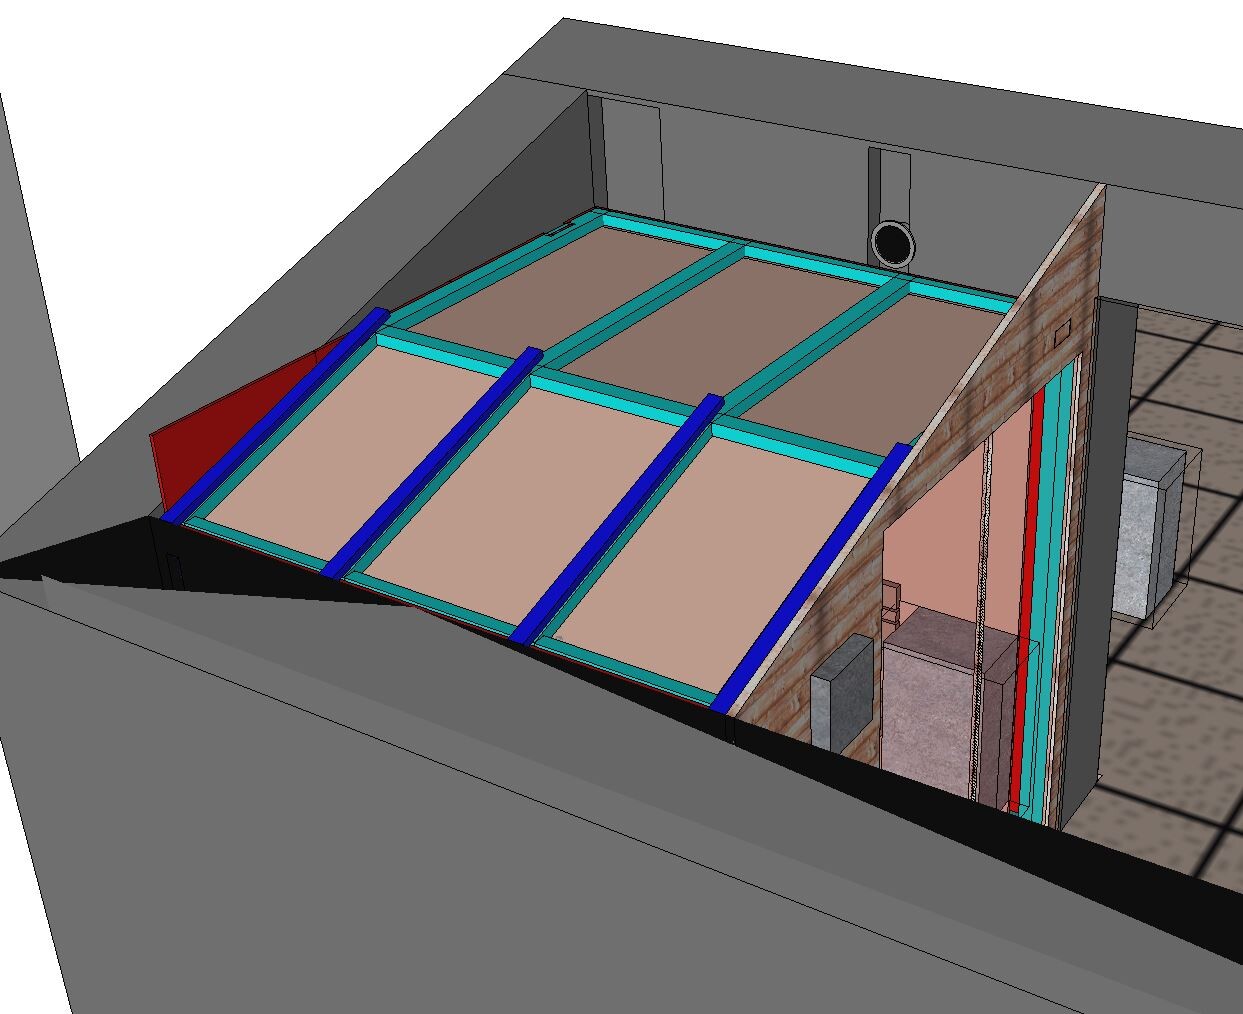
I’d like to start this thread to get help and feedback on my plan to build a sauna myself. Of course, this thread can also be used for any topics related to sauna construction.
We decided to get a sauna, and since a prefabricated kit was not an option and a custom build was too expensive, I decided to take matters into my own hands.
When we built our house three years ago, we reserved space for a sauna at the top near the roof terrace. Unfortunately, instead of a planned flat roof, we had to install a sloped roof to get the building permit / planning permission.
This results in a roof slope with knee wall height of 1.81m (5 ft 11 in) clear height.
There is a floor area of 2.10m (83 inches) wide and 1.91m (75 inches) deep available.
The height is additionally limited by a fresh air vent on the higher side. The bottom edge of the vent is located at 2.05m (6 ft 9 in) above the finished floor level.
My idea is to build the sauna ceiling at 2.05m (6 ft 9 in) height to still be able to access this vent if necessary. According to my plan, the clear interior height inside the sauna would then be about 1.995m (6 ft 6.5 in).
The sauna will be surrounded on three sides by exterior walls (Poroton T9 masonry).
The ceiling is attached directly to the beams and vapor barrier, without counter battens. This was necessary because otherwise the terrace door would not be able to open. The architect missed that... : [IMG alt=":roll:"]https://saunabauen.de/forum/images/smilies/icon_rolleyes.gif[/IMG]
The floor is fine stoneware tiles on a screed layer with underfloor heating.
We have a three-phase power supply with 5x2.5mm² cable and a cable length of about 20m (66 ft). According to an electrician, this line should not restrict the project.
Since space is quite tight, I want to keep the wall construction as thin as possible.
Planned wall build-up:
1. Masonry with plaster
2. Vertical battens (24x48mm / 1x2 inches) with 24mm (1 inch) air gap for ventilation
3. OSB boards 15mm (0.6 inch)
4. KVH timber beams 40x60mm (1.5x2.5 inches), positioned so the 40mm (1.5 inch) side accommodates insulation
5. 40mm (1.5 inch) wood fiber insulation inside
6. No vapor barrier
7. 15mm (0.6 inch) profiled battens mounted horizontally
Now my questions:
1. Is my wall build-up feasible, or am I trying to save too much space? This would leave an interior floor dimension of nearly 1.92m x 1.75m (6 ft 3.5 in x 5 ft 9 in).
I’m 1.84m (6 ft 0.5 in) tall, so I should still have enough room to lie down comfortably.
2. We want to install a full glass door with a side panel to enjoy the outdoor view.
We plan to use 8mm (0.3 inch) tempered safety glass (ESG). Is that okay, or can this cause issues near the heater?
3. How do you connect the glass wall to the sauna structure? I thought about routing a groove around the KVH timber to set the glass in. Is that a good approach?
For the floor, I read that someone placed the glass on a silicone mat which was then trimmed flush. That sounds like a good solution to me.
3. The sauna floor area is 3.34m² (36 ft²) with an interior height of 1.995m (6 ft 6.5 in). Ignoring the slope, that gives a volume of 6.66m³ (235 ft³).
I read that for a glass door you add 1.5m³ (53 ft³) and for a glass wall the area (1.5m² / 16 ft²) multiplied by 1.2 as additional volume.
So, I’d end up with a total volume of 9.66m³ (341 ft³) and chose a 9kW heater accordingly. Does that sound right or oversized? I’m currently leaning towards the "Harvia The Wall" with external control.
4. Due to the heater’s position, there is essentially no room for a heater guard between the glass wall and heater. Is a guard necessary in a private sauna? I’m not too worried about it, but my wife is concerned.
The alternative would be to shift the lower bench slightly under the upper bench and move the heater, which would create space for a guard.
Alternatively, there is a glass protective shield with integrated lighting available that mounts in front of the heater. Would that be enough? I’m not too keen on wooden guards though... [IMG alt=";)"]https://saunabauen.de/forum/images/smilies/icon_wink.gif[/IMG]
5. A coworker recommended bench heights of 60cm and 120cm (24 and 47 inches). That would cause problems with the sauna height. I was thinking about 45cm and 90cm (18 and 35 inches) instead. Since we don’t want it very hot anyway, I see no reason for higher benches.
6. To avoid further reducing the roof slope height, I considered skipping the OSB boards there and mounting the KVH beams directly at a 24mm (1 inch) gap (batten distance) from the ceiling. Any issues with that?
7. We prefer the look of horizontally mounted profiled battens. Any objections? Given the tight space, I would skip additional rear ventilation. From what I’ve read, that’s not strictly necessary.
8. In my case, would it be better to use a different insulation material with a vapor barrier instead of wood fiber insulation?
9. The left wall with the glass door will be clad on the outside with profiled wood boards as well. This way I could install an access panel above the sauna to reach the fresh air vent if needed. Also, I could place the electronics for lighting and audio on the ceiling, making them accessible.
Can I mount the cladding boards directly on the KVH beams, or is an additional counter batten or similar required?
I want the wall to finish flush with the terrace door frame. To prevent the terrace door (especially the handle) from hitting the wall, I plan to install a stopper mounted on the KVH timber there.
That’s it for now. I’m curious what you think about my plan. I hope my post is not too long... [IMG alt=":?"]https://saunabauen.de/forum/images/smilies/icon_confused.gif[/IMG]
I’m attaching some pictures to show the current planning status. If you need more info, just ask.
Looking forward to any feedback [IMG alt=";)"]https://saunabauen.de/forum/images/smilies/icon_wink.gif[/IMG]
Thanks in advance!
Best regards
P
pagoni20209 Jan 2021 16:44Be glad that you managed to achieve such a neat result; good things take time...!
The board cladding also looks good, there are no wide gaps like you usually see with standard tongue-and-groove boards; I like it.
The board cladding also looks good, there are no wide gaps like you usually see with standard tongue-and-groove boards; I like it.
So, the glazier just left.
After I was almost having a nervous breakdown and had to take off my sweater because of heat flushes, he came up with an idea:
For the regular door installation, he would have needed a stop, and the door hinges would have had to be mounted flush on the wall.
But because of the 15mm (0.6 inch) thick reveal boards, he wouldn’t have been able to install the fittings properly, since they must be no more than 20mm (0.8 inch) away from the edge of the opening. That would have been too unstable because the holes would then be right at the edge of the structural timber.
At that point, I got really hot and already imagined having to dismantle half the cabin. 😱
He said the easiest solution would be for me to build a wooden door and window frame, so he only has to install the glass panes.
When I explained that I had actually assumed he could mount it with door hinges screwed directly onto the reveal, he came up with the idea to use hinges from shower doors, which should work well.
From the lintel to the upper hinge, between the two hinges, and down to the floor, he will install a sealing lip. It won’t be completely airtight, but given our usage pattern (pre-heating the sauna 1-3 times per week), that doesn’t matter to me.
On the other side facing the window, we'll use a magnetic catch and sealing lips to keep the door closed.
As usual, this won’t be cheap. I’m currently estimating about €900 (~$980) for this, but at least it will be the full glass look we always wanted.
For now, I’m just relieved I don’t have to dismantle the cabin—that would have been a real setback... 😉
This also lets me estimate the total sauna costs more accurately by now. It might be useful for some DIY builders.
We’re looking at around €4,800 (~$5,230). Attached is the cost breakdown. Initially, I wanted to stay under €4,000 (~$4,350). Not happening 😀
The most expensive items with potential savings are definitely the lighting at €550 (~$600), the stove with controls at around €1,350 (~$1,470), and the glass front.
In addition, there were expenses for various tools (miter saw, work scaffold, circular saw, etc.) amounting to about €650 (~$710).

After I was almost having a nervous breakdown and had to take off my sweater because of heat flushes, he came up with an idea:
For the regular door installation, he would have needed a stop, and the door hinges would have had to be mounted flush on the wall.
But because of the 15mm (0.6 inch) thick reveal boards, he wouldn’t have been able to install the fittings properly, since they must be no more than 20mm (0.8 inch) away from the edge of the opening. That would have been too unstable because the holes would then be right at the edge of the structural timber.
At that point, I got really hot and already imagined having to dismantle half the cabin. 😱
He said the easiest solution would be for me to build a wooden door and window frame, so he only has to install the glass panes.
When I explained that I had actually assumed he could mount it with door hinges screwed directly onto the reveal, he came up with the idea to use hinges from shower doors, which should work well.
From the lintel to the upper hinge, between the two hinges, and down to the floor, he will install a sealing lip. It won’t be completely airtight, but given our usage pattern (pre-heating the sauna 1-3 times per week), that doesn’t matter to me.
On the other side facing the window, we'll use a magnetic catch and sealing lips to keep the door closed.
As usual, this won’t be cheap. I’m currently estimating about €900 (~$980) for this, but at least it will be the full glass look we always wanted.
For now, I’m just relieved I don’t have to dismantle the cabin—that would have been a real setback... 😉
This also lets me estimate the total sauna costs more accurately by now. It might be useful for some DIY builders.
We’re looking at around €4,800 (~$5,230). Attached is the cost breakdown. Initially, I wanted to stay under €4,000 (~$4,350). Not happening 😀
The most expensive items with potential savings are definitely the lighting at €550 (~$600), the stove with controls at around €1,350 (~$1,470), and the glass front.
In addition, there were expenses for various tools (miter saw, work scaffold, circular saw, etc.) amounting to about €650 (~$710).
P
pagoni202013 Jan 2021 12:29Hmm… I can’t quite picture it right now, but it doesn’t have to be that way; maybe it’s just because of my hair color 😀.
When we built our own sauna, we used a simple glass door mounted on a vertical door frame. You don’t need to worry about tightness since there is no draft inside. There are also stylish fittings if that is a concern. Our door was hung on a normal wooden beam and it was a relatively lightweight glass door, though maybe I don’t fully understand it.
This photo is about 20 years old, and my new sauna would look different by now, but maybe this gives you an idea of what I mean or don’t understand 😀

When we built our own sauna, we used a simple glass door mounted on a vertical door frame. You don’t need to worry about tightness since there is no draft inside. There are also stylish fittings if that is a concern. Our door was hung on a normal wooden beam and it was a relatively lightweight glass door, though maybe I don’t fully understand it.
This photo is about 20 years old, and my new sauna would look different by now, but maybe this gives you an idea of what I mean or don’t understand 😀
 Schimi179113 Jan 2021 12:54
I ALSO WANT a SAUNA!!! 🙁
wwwuuuuuääääähhhhhhh ....
wwwuuuuuääääähhhhhhh ....
Yes, his approach would have been the same as yours. However, since the hinges require a maximum distance of about 20mm (0.8 inches) from the opening, it wouldn’t have worked because the reveal board is already 15mm (0.6 inches) thick.
But that was never my intention. Otherwise, the door would have ended flush with the outer wall surface or been mounted on it. From the beginning, I wanted it positioned centered within the reveal.
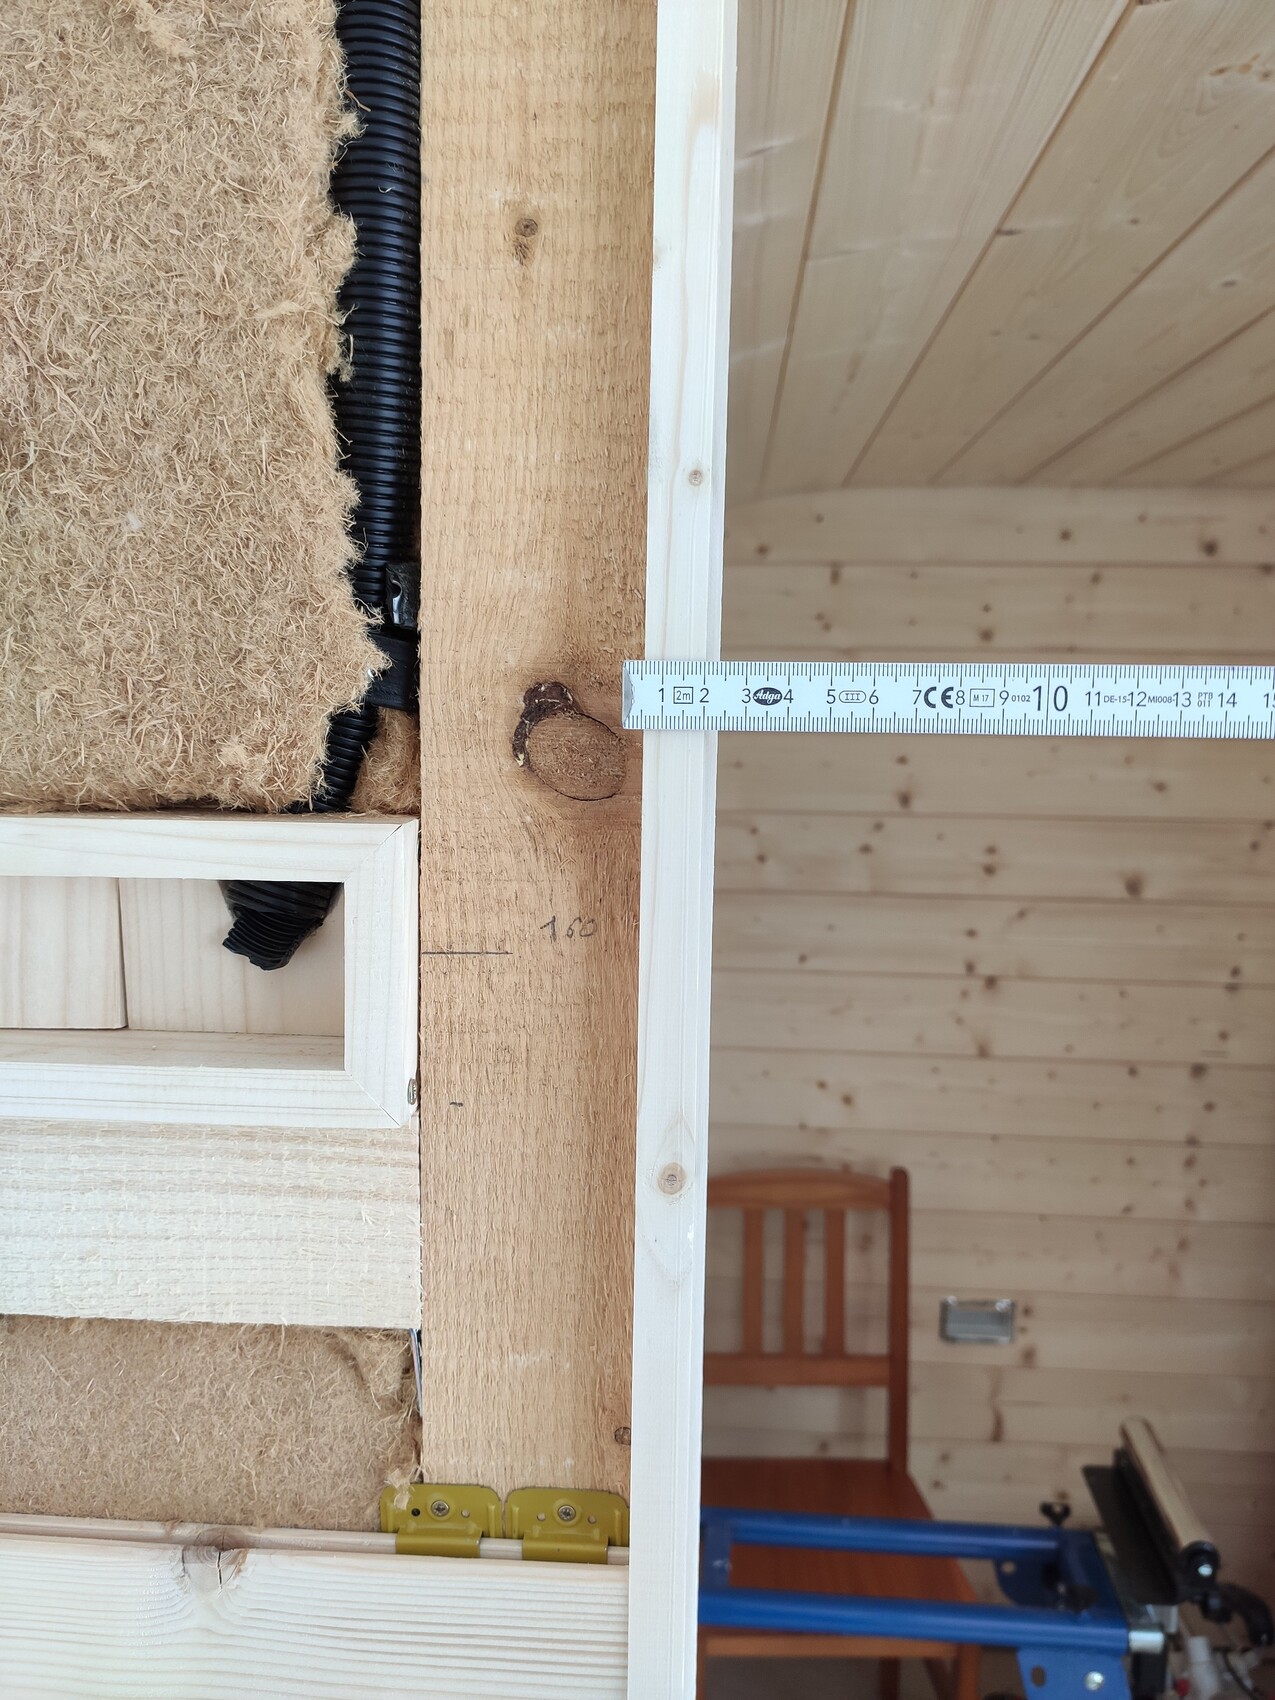
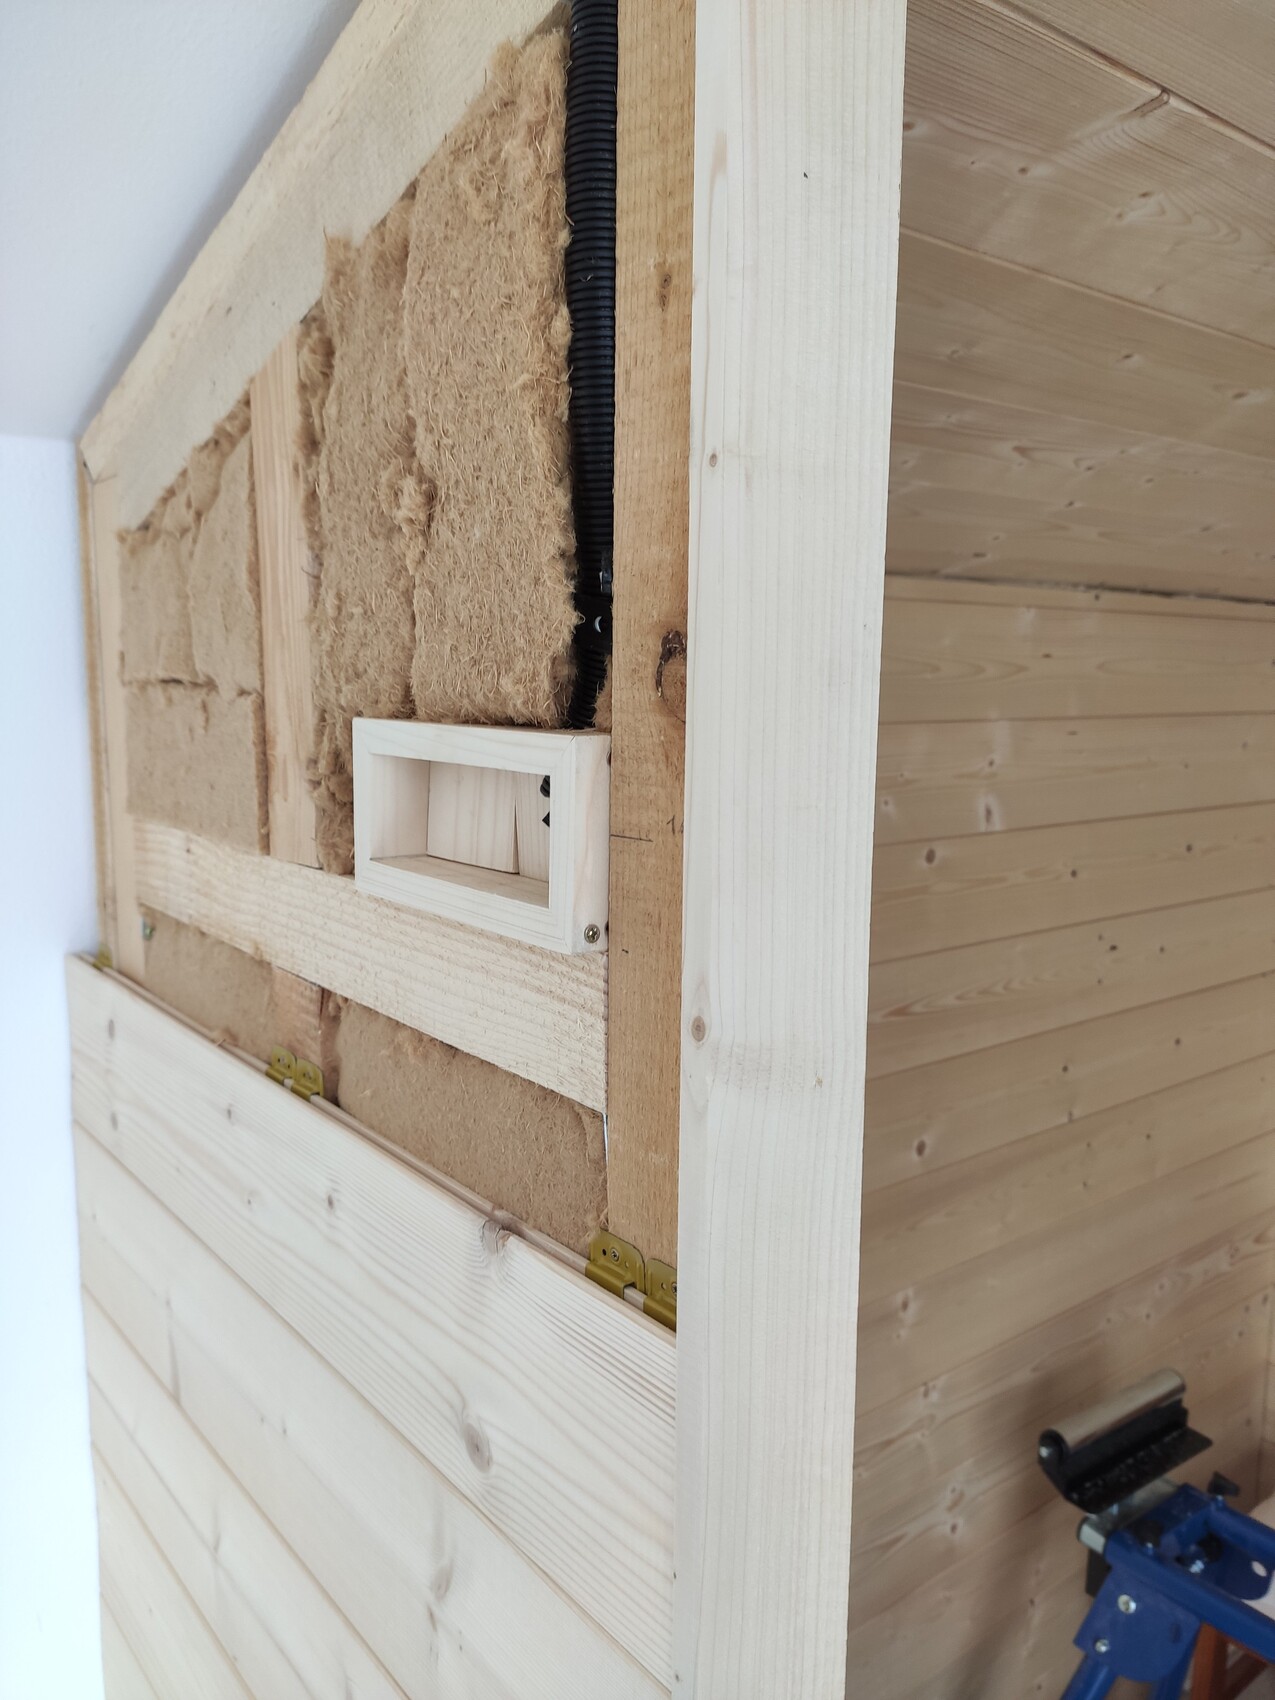

But that was never my intention. Otherwise, the door would have ended flush with the outer wall surface or been mounted on it. From the beginning, I wanted it positioned centered within the reveal.

Similar topics