
ᐅ Location of Combustion Appliances / LED Spotlights / LED Panels
Created on: 4 Aug 2022 19:45
R
RemusLazar
Hello everyone,
we are building a single-family house, and the ceiling on the upper floor is currently being worked on. Now we need to decide on the exact positions of the light fixtures, i.e., spots or panels, as well as the cutouts, etc.
Here is the current plan: the bedroom is at the top left, with two children's rooms below. I’m also attaching a perspective image to give an idea of how the rooms look. Due to the 6-degree pitch of the roof, the room height is quite high, especially in the bathroom and hallway.
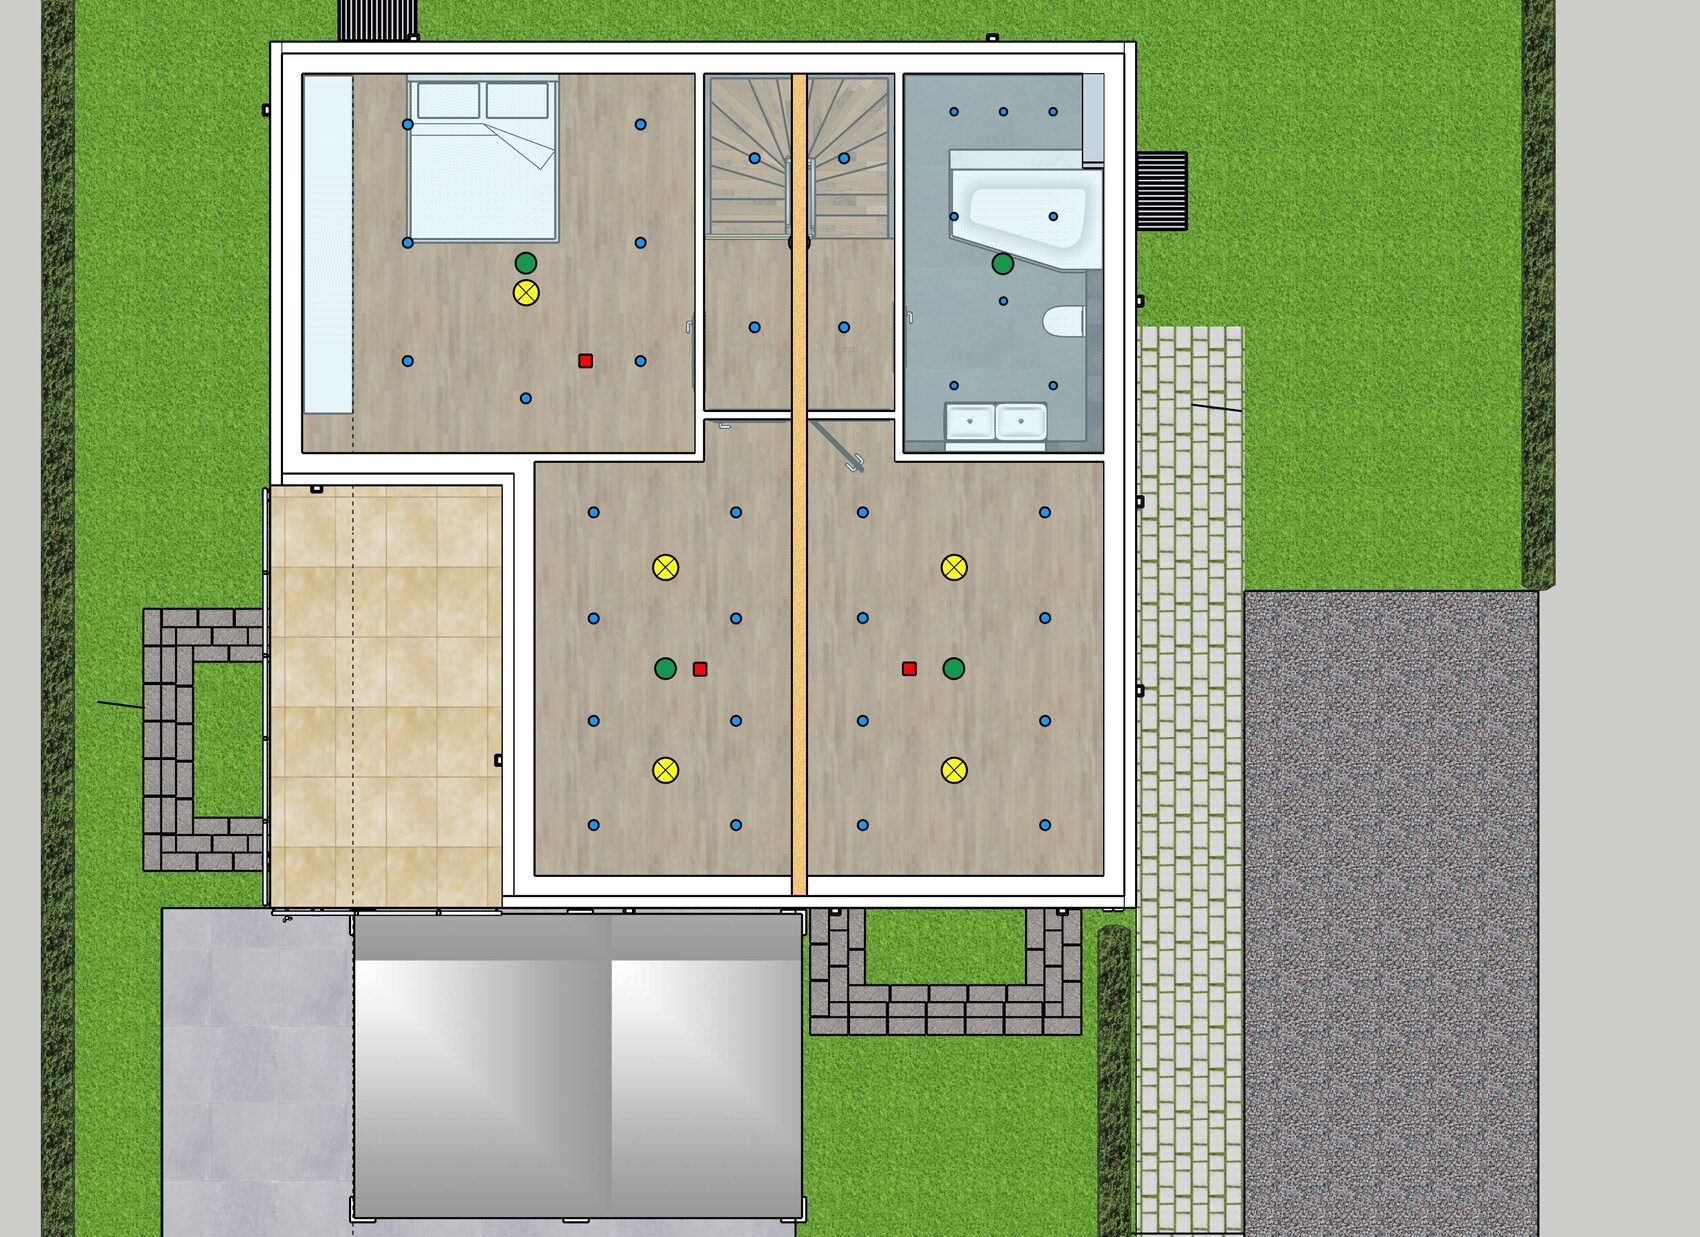
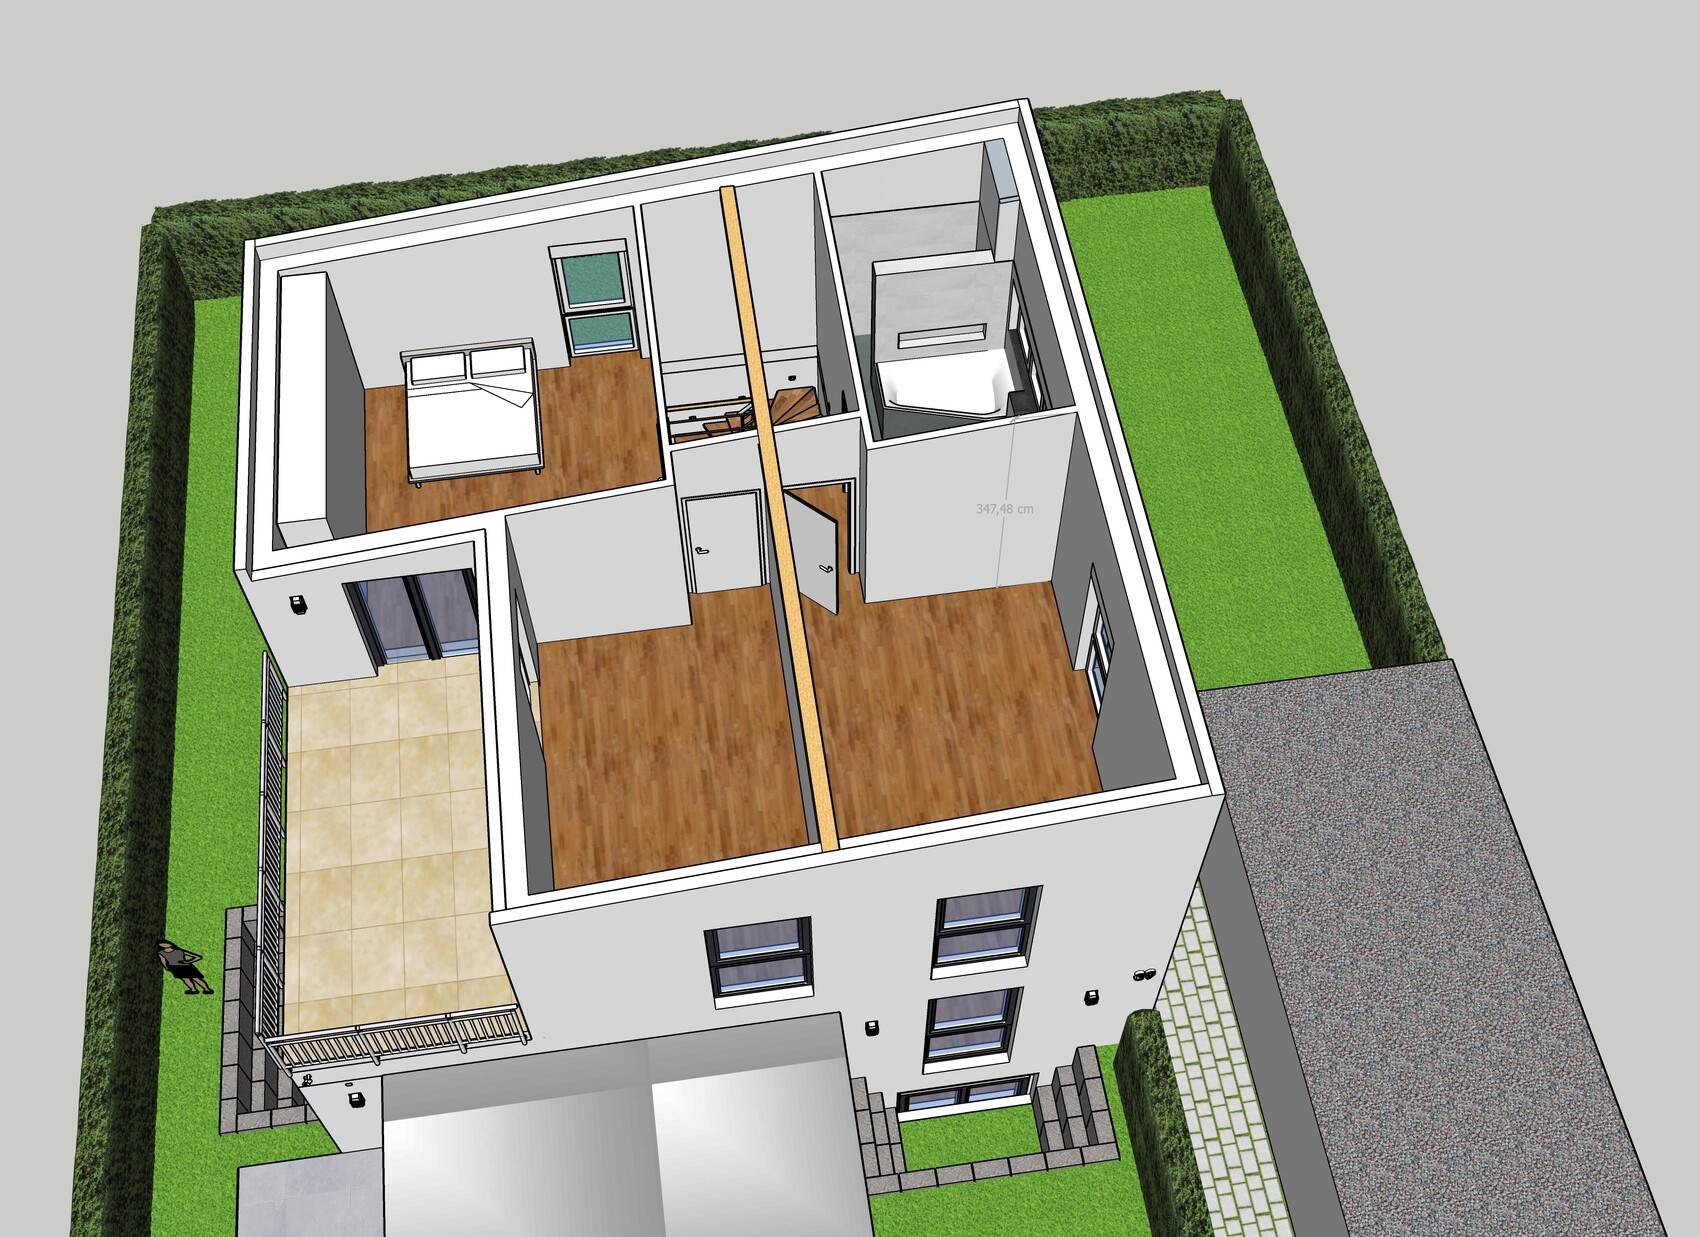
Currently, I have planned many smaller spots (6cm (2.4 inches) diameter) that can be tilted or rotated up to 30 degrees. In the bedroom, there is also an additional surface-mounted lamp (yellow circle), for example, a chandelier.
The ceiling will consist of a 30mm (1.2 inches) layer of boards with 12mm (0.5 inches) drywall panels on top, resulting in a total depth of only 42mm (1.7 inches).
Now we are unsure whether to proceed with many spots as planned or rather choose smaller or medium-sized LED panels that have a more modern look. I have shortlisted some panels from EVN in sizes 12cm (4.7 inches), 17.2cm (6.8 inches), 22.5cm (8.9 inches), and 28cm (11 inches) diameter, which provide good lighting. Dimmable lights are planned for all rooms. All rooms have been wired in a star topology with 5-core cables (from the distribution box), allowing either DALI control or the creation of up to three separate groups that can be switched independently. The entire lighting system will be operated via KNX.
We are looking for ideas and suggestions. We are considering completely changing the current plan and using panels instead of spots. For example, in the children’s rooms, we might install two 22.5cm (8.9 inches) or 28cm (11 inches) panels at the upper and lower parts of the rooms that can be separately switched and dimmed. One panel in the center would probably not be sufficient to provide good illumination.
We are also uncertain whether to make cutouts now for the panels or just install cable outlets to stay flexible and avoid committing to specific sizes or locations prematurely. The surface-mounted option is also worth considering, especially since the rooms have quite high ceilings.
Thanks in advance!
Best regards,
Remus
we are building a single-family house, and the ceiling on the upper floor is currently being worked on. Now we need to decide on the exact positions of the light fixtures, i.e., spots or panels, as well as the cutouts, etc.
Here is the current plan: the bedroom is at the top left, with two children's rooms below. I’m also attaching a perspective image to give an idea of how the rooms look. Due to the 6-degree pitch of the roof, the room height is quite high, especially in the bathroom and hallway.
Currently, I have planned many smaller spots (6cm (2.4 inches) diameter) that can be tilted or rotated up to 30 degrees. In the bedroom, there is also an additional surface-mounted lamp (yellow circle), for example, a chandelier.
The ceiling will consist of a 30mm (1.2 inches) layer of boards with 12mm (0.5 inches) drywall panels on top, resulting in a total depth of only 42mm (1.7 inches).
Now we are unsure whether to proceed with many spots as planned or rather choose smaller or medium-sized LED panels that have a more modern look. I have shortlisted some panels from EVN in sizes 12cm (4.7 inches), 17.2cm (6.8 inches), 22.5cm (8.9 inches), and 28cm (11 inches) diameter, which provide good lighting. Dimmable lights are planned for all rooms. All rooms have been wired in a star topology with 5-core cables (from the distribution box), allowing either DALI control or the creation of up to three separate groups that can be switched independently. The entire lighting system will be operated via KNX.
We are looking for ideas and suggestions. We are considering completely changing the current plan and using panels instead of spots. For example, in the children’s rooms, we might install two 22.5cm (8.9 inches) or 28cm (11 inches) panels at the upper and lower parts of the rooms that can be separately switched and dimmed. One panel in the center would probably not be sufficient to provide good illumination.
We are also uncertain whether to make cutouts now for the panels or just install cable outlets to stay flexible and avoid committing to specific sizes or locations prematurely. The surface-mounted option is also worth considering, especially since the rooms have quite high ceilings.
Thanks in advance!
Best regards,
Remus
T
Traufgänger4 Aug 2022 23:57I installed a 2.52m (8 ft 3 in) ceiling height. A typical 68mm (2.7 inch) LED spotlight provides about 500 lumens. You will need a higher number of reflectored spots, but this gives better light quality with less glare. The UGR values are all around 20, which is comfortable even in living areas. I would calculate with 300 lx in the living area at 100%, and always make the lighting dimmable! In the bathroom, use IP54 or IP68 rated fixtures above the shower area, or skip them, and do the same above the bathtub. Always include mirror lighting and indirect light sources in the bathroom, possibly even a central decorative bathroom light.
In the bedroom, leave out or make separately switchable the row of lights directly above the bed. Always divide lighting zones or use a central fixture directly over the bed instead of spotlights. Definitely include indirect lighting on the wall facing upwards or run wiring under the bed. The hallway lighting is fine as is. Tip: add indirect lighting to all rooms and, if needed, a central fixture with a switch to toggle between lighting options.
For lighting, I always recommend sampling in advance, as LED spotlights can produce very different light qualities. Brumberg is generally recommended. Buying from Amazon can work, but not always, so always sample first. This plan is meant as a suggestion and rough estimate. I did not model the angled roof layout in detail, but you might need more spots near the higher ceiling areas due to light loss reaching the target surface.
In the bedroom, leave out or make separately switchable the row of lights directly above the bed. Always divide lighting zones or use a central fixture directly over the bed instead of spotlights. Definitely include indirect lighting on the wall facing upwards or run wiring under the bed. The hallway lighting is fine as is. Tip: add indirect lighting to all rooms and, if needed, a central fixture with a switch to toggle between lighting options.
For lighting, I always recommend sampling in advance, as LED spotlights can produce very different light qualities. Brumberg is generally recommended. Buying from Amazon can work, but not always, so always sample first. This plan is meant as a suggestion and rough estimate. I did not model the angled roof layout in detail, but you might need more spots near the higher ceiling areas due to light loss reaching the target surface.
 RemusLazar5 Aug 2022 13:39
Many thanks for the calculation! We will take the weekend to carefully consider whether to use recessed downlights or surface-mounted fixtures. I’m not keen on having to decide this so early, especially for children’s rooms or bedrooms, where I’d prefer to choose the light type and shape later, once the room is finished. In the bathroom, recessed downlights definitely make sense.
Additionally, some of the ceiling panels have already been installed, so adding a second layer of battens is no longer possible. Depending on the LED recessed downlight, 42mm (1.65 inches) clearance isn’t much due to the heat generated behind the fixture; it would also require an installation box, which needs at least 65mm (2.56 inches) of space. Unfortunately, I only have 30mm (1.18 inches) up to the vapor barrier. In the bathroom, however, it would be relatively easy to add a second layer of battens, while in other rooms, the effort would be disproportionately high. 🙁
Exactly! The mirrored cabinet will be one from Ke*co with DALI control, so the light can be controlled directly at the mirror as well as via the light switch (on/off for everything). It will also be possible to adjust the color temperature at the mirror.
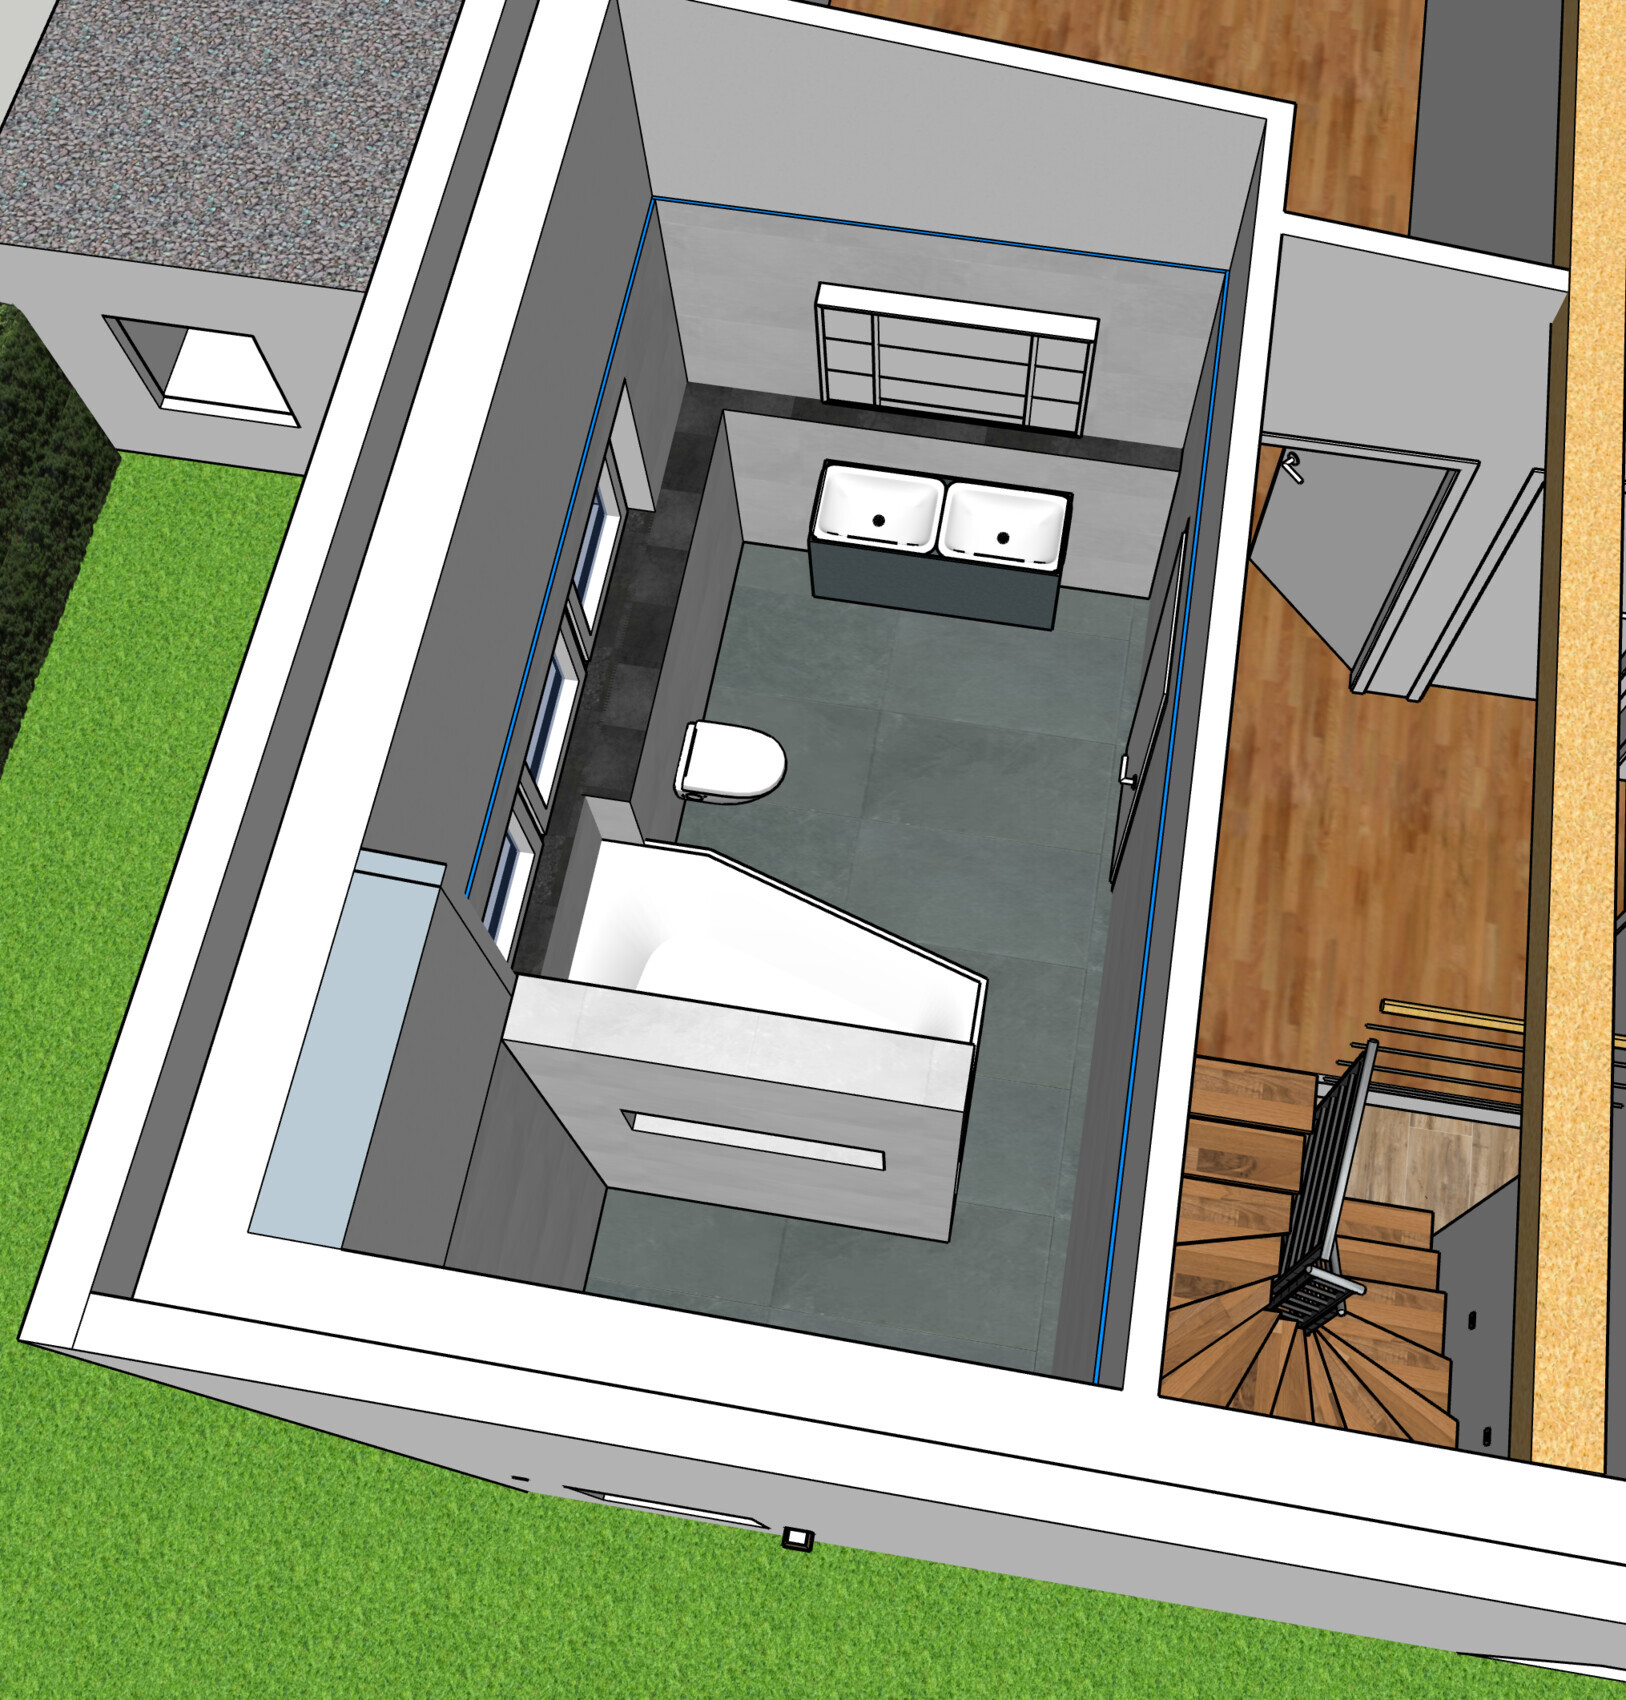
What I forgot to mention is that the room will only be tiled up to 2.4m (7 ft 10 in) high. Above this, the room continues up to 3.5m (11 ft 6 in). After the last row of tiles, I want to install an RGB LED strip all around, which can also be controlled via KNX. I have already had the empty conduits installed for this. It will indirectly illuminate the ceiling from below (blue line in the sketch), and will allow for both RGB and white light adjustments as well as dimming (RGBW strips from ConstaLED):
Yes, I have already shortlisted them. They also offer tunable white downlights, though I’m not sure if we will go for that (cost vs. benefit). Otherwise, I found some options from EVN with a CRI over 90. Ideally, I’d like to use halogen with a CRI of 100, but that’s not really common anymore these days.. 🙂
In the hallway, I think we will skip downlights (since ceiling panels have already been installed there as well, and a double batten layer is no longer possible) and instead install an LED panel centrally. For the staircase, I have positioned individual downlights at the bottom to nicely illuminate the steps from the side.
Additionally, some of the ceiling panels have already been installed, so adding a second layer of battens is no longer possible. Depending on the LED recessed downlight, 42mm (1.65 inches) clearance isn’t much due to the heat generated behind the fixture; it would also require an installation box, which needs at least 65mm (2.56 inches) of space. Unfortunately, I only have 30mm (1.18 inches) up to the vapor barrier. In the bathroom, however, it would be relatively easy to add a second layer of battens, while in other rooms, the effort would be disproportionately high. 🙁
Traufgänger schrieb:
always mirrors and indirect light sources
Exactly! The mirrored cabinet will be one from Ke*co with DALI control, so the light can be controlled directly at the mirror as well as via the light switch (on/off for everything). It will also be possible to adjust the color temperature at the mirror.
What I forgot to mention is that the room will only be tiled up to 2.4m (7 ft 10 in) high. Above this, the room continues up to 3.5m (11 ft 6 in). After the last row of tiles, I want to install an RGB LED strip all around, which can also be controlled via KNX. I have already had the empty conduits installed for this. It will indirectly illuminate the ceiling from below (blue line in the sketch), and will allow for both RGB and white light adjustments as well as dimming (RGBW strips from ConstaLED):
Traufgänger schrieb:
Brumberg is generally recommended
Yes, I have already shortlisted them. They also offer tunable white downlights, though I’m not sure if we will go for that (cost vs. benefit). Otherwise, I found some options from EVN with a CRI over 90. Ideally, I’d like to use halogen with a CRI of 100, but that’s not really common anymore these days.. 🙂
In the hallway, I think we will skip downlights (since ceiling panels have already been installed there as well, and a double batten layer is no longer possible) and instead install an LED panel centrally. For the staircase, I have positioned individual downlights at the bottom to nicely illuminate the steps from the side.
T
Traufgänger5 Aug 2022 13:42Which software did you use to create your house 3D model?
RemusLazar5 Aug 2022 13:54Traufgänger schrieb:
Which software did you use to create your 3D house model?I used SketchUp. I started with the basic version (which runs quite well in the browser), and later upgraded to the Pro version because it offers additional features, like organizing components. You can build everything hierarchically and easily show or hide parts.
Similar topics