
Hello everyone,
After reading and gathering information here for several weeks, I am now ready to participate actively.
We plan to build a house of about 190 m² (2,045 sq ft) plus a double garage in Saarland in 2015.
For this, we have ordered some catalogs from national suppliers and also requested individual quotes. In the end, based on a recommendation, we found the regional company DHI Planen und Wohnen in St. Wendel. They work exclusively with local craftsmen and specialist companies and have built over 400 houses in the last 14 years.
If I understand correctly, I would sign a contract with DHI, who then prepare an offer for the entire construction project and purchase all the building materials. The individual trades are paid directly by me to the craftsmen (according to the offer that was included in DHI’s overall quote). This is said to have the advantage that in case of warranty claims, I can hold DHI liable (because of the contract with them), and if they become insolvent, I can still pay the craftsmen directly.
Has anyone here had experience with the company DHI or can share insights about this billing model?
Thank you and best regards,
Jochen
After reading and gathering information here for several weeks, I am now ready to participate actively.
We plan to build a house of about 190 m² (2,045 sq ft) plus a double garage in Saarland in 2015.
For this, we have ordered some catalogs from national suppliers and also requested individual quotes. In the end, based on a recommendation, we found the regional company DHI Planen und Wohnen in St. Wendel. They work exclusively with local craftsmen and specialist companies and have built over 400 houses in the last 14 years.
If I understand correctly, I would sign a contract with DHI, who then prepare an offer for the entire construction project and purchase all the building materials. The individual trades are paid directly by me to the craftsmen (according to the offer that was included in DHI’s overall quote). This is said to have the advantage that in case of warranty claims, I can hold DHI liable (because of the contract with them), and if they become insolvent, I can still pay the craftsmen directly.
Has anyone here had experience with the company DHI or can share insights about this billing model?
Thank you and best regards,
Jochen


So, yesterday 11 hours on site... this morning I can feel every muscle in my body... I simply am not used to it anymore... but tonight we’ll continue.
We started on the upper floor because there was still some moisture on the ground floor from the plaster (but everything dried out yesterday).
Procedure for the upper floor:
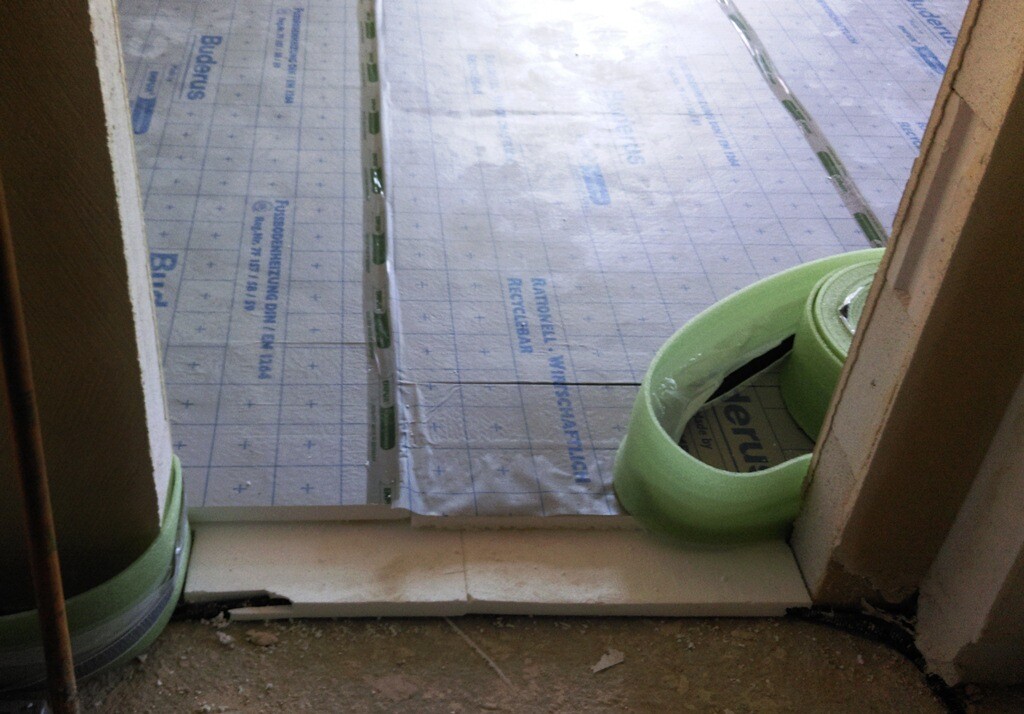

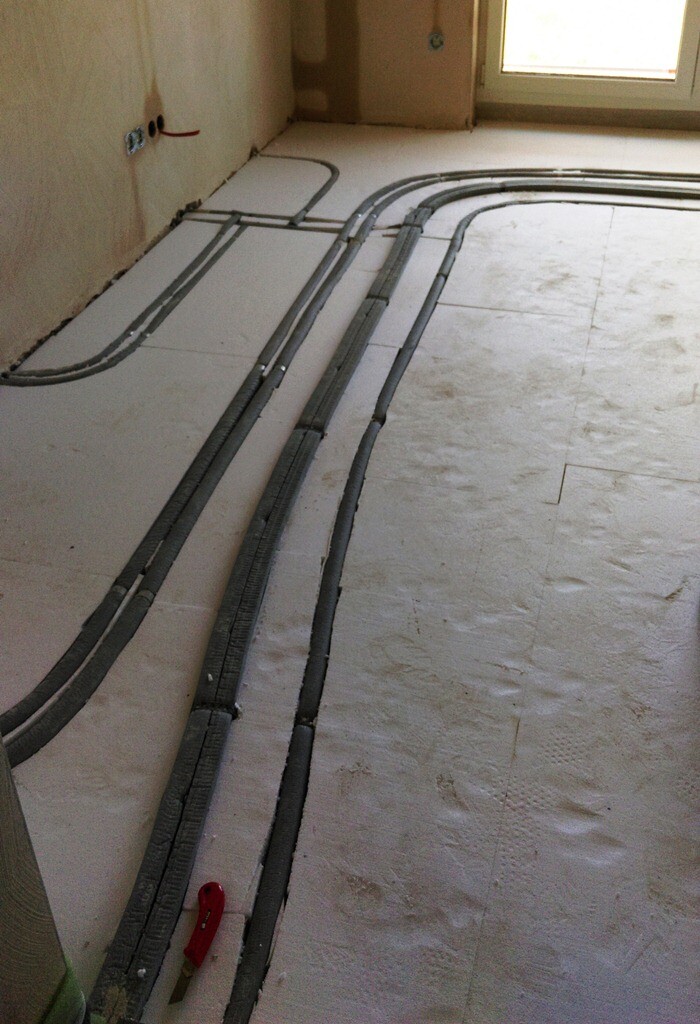
On the ground floor the same approach is used, except a 53mm (2.1 inches) PUR board (1.20m x 0.60m (3.9ft x 2ft)) is installed underneath first. This board needs to be cut around the pipes, then the other boards are placed on top.
Cutting around the water pipes or empty conduit pipes for cables is the most labor-intensive part everywhere.
All materials were delivered, including tape, roller, hammer stapler with staples.
What you still need:
We started on the upper floor because there was still some moisture on the ground floor from the plaster (but everything dried out yesterday).
Procedure for the upper floor:
- Sweep (and vacuum if necessary)
- One layer of EPS boards (30mm thick, 1m x 1m (1.2ft x 3.3ft)) on the concrete. This is the most work because all pipes need to be cut out.
- Then the edge insulation strip is installed around the perimeter, fixed to the walls with a hammer stapler.
- Next comes the “system board” on top. This is a membrane with another 30mm (1.2 inches) insulation layer underneath. It comes in sheets of 12m x 1m (39ft x 3.3ft) and is easier to lay because only the domestic water pipes (rectangular insulation) need to be cut out.
- The membrane is then sealed by overlapping and sticking the seams.
- Afterwards, the membrane is glued from the edge insulation strip onto the system board.
On the ground floor the same approach is used, except a 53mm (2.1 inches) PUR board (1.20m x 0.60m (3.9ft x 2ft)) is installed underneath first. This board needs to be cut around the pipes, then the other boards are placed on top.
Cutting around the water pipes or empty conduit pipes for cables is the most labor-intensive part everywhere.
All materials were delivered, including tape, roller, hammer stapler with staples.
What you still need:
- Utility knife with sharp blades (one per person)
- Measuring tape (one per person)
- Marker pen for marking (one per person; more visible than pencil)
- Broom
- Industrial vacuum cleaner (or what do you call those devices that can also pick up small stones and similar debris)
- Straight edge for straight cuts (yesterday we used a short one (~80cm (31 inches)), a 1.50m (5 feet), and a 2m (6.6 feet) one)
- Two sawhorses and a wooden board as a work surface (this is very handy so you don’t have to work directly on the floor)
- Radio
- How should insulation and the edge strip be installed where the toilet cistern / wall-mounted installation will go? Some pipes are already installed there.
- Does the edge strip also need to run along the stair formwork? We have a steel stringer staircase and the enclosure of the airspace is already installed.
- Does the membrane of the system board need to be continuous over the pipes, or is it enough to seal it tightly?
Hey Jochen,
with such a detailed post, it really seems like you enjoyed the work a lot. Seriously though, it’s really great and thanks a lot for the preliminary information. We will be able to use a lot of it.
You can provide the missing information later on if you want... once your sore muscles have eased.
Best regards and have a good start to the week,
Martin
with such a detailed post, it really seems like you enjoyed the work a lot. Seriously though, it’s really great and thanks a lot for the preliminary information. We will be able to use a lot of it.
You can provide the missing information later on if you want... once your sore muscles have eased.
Best regards and have a good start to the week,
Martin
Good morning,
we have now finished installing the insulation. Yes, it was quite enjoyable since it felt good to finally do some work on our house ourselves. However, we were all relieved once it was done.
The time investment was quite substantial. My father and I (both, in my opinion, skilled craftsmen), my wife (fortunately also somewhat talented), and two additional helpers on Saturday together spent about 110 hours. Short breaks for meals are not included.
However, from my point of view, we worked very thoroughly during this time and left the construction site wonderfully clean.
The work on the ground floor was actually easier since the PUR boards are the same thickness as the pipe insulation. However, especially in the utility room, there were significantly more pipes. For cutting the PUR boards, I would recommend using a jigsaw. It is much easier than using a utility knife.
We filled small gaps or empty spaces above the round insulated pipes with loose fill. One bag was more than enough for this.
The PUR boards were cut quite precisely, but it fit exactly. We still have about 2 m² (22 sq ft) of EPS boards and system boards each remaining, so the planning was good.
The edge insulation strips were a bit too few and were unfortunately stapled incorrectly over a few meters (with the adhesive film facing up), damaging the film. Therefore, we had to get additional supplies from company L. in N. This was offered to us in advance and worked perfectly.
Regarding the open questions:
We laid and glued the edge insulation strip around the pipes. That worked fine.
Yes, it must run past there as well. The edge insulation strip should be installed all around so that the screed has no direct contact with the outside afterward.
It is sufficient if the pipes are tightly sealed. Alternatively, the foil can be peeled off from leftover system board pieces and then glued over the pipes.
So, I hope this covers all the important information.
we have now finished installing the insulation. Yes, it was quite enjoyable since it felt good to finally do some work on our house ourselves. However, we were all relieved once it was done.
The time investment was quite substantial. My father and I (both, in my opinion, skilled craftsmen), my wife (fortunately also somewhat talented), and two additional helpers on Saturday together spent about 110 hours. Short breaks for meals are not included.
However, from my point of view, we worked very thoroughly during this time and left the construction site wonderfully clean.
The work on the ground floor was actually easier since the PUR boards are the same thickness as the pipe insulation. However, especially in the utility room, there were significantly more pipes. For cutting the PUR boards, I would recommend using a jigsaw. It is much easier than using a utility knife.
We filled small gaps or empty spaces above the round insulated pipes with loose fill. One bag was more than enough for this.
The PUR boards were cut quite precisely, but it fit exactly. We still have about 2 m² (22 sq ft) of EPS boards and system boards each remaining, so the planning was good.
The edge insulation strips were a bit too few and were unfortunately stapled incorrectly over a few meters (with the adhesive film facing up), damaging the film. Therefore, we had to get additional supplies from company L. in N. This was offered to us in advance and worked perfectly.
Regarding the open questions:
Jochen104 schrieb:
How should the insulation be installed, or how should the edge strip be laid where the toilet flush / pre-wall installation will go? Some pipes are already in place there.
We laid and glued the edge insulation strip around the pipes. That worked fine.
Jochen104 schrieb:
Does the edge strip also have to run along the stair formwork? We have a steel stringer staircase, and the lining of the air space is already installed.
Yes, it must run past there as well. The edge insulation strip should be installed all around so that the screed has no direct contact with the outside afterward.
Jochen104 schrieb:
Does the system board’s foil over pipes need to be continuous, or is tightly sealing it enough?
It is sufficient if the pipes are tightly sealed. Alternatively, the foil can be peeled off from leftover system board pieces and then glued over the pipes.
So, I hope this covers all the important information.
Similar topics