
ᐅ Location of a city villa or detached single-family house on a 500 m² rectangular plot
Created on: 17 Jan 2020 18:03
T
Tolentino
Dear all,
after sharing the floor plans of my possible hamster cage with you in the other thread , here comes the next thread (thanks again for all the constructive suggestions there).
Just so you know, the semi-detached house is not off the table yet, as this plot of land is highly sought after and it’s not clear whether it will work out. But this one would be my favorite.
Now to this plot. For now, I’m mainly concerned with where and roughly how the house should be positioned on this plot.
Development plan / restrictions
Plot size: 500 m² (5400 sq ft)
Slope: none
Site coverage ratio: 0.2
Floor area ratio: 0.4
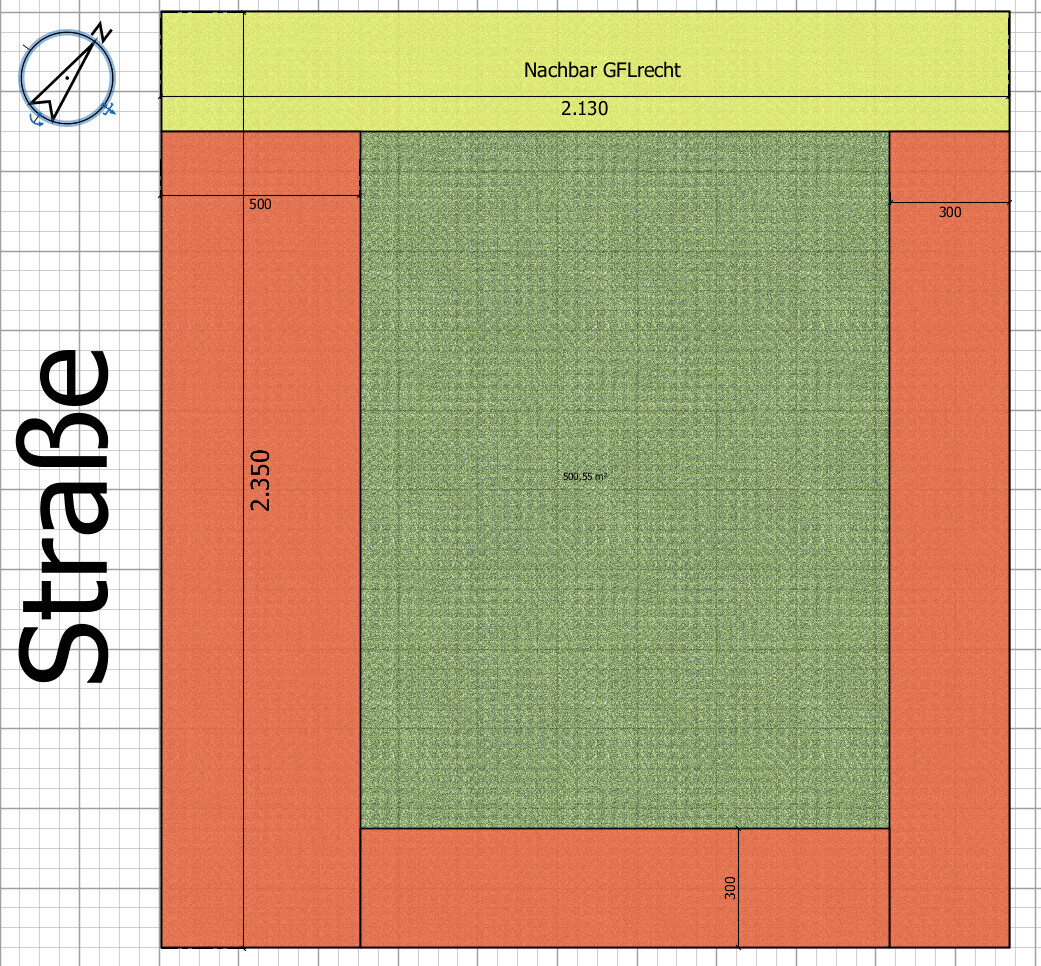
Building envelope, building line and boundary: 5 m (16 ft) from the street, 3 m (10 ft) from neighbors
Edge development: allowed for garages and sheds, none existing on the plot
Number of parking spaces: 1-2
Number of floors: 1.5–2.5
Roof shape: no preference
Architectural style: no preference
Orientation: aligned parallel to the street
Maximum heights / limits: ridge height max. 9 m (30 ft)
Below are the site plans I created myself based on the details from the listing.
This is a rough overview of the plot with building boundaries and dimensions.
My question is: where to put the house?
The broker suggests placing it towards the back, since you already have the 5 m (16 ft) setback at the front and would “gain” about 3 m (10 ft) of garden. My partner doesn’t like this because of the visibility from the street. I say: privacy screen! But I also think, a fence too high might create a prison-yard feel.
But even if you follow this suggestion, I wonder if a more square floor plan (-> town villa style) would be better?
Like this, for example:
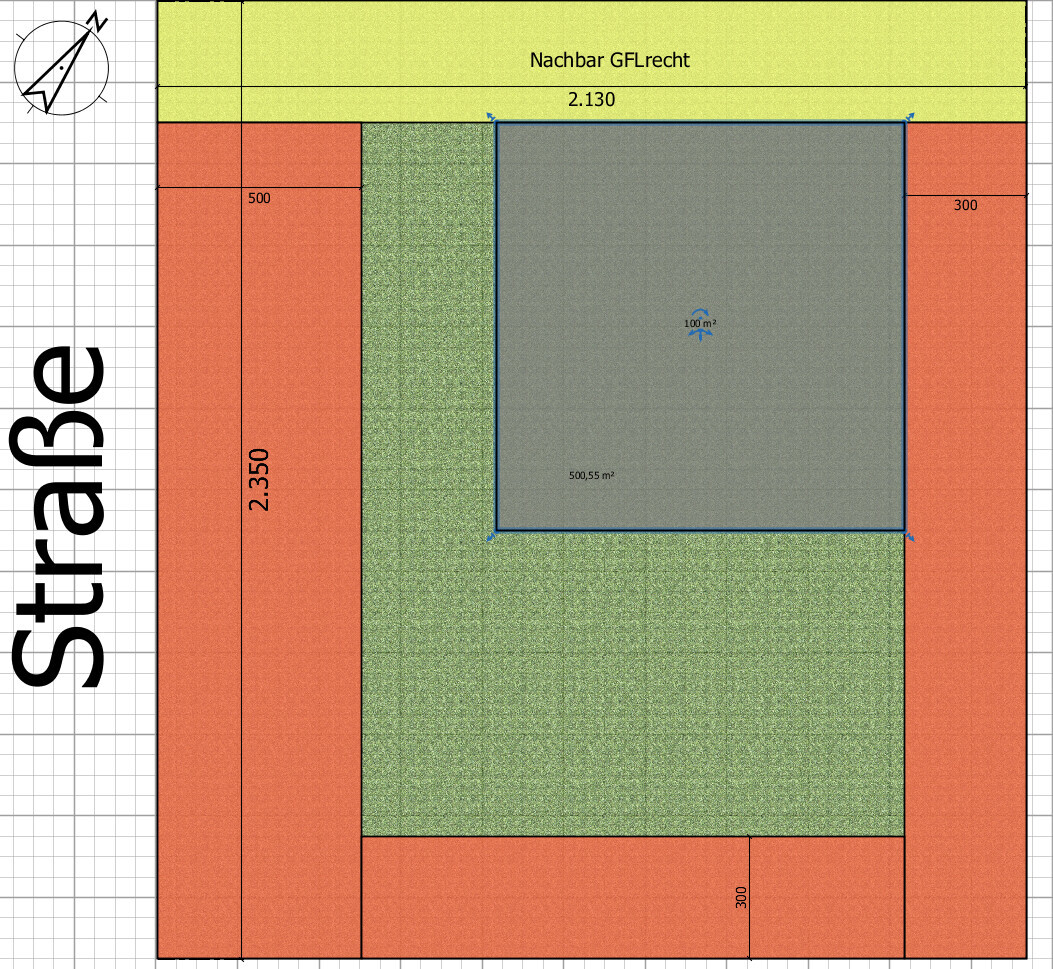
Then parking space might be tricky, right?
Or upright like this?
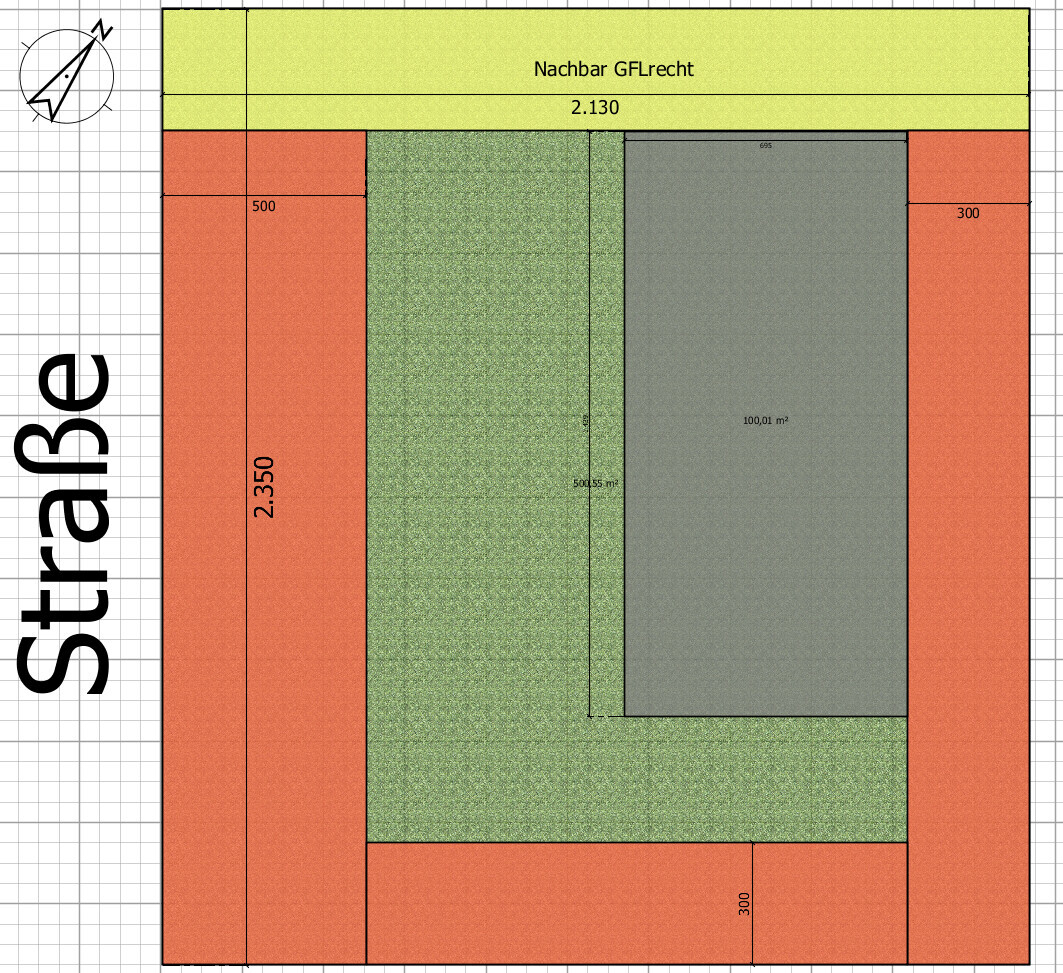
I really want as much of a west-facing view and garden as possible. I tend to be an evening person and that side is less built up, due to the road. So I think more light comes through.
But the narrow floor plan caused lots of problems with the semi-detached house already. Well, here you could build longer instead.
What do you think?
Best regards
Tolentino
after sharing the floor plans of my possible hamster cage with you in the other thread , here comes the next thread (thanks again for all the constructive suggestions there).
Just so you know, the semi-detached house is not off the table yet, as this plot of land is highly sought after and it’s not clear whether it will work out. But this one would be my favorite.
Now to this plot. For now, I’m mainly concerned with where and roughly how the house should be positioned on this plot.
Development plan / restrictions
Plot size: 500 m² (5400 sq ft)
Slope: none
Site coverage ratio: 0.2
Floor area ratio: 0.4
Building envelope, building line and boundary: 5 m (16 ft) from the street, 3 m (10 ft) from neighbors
Edge development: allowed for garages and sheds, none existing on the plot
Number of parking spaces: 1-2
Number of floors: 1.5–2.5
Roof shape: no preference
Architectural style: no preference
Orientation: aligned parallel to the street
Maximum heights / limits: ridge height max. 9 m (30 ft)
Below are the site plans I created myself based on the details from the listing.
This is a rough overview of the plot with building boundaries and dimensions.
My question is: where to put the house?
The broker suggests placing it towards the back, since you already have the 5 m (16 ft) setback at the front and would “gain” about 3 m (10 ft) of garden. My partner doesn’t like this because of the visibility from the street. I say: privacy screen! But I also think, a fence too high might create a prison-yard feel.
But even if you follow this suggestion, I wonder if a more square floor plan (-> town villa style) would be better?
Like this, for example:
Then parking space might be tricky, right?
Or upright like this?
I really want as much of a west-facing view and garden as possible. I tend to be an evening person and that side is less built up, due to the road. So I think more light comes through.
But the narrow floor plan caused lots of problems with the semi-detached house already. Well, here you could build longer instead.
What do you think?
Best regards
Tolentino

K1300S schrieb:
I would say the same if I didn’t have to live in the house and just wanted to finish quickly.Just to emphasize again: My HSL foreman really insists on delivering proper work, and if a necessary preliminary task was done poorly, he would say so. He said the most important thing is north-facing. Whether it’s northeast or northwest doesn’t make much difference; he can manage that. Today's heat pumps are "adjustable" enough.K1300S schrieb:
Are you sure this is really a problem? The adjacent panels should actually, uh, lie flat, firmly on the floor, right?Well, as I said, I already had that problem during installation with very narrow pieces in real life. I can also imagine that with pure EPS on top it might still happen even after the screed over the years, vibrations, etc., could cause the perlite to settle. That can’t happen with hard wax or bitumen-coated perlite because once pressure is applied, it bonds and keeps its shape, so it’s fixed in place. But before I had panels on top, during installation, even that type would have perlite slipping underneath the pieces. At first, I taped the joints, then later I used mounting adhesive because it was faster. This didn’t happen as easily with large panels.K1300S schrieb:
That is probably meant positively (for @pagoni2020), right?I’m happy to elaborate further.
My impression of @pagoni2020 from the forum was of an elderly, reserved (and maybe somewhat stocky) man of average height, with salt-and-pepper hair and a full white beard.
Kind and with the vibe of a kindly uncle who tells stories.
But I actually met a tall, slim, vital man in the prime of life, with a youthful aura and energy, combined with the presence of a worldly professor who lectures at international conferences and a hint of French bohemian style. Add a bit of Swabian wit and the savoir-faire of a Cuban casino owner, and you have a perhaps somewhat exaggerated picture of @pagoni2020.
So, now go ahead and turn a little red!
Back to my construction project:
As I said, I was quite exhausted, and the fact that the exterior plaster was almost finished except for the base was some consolation...
View from the street
View from the side neighbor onto the large stairwell window and the main entrance as well as guest bathroom, you can see the core drillings for the mechanical ventilation system
View from the rear neighbor onto the garden side (through the window you can see a bit of @pagoni2020 insulation)
Another view of the back of the house from the rear neighbor’s perspective. Kitchen window and side entrance door (main construction door)
Again the garden side (also in the house photo thread)…
So, I would have liked to show you pictures of the underfloor insulation. But I was actually so busy that the idea didn’t even occur to me. I also didn’t document any progress stages. Crazy.
Now here are pictures of what rests on the underfloor insulation. I think I must have done something right...
Guest bathroom – nice small manifold also in the shower
Main living area – larger manifold but also much larger total floor area. Approved by the poodle...
The utility room with the heating circuit manifold does not have its own thermostat. That wasn’t originally planned, but apparently it should be enough. I will check with the foreman again whether that will remain so and whether it might have been better to center the supply line installation...
Hallway with recess for the staircase footing (according to the stair builder not necessary, but better safe than sorry).
LukasFerante schrieb:
Your project is really impressive! rentschler-lüftung deThank you very much. The last few days, and also whenever my general contractor annoyed me, it was sometimes quite stressful, but I definitely learned a lot for the next house and I’m happy if my post here helps other builders or those planning to become builders.Now a few more pictures of the underfloor heating:
Main bathroom with bathtub recess, otherwise a nice small heating circuit
Again in the main bathroom, neatly installed in the shower area...
The heating control valve on the upper floor is in the older child’s bedroom. He will have it nice and cozy. That’s probably why the heating circuit is a bit larger...
Here are the rest of the child’s bedroom
Small child’s room, which will initially become my wife’s hobby room.
Hallway, which doesn’t need much heating...
Another child’s room, initially chosen by my wife as a dressing room...
Bedroom, or more precisely, my wife’s room...
The installer said he hadn’t laid pipes this close together for a long time, but he knows why—heat pump, etc....
To be continued...

Nida35a schrieb:
The heating system looks good,
but if the older one sleeps with the window open, it reduces the heating efficiency by 0.003 points. That's why I have lockable valves. He doesn't get the key... :p

Tolentino schrieb:
PudelMy wife isn’t really interested in this forum at all, even though our floor plan was created here.Exception: Pudel!
It looks really great. Respect for the self-build effort. And now even heating in the shower!
Similar topics