
ᐅ Installing hardwood flooring: Which direction should it be laid?
Created on: 6 Mar 2016 22:13
W
werschtl
Dear forum,
I want to install ship deck parquet flooring in the living room of a penthouse apartment and have attached two pictures. The living room measures 6x5m (20x16 ft). The windows on the longer 6m (20 ft) side face southwest.
How should the parquet boards run—option 1 or along the long side option 2?
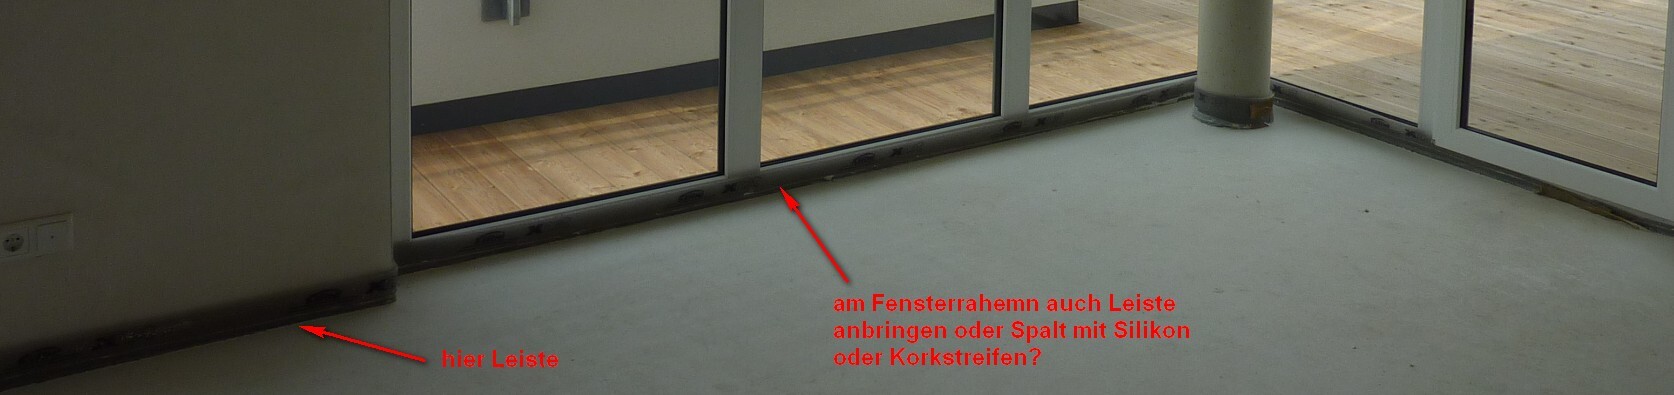
How would you recommend finishing the parquet at the window frame? Should I install a baseboard along the walls as well? Or rather create a silicone joint between the frame and the parquet, or glue in a cork strip?
I was considering Haro FP4000 3-strip oak, 13.5 mm (0.53 inch) thick. Is the quality good?
Thanks in advance, best regards
Frank
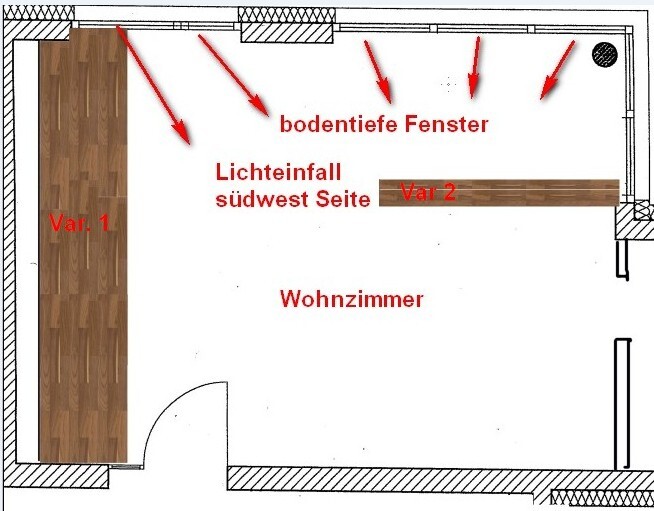
I want to install ship deck parquet flooring in the living room of a penthouse apartment and have attached two pictures. The living room measures 6x5m (20x16 ft). The windows on the longer 6m (20 ft) side face southwest.
How should the parquet boards run—option 1 or along the long side option 2?
How would you recommend finishing the parquet at the window frame? Should I install a baseboard along the walls as well? Or rather create a silicone joint between the frame and the parquet, or glue in a cork strip?
I was considering Haro FP4000 3-strip oak, 13.5 mm (0.53 inch) thick. Is the quality good?
Thanks in advance, best regards
Frank

I had the impression while installing parquet flooring that floors with an MDF core tend to develop fewer gaps compared to those made of solid wood.
Frank,
Gaps can also occur with floating floors.
Installation is always done from left to right, meaning the groove side faces the wall, regardless of whether the floor is floating or glued down.
Before starting, you should check how many planks you will need for the length of the room. This is important to ensure that the plank widths at the beginning and end of the room are roughly the same. It is quite possible that you will need to cut the first row. When gluing, it is important to prepare the first three rows in advance, so to speak.
In your case, you start at the wall on the left side according to the plan and work your way toward the column. Necessary cutouts should be prepared before applying the adhesive. For the column, you can either use a contour gauge or make one yourself out of cardboard. For finishing at the column, flexible floor profiles or liquid cork can be used (here, of course, work very carefully).
You must also pay attention to using the appropriate adhesive and the correct notched trowel (usually TKB B9). Please be sure to follow the parquet manufacturer’s instructions carefully.
So, if I have accidentally written something incorrect or forgotten anything, please correct and add as needed.
Sent from my mobile device
link removed by moderation
_________________________
Construction expert
Frank,
Gaps can also occur with floating floors.
Installation is always done from left to right, meaning the groove side faces the wall, regardless of whether the floor is floating or glued down.
Before starting, you should check how many planks you will need for the length of the room. This is important to ensure that the plank widths at the beginning and end of the room are roughly the same. It is quite possible that you will need to cut the first row. When gluing, it is important to prepare the first three rows in advance, so to speak.
In your case, you start at the wall on the left side according to the plan and work your way toward the column. Necessary cutouts should be prepared before applying the adhesive. For the column, you can either use a contour gauge or make one yourself out of cardboard. For finishing at the column, flexible floor profiles or liquid cork can be used (here, of course, work very carefully).
You must also pay attention to using the appropriate adhesive and the correct notched trowel (usually TKB B9). Please be sure to follow the parquet manufacturer’s instructions carefully.
So, if I have accidentally written something incorrect or forgotten anything, please correct and add as needed.
Sent from my mobile device
link removed by moderation
_________________________
Construction expert
Hello Neige,
thank you very much, I understand, very good tip, I wouldn’t have thought of that, it would be bad if the last board is only 2cm (1 inch) wide, so that’s why the first board should already be cut to size.
The tiler noticed that there is a kind of dried cement/gypsum slurry on the screed. This needs to be ground off for the floors to be tiled. Probably also for the parquet.
- Can I remove it with my long-reach sander and sanding mesh?
- Does the floor need to be primed with a deep primer before applying the adhesive?
Good luck, Frank
thank you very much, I understand, very good tip, I wouldn’t have thought of that, it would be bad if the last board is only 2cm (1 inch) wide, so that’s why the first board should already be cut to size.
The tiler noticed that there is a kind of dried cement/gypsum slurry on the screed. This needs to be ground off for the floors to be tiled. Probably also for the parquet.
- Can I remove it with my long-reach sander and sanding mesh?
- Does the floor need to be primed with a deep primer before applying the adhesive?
Good luck, Frank

Hello "Werschtl".
I’ll say this cautiously: If I were on site, I would look your tiler in the eye for a long and serious moment if something like this was mentioned by them!
Is it cement screed or calcium sulfate screed? One should be able to distinguish between the two. And a "sludge" would always indicate overwatering of the fresh mortar, which would only apply to cement screed in this case.
But all of this seems to miss the point, because these so-called "hard crusts," which had to be milled off many years ago when self-leveling screeds first appeared on the market (and only with those did it happen), were a defect that had to be repaired—the screed installer was responsible. This only concerned and concerns exclusively new screed surfaces.
This is because older screeds were or are already covered with a floor covering, and the floor layer who dealt with the issue first back then would have brought the screed installer "on board."
It would be impossible to deal with this using just abrasive mesh—no way! You need the "right equipment," not DIY tools.
Typically, a cleaning grind with a maximum grit size of 16 is applied.
Again: This problem occurred years ago with new calcium sulfate self-leveling screeds. Due to modifications in the formulation, it is now a thing of the past and hardly occurs today (formulation-related).
--------------------
Regards, KlaRa
I’ll say this cautiously: If I were on site, I would look your tiler in the eye for a long and serious moment if something like this was mentioned by them!
Is it cement screed or calcium sulfate screed? One should be able to distinguish between the two. And a "sludge" would always indicate overwatering of the fresh mortar, which would only apply to cement screed in this case.
But all of this seems to miss the point, because these so-called "hard crusts," which had to be milled off many years ago when self-leveling screeds first appeared on the market (and only with those did it happen), were a defect that had to be repaired—the screed installer was responsible. This only concerned and concerns exclusively new screed surfaces.
This is because older screeds were or are already covered with a floor covering, and the floor layer who dealt with the issue first back then would have brought the screed installer "on board."
It would be impossible to deal with this using just abrasive mesh—no way! You need the "right equipment," not DIY tools.
Typically, a cleaning grind with a maximum grit size of 16 is applied.
Again: This problem occurred years ago with new calcium sulfate self-leveling screeds. Due to modifications in the formulation, it is now a thing of the past and hardly occurs today (formulation-related).
--------------------
Regards, KlaRa
Thank you, the construction description mentions a "floating heated screed." Should I report this as a defect? Although I am not an expert, I can see, especially in the areas where people walk, that small patches are coming loose. The tile setter has a special machine and would grind it down.
Good luck, Frank
Good luck, Frank
Similar topics