
ᐅ Constructing a Cost-Effective Retaining Wall / Slope Stabilization
Created on: 27 Feb 2019 13:50
A
abc12345
Hello everyone,
The weather is steadily improving, so it’s time to start planning the outdoor area. Parts of the property will need to be filled in. The site has already been surveyed, and leveling at the lowest point would require approximately 2 meters (6.5 feet) of fill soil.
There are gardens adjacent to the property on all sides, so I will need to build a retaining wall accordingly.
I have already spoken with the local building materials supplier. He suggested simply making a foundation by excavating 1 meter (3.3 feet) deep, then adding a 20 cm (8 inches) layer of crushed stone, followed by 80 cm (31.5 inches) of reinforced concrete. On top, concrete blocks would be placed, reinforced with rebar and filled with concrete. He recommended using blocks sized 26 cm or 29 cm (10 or 11.5 inches), but said he could not provide structural calculations or any official advice. He quoted me a material cost of about 3,500 euros.
Nothing was mentioned about installing drainage. I’m also unsure where the water would be directed since all sides border neighboring properties. Or did I misunderstand the purpose of drainage—is it to carry water away from the retaining wall to somewhere else?
Now my question is whether there might be other, possibly more cost-effective ways to do this? Precast L-shaped concrete elements are available here, but they cost about three times as much and require a mini-excavator for installation.
Another option I considered is to reduce the wall height to 1 meter (3.3 feet) and create a steep slope up to the fill level. However, I’m not sure how steep the slope can be without causing sliding. The property will later be enclosed with a dense hedge for privacy. As far as I understand, the wall must be set back 2 meters (6.5 feet) from the property boundary to avoid problems with height restrictions, especially because the ground has already been raised by 2 meters (6.5 feet).
I want to minimize the amount of space lost to make the most of the property, but I also want to keep costs relatively low since there are many other projects planned.
Since I can’t see the wall from my side and the neighbor is a daycare center, appearance is not a major concern for me.
Maybe you have some ideas or tips on the best way to approach this.
Thank you in advance for your help.
The weather is steadily improving, so it’s time to start planning the outdoor area. Parts of the property will need to be filled in. The site has already been surveyed, and leveling at the lowest point would require approximately 2 meters (6.5 feet) of fill soil.
There are gardens adjacent to the property on all sides, so I will need to build a retaining wall accordingly.
I have already spoken with the local building materials supplier. He suggested simply making a foundation by excavating 1 meter (3.3 feet) deep, then adding a 20 cm (8 inches) layer of crushed stone, followed by 80 cm (31.5 inches) of reinforced concrete. On top, concrete blocks would be placed, reinforced with rebar and filled with concrete. He recommended using blocks sized 26 cm or 29 cm (10 or 11.5 inches), but said he could not provide structural calculations or any official advice. He quoted me a material cost of about 3,500 euros.
Nothing was mentioned about installing drainage. I’m also unsure where the water would be directed since all sides border neighboring properties. Or did I misunderstand the purpose of drainage—is it to carry water away from the retaining wall to somewhere else?
Now my question is whether there might be other, possibly more cost-effective ways to do this? Precast L-shaped concrete elements are available here, but they cost about three times as much and require a mini-excavator for installation.
Another option I considered is to reduce the wall height to 1 meter (3.3 feet) and create a steep slope up to the fill level. However, I’m not sure how steep the slope can be without causing sliding. The property will later be enclosed with a dense hedge for privacy. As far as I understand, the wall must be set back 2 meters (6.5 feet) from the property boundary to avoid problems with height restrictions, especially because the ground has already been raised by 2 meters (6.5 feet).
I want to minimize the amount of space lost to make the most of the property, but I also want to keep costs relatively low since there are many other projects planned.
Since I can’t see the wall from my side and the neighbor is a daycare center, appearance is not a major concern for me.
Maybe you have some ideas or tips on the best way to approach this.
Thank you in advance for your help.
H
HilfeHilfe2 Mar 2019 06:4511ant schrieb:
In retaining wall discussions, I often feel like I’m among people who have never seen a landslide after heavy rain and only studied a bit of optics and electricity in physics class.
On one side, there is (supposedly) solid mass (plus potential energy), and on the other side only air: of course that creates pressure—even if the internal strength of the mass “resists” (just not dramatically yet). When it gets too wet (or experiences similar effects), being completely rigid and tipping over is relatively the bravest thing the wall can do.
Theodor in goal would still hold the ball, the hairstyle with strong hold gel stays intact, but unfortunately, the wall only holds as well as the father’s previous experience.
Three things help here, ideally combined as a triple strategy: anchoring (L-shaped blocks do nothing else), inclination against the direction of pressure, and “reinforcement” (of the pressing mass itself!) with root systems or similar.
Reinforcement in the wall does not make it strong, just stiff. That is also good and useful as a fourth measure but does not replace the first three. The stiffness of the wall only makes the difference between crumbling and tipping over. Because crumbling requires lower forces, which become visible, stiffness is mistakenly assumed by laypeople to be sufficient except in century events.
Forces often only become evident when the one side becomes more than equivalent to the other—but denying their existence until then can still be a serious mistake.
I dare to say it’s quite easy to tell whether retaining wall builders are physics teachers, business economists, or computer scientists. Yes, provided you have a mountain of soil behind you. This should not be generalized. We were basically the 2-meter (6.5 feet) soil mound built up for the house; behind us, the last house is at the same level. After 5 years, I can say the house stands, the wall stands, and we have had about five storms per year. The original poster is just bringing their property up to the same level as the house. There is nothing structural about it.Webmaster-uk schrieb:
to make a foundation (dig 1 meter deep, 20 cm gravel layer and 80 cm concrete with reinforcement) and place concrete formwork blocks on it, insert rebar and fill with concrete. You should use 26 cm or 29 cm blocks, but they probably won’t provide structural calculations or advice. Hello Webmaster-uk
Last year I worked with a bit over 1,000 concrete formwork blocks for an underground climate cellar. Did it all myself. Mixed and placed the concrete with 3 people. You just have to know what you’re getting into. Then it works.
First of all, you should use 30 cm (12 inches) formwork blocks. The earth pressure shouldn’t be underestimated. The blocks, concrete gravel, and cement can be easily transported from the street with a wheelbarrow. It’s hard work and not something done in a weekend.
Digging 1 meter (3.3 feet) deep for the foundation seems a bit excessive to me, but it definitely won’t hurt.
So: start by digging out the foundation. Because of the earth pressure, I would also extend the foundation into the property. Ideally, every 5 meters (16 feet) dig 2 meters (6.6 feet) deep. To explain it better: a foundation along the full length where the wall will be, plus a 2-meter (6.6 feet) deep foundation extending at a 90° angle into the property. No wall will go on top of this extension, but it stabilizes the structure.
Then place recycled crushed rock (RCL) into the foundation and compact it well. Then pour concrete. Insert 12 mm (1/2 inch) rebar into the concrete, one every 50 cm (20 inches). At least 20 cm (8 inches) deep and extending upward about one meter (3.3 feet).
Make sure the rebar is positioned inside the gaps of the formwork blocks.
After that, build up the formwork blocks in a staggered pattern. Reinforce each course with at least 2 pieces of 8 mm (5/16 inch) rebar. So, horizontally place 2 rebars per course and continue the 12 mm (1/2 inch) vertical rebars. Pour concrete and eventually the wall will stand.
You will need to use shims when placing the blocks. The formwork blocks can vary by a few millimeters (inches) in height.
Lastly: use formwork blocks sized 30 x 25 x 50 cm (12 x 10 x 20 inches). You might have to look around. Most suppliers only offer 20 cm (8 inch) high blocks.
Steven
S
sichtbeton824 Mar 2019 10:43Maybe this tip has already been given, but it’s better to hear it one more time than not at all... It’s best to pour concrete after placing 2-3 rows of formwork blocks. Otherwise, the formwork blocks in the lower rows may break due to their own weight.
sichtbeton82 schrieb:
It’s best to pour concrete after placing 2-3 rows of formwork blocks. Otherwise, the blocks in the lower rows may break due to their own weight. Hello
Absolutely correct.
But it is more likely that the formwork blocks are pushed out of alignment while pouring rather than breaking. I don’t think they usually break.
This is also the reason why ready-mix concrete isn’t ideal. If the driver lets it flow freely, there’s a high chance the blocks will be pushed out of position.
Steven

sichtbeton82 schrieb:
Maybe this tip has already been given, Then I must have missed it, otherwise I would have added my two cents: the phenomenon you fear is not a problem, since the shuttering blocks are just lost formwork, and even localized water ingress through cracks does not significantly weaken the "wall."
What can be more dangerous to their stability is the layered setting of the poured concrete, similar to how the shuttering block rows are installed. The overly clever DIY builder might pour the concrete up to the top edge of the ribs of the third row, then take a lunch break, and only after that place the next five rows.
Due to a groove and the reinforcing steel bars placed across the layers, the upper part then "hangs" like on a proverbial silk thread. Flip back one page—I had already warned against relying on oversimplified physics.
https://www.instagram.com/11antgmxde/
https://www.linkedin.com/company/bauen-jetzt/
Due to being away on vacation, I’m returning late to my created thread here.
First of all, thank you very much for all your answers and tips, which unfortunately have only made me more uncertain about how to proceed in the best or most ideal way.
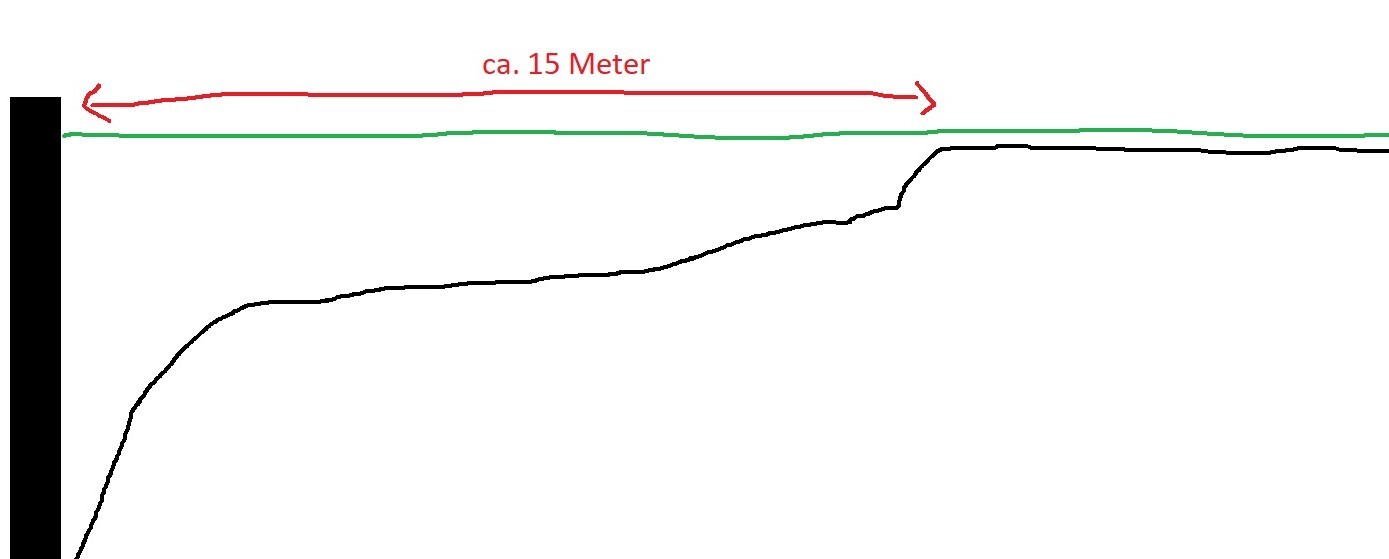
I don’t know if the static load and the slope/filling issues are being overemphasized because of my initial statement, so I quickly created a sketch with Paint to show what needs to be supported.
The thick beam represents the wall at a height of 2 meters (6.5 feet), which currently still exists. Instead of the wall, there is currently a chain-link fence. The black line shows the current property boundary. The green line indicates how the elevation is intended to be adjusted—namely, to the highest black line—because from thereon the property continues relatively flat for another 30 meters (98 feet).
Between the lowest point and the medium-low point, there are three rows of 25 fir trees across the width of the property, which are still to be cut down.
I want to use as much of the property as possible, but it should also be proportional to the effort involved. I do not want to spend my money at this point at all costs, but still want to use as much of the property as reasonably possible.
Hence my question whether I should build the wall 2 meters (6.5 feet) high in order to fill up straight to the property boundary, or maybe build the wall not quite that high and have a slope, which I could stabilize and plant with shrubs to serve as a privacy screen for the lower neighboring property.
Due to the location of the property, it is not possible to use ready-mixed concrete for the entire job. The materials would also have to be transported from the front of the house 40 meters (131 feet) to the back of the house.
I am physically fit and two years ago fully renovated an entire house myself. So, I have the craftsmanship experience and the motivation.
First of all, thank you very much for all your answers and tips, which unfortunately have only made me more uncertain about how to proceed in the best or most ideal way.
I don’t know if the static load and the slope/filling issues are being overemphasized because of my initial statement, so I quickly created a sketch with Paint to show what needs to be supported.
The thick beam represents the wall at a height of 2 meters (6.5 feet), which currently still exists. Instead of the wall, there is currently a chain-link fence. The black line shows the current property boundary. The green line indicates how the elevation is intended to be adjusted—namely, to the highest black line—because from thereon the property continues relatively flat for another 30 meters (98 feet).
Between the lowest point and the medium-low point, there are three rows of 25 fir trees across the width of the property, which are still to be cut down.
I want to use as much of the property as possible, but it should also be proportional to the effort involved. I do not want to spend my money at this point at all costs, but still want to use as much of the property as reasonably possible.
Hence my question whether I should build the wall 2 meters (6.5 feet) high in order to fill up straight to the property boundary, or maybe build the wall not quite that high and have a slope, which I could stabilize and plant with shrubs to serve as a privacy screen for the lower neighboring property.
Due to the location of the property, it is not possible to use ready-mixed concrete for the entire job. The materials would also have to be transported from the front of the house 40 meters (131 feet) to the back of the house.
I am physically fit and two years ago fully renovated an entire house myself. So, I have the craftsmanship experience and the motivation.
Similar topics