
ᐅ Base plaster waterproofing: what was used and who installed it?
Created on: 18 Nov 2020 18:53
I
immermehrI
immermehr18 Nov 2020 18:53Hello everyone,
we are building with a general contractor. Today, I was “surprised” to learn that the base plaster waterproofing is our responsibility.
My landscaper says that the exterior plasterer should do it. He can then guarantee the entire scope of his work. In an emergency, the landscaper can also do it.
The landscaper’s quote (about 2000€) is almost twice as expensive as the plasterer’s (1000€). The landscaper seems a bit more reliable to me.
Question:
- Who did it for you?
- With what material (black bitumen, mineral cement, etc.)?
- What is your experience? Is this work so risky (in terms of warranty) that no one wanted to take it on? I don’t want to take unnecessary risks over 1000€.
Thank you for your answers.
we are building with a general contractor. Today, I was “surprised” to learn that the base plaster waterproofing is our responsibility.
My landscaper says that the exterior plasterer should do it. He can then guarantee the entire scope of his work. In an emergency, the landscaper can also do it.
The landscaper’s quote (about 2000€) is almost twice as expensive as the plasterer’s (1000€). The landscaper seems a bit more reliable to me.
Question:
- Who did it for you?
- With what material (black bitumen, mineral cement, etc.)?
- What is your experience? Is this work so risky (in terms of warranty) that no one wanted to take it on? I don’t want to take unnecessary risks over 1000€.
Thank you for your answers.
F
fach1werk18 Nov 2020 20:19Application is very easy, but now it is actually already too cold for it.
We built with Heinz von Heiden and chose cellar waterproofing from Alsecco, as Heinz von Heiden used their products and we wanted to stay within their system. Alsecco offers two similar suitable products for this purpose. They sell directly, and the product is not intended for laypersons. However, if you ask politely, they will still provide good support.
I applied it in several layers, starting below and extending down over the beveled insulation panels. On the upper side, I applied it slightly above the splash protection edge. The brush is really impossible to clean.
Can’t you leave it open until spring?
Best regards
Gabriele
We built with Heinz von Heiden and chose cellar waterproofing from Alsecco, as Heinz von Heiden used their products and we wanted to stay within their system. Alsecco offers two similar suitable products for this purpose. They sell directly, and the product is not intended for laypersons. However, if you ask politely, they will still provide good support.
I applied it in several layers, starting below and extending down over the beveled insulation panels. On the upper side, I applied it slightly above the splash protection edge. The brush is really impossible to clean.
Can’t you leave it open until spring?
Best regards
Gabriele
Both are required. The plasterer applies the initial waterproofing layer and then the base plaster over it. The landscaper must apply the bitumen coating. Only they can do this, as terrain shaping can only begin afterward.
The plasterer is not aware of the final terrain heights.
The plasterer is not aware of the final terrain heights.
I
immermehr18 Nov 2020 20:55fach1werk schrieb:
Applying it is very easy, but now it’s actually already too cold for it.
We built with Heinz von Heiden and used Kellerdicht from Alsecco, since Heinz von Heiden used their products and we wanted to stay within the system. Alsecco offers two similar suitable products for this purpose. It is sold directly and not intended for DIY beginners. However, if you ask politely, they really provide good support.
I applied it in multiple layers downwards, extending over the beveled insulation boards. On top, I applied it slightly above the splash protection edge. You really cannot get the brush clean afterward.
Can’t you leave it open until spring?
Best regards,
Gabriele Thank you very much for your reply.
Yes, we are also building with Heinz von Heiden.
Do you mean Waterstop Kellerdicht W (I found this with Google’s help)? And you identified correctly, the base render from Alsecco. So based on your recommendation, I would like to use that as well.
According to the datasheet, it should not be applied below 5°C (41°F). 🙁
We prefer not to wait until spring since access is already difficult due to the slope.
What did you pay back then? How much do you need for that? What color is it?
@immermehr
Here, also Heinz von Heiden. My neighbor is a bricklayer, so he knows his stuff. I got Schomburg Aquafina 2k waterproofing slurry, and my neighbor applied it. A bit higher than on the original base. Let’s see if I have a picture....
The dark gray material is the waterproofing slurry.
He advised against using bitumen because you end up looking like a mess ;-) and depending on the facade, you can even damage it if you’re not extremely careful.
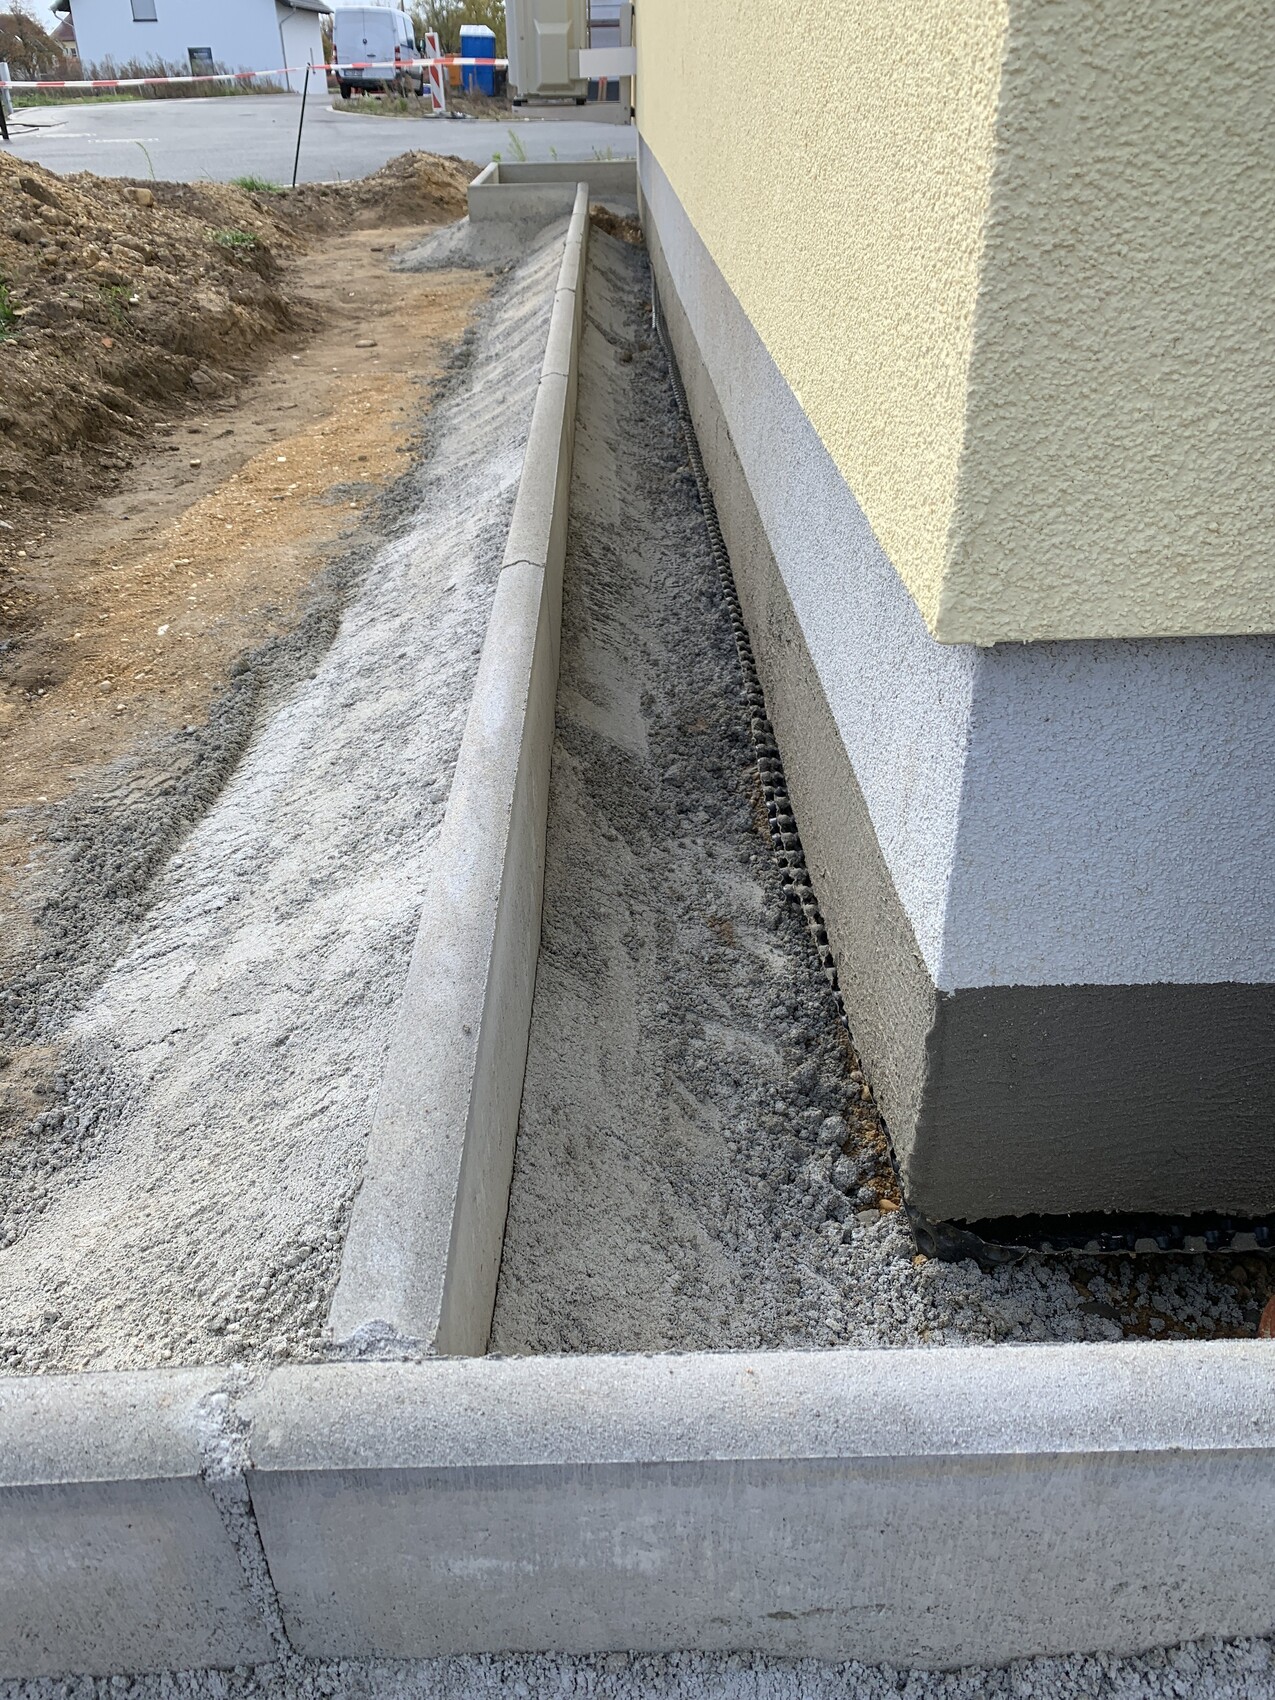
Here, also Heinz von Heiden. My neighbor is a bricklayer, so he knows his stuff. I got Schomburg Aquafina 2k waterproofing slurry, and my neighbor applied it. A bit higher than on the original base. Let’s see if I have a picture....
The dark gray material is the waterproofing slurry.
He advised against using bitumen because you end up looking like a mess ;-) and depending on the facade, you can even damage it if you’re not extremely careful.
We built a solid basement house. Right after the plastering was completed, the landscaper started work at the beginning of September. We were in contact with both the landscaper and the plasterer early on. For the plaster heights, the plasterer first asked us to mark the planned levels on the shell structure. He then plastered about 15 cm (6 inches) below that. When the landscaping work began, the landscaper marked the final height, and the plasterer applied a waterproof slurry slightly above it on the plaster. After that, the landscaper shaped the terrain, partially sealed it with bitumen, and installed dimpled membrane as protection. Once the landscaping was finished, the plasterer painted over the exposed mineral coating with white paint.
Similar topics