
ᐅ Tiling in New Single-Family Home Construction – Experiences
Created on: 26 Jul 2022 22:40
K
KlausBautHausK
KlausBautHaus26 Jul 2022 22:40Hello everyone,
We are currently building and, so far, only the tiling for the bathrooms (ground floor + upper floor) and the utility room has been contracted (through the general contractor). Regarding the other rooms on the ground floor, we have now agreed that we would also like tiles there. Therefore, I wanted to get some tips and ask whether it might be possible to do the tiling ourselves.
A few facts:
- I am more of a beginner when it comes to DIY.
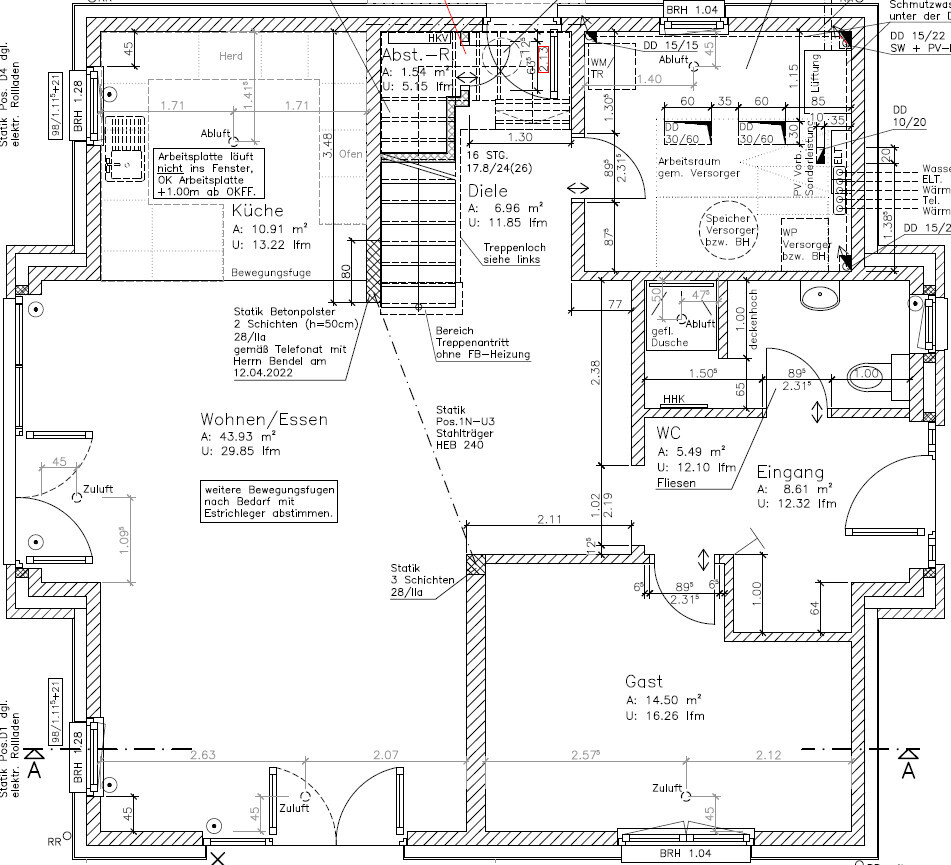
- I have attached the ground floor layout.
- The main entrance is on the right, west is on the left.
- We would prefer oak-look wood effect tiles, currently looking at the size 120cm x 30cm (47 inches x 12 inches).
- Except for the guest bathroom and utility room, the same tiles should go in all rooms, a total area of about 85m² (915 sq ft).
- The stair treads will probably be beech. I hope that does not clash too much with the oak look.
- We have not yet consulted a professional, although my impression from this forum is that expert opinions often vary...
What is currently on our minds:
1. Is it even reasonable for a layperson to take on tiling such a large area? We don’t want the move-in date to be delayed by 3 months...
2. Does anyone have experience with DIY workshops where tiling is taught? I have seen that some hardware stores sometimes offer such courses.
3. Do you have experience with leveling systems that connect adjacent tiles to keep them even? Without such a system, I would suspect that the floor in these large rooms might end up uneven and crooked...
4. Would you lay the tiles sideways (left-right) or lengthwise? We are currently leaning towards sideways:
- Parallel to the expansion joint between the kitchen and dining area, and probably also to a joint that should still be installed between the dining and living areas (not shown on the plan).
- In the direction of the rooms when entering through the front door.
- The sun in the west also shines lower at times, so this would reduce how much the grout lines/edges stand out.
- Parallel to the stair treads.
5. The easiest pattern in my opinion would be a random or staggered bond. It definitely should not look too uniform.
6. Where would be the best place to start?
- Generally practice first in the kitchen or guest room 😀?
- Any other tips?
7. Do you know whether tilers generally mind if you purchase the tiles yourself, or do they prefer to supply the tiles? The reason is that I would like to buy the tiles soon to avoid price increases and delivery delays, and also to use the bank loan before the interest-free period ends.
8. The general contractor will want to know the final floor height at some point, so they can adjust the screed height accordingly and ensure the doors fit properly. What is the best way to handle this? For example, the tile is 8mm (0.3 inches) thick, the adhesive 1mm (0.04 inches), so that would be about 9mm (0.35 inches) total 🙂 That sounds almost too simple.
Thanks in advance, thanks, thanks, thanks
We are currently building and, so far, only the tiling for the bathrooms (ground floor + upper floor) and the utility room has been contracted (through the general contractor). Regarding the other rooms on the ground floor, we have now agreed that we would also like tiles there. Therefore, I wanted to get some tips and ask whether it might be possible to do the tiling ourselves.
A few facts:
- I am more of a beginner when it comes to DIY.
- I have attached the ground floor layout.
- The main entrance is on the right, west is on the left.
- We would prefer oak-look wood effect tiles, currently looking at the size 120cm x 30cm (47 inches x 12 inches).
- Except for the guest bathroom and utility room, the same tiles should go in all rooms, a total area of about 85m² (915 sq ft).
- The stair treads will probably be beech. I hope that does not clash too much with the oak look.
- We have not yet consulted a professional, although my impression from this forum is that expert opinions often vary...
What is currently on our minds:
1. Is it even reasonable for a layperson to take on tiling such a large area? We don’t want the move-in date to be delayed by 3 months...
2. Does anyone have experience with DIY workshops where tiling is taught? I have seen that some hardware stores sometimes offer such courses.
3. Do you have experience with leveling systems that connect adjacent tiles to keep them even? Without such a system, I would suspect that the floor in these large rooms might end up uneven and crooked...
4. Would you lay the tiles sideways (left-right) or lengthwise? We are currently leaning towards sideways:
- Parallel to the expansion joint between the kitchen and dining area, and probably also to a joint that should still be installed between the dining and living areas (not shown on the plan).
- In the direction of the rooms when entering through the front door.
- The sun in the west also shines lower at times, so this would reduce how much the grout lines/edges stand out.
- Parallel to the stair treads.
5. The easiest pattern in my opinion would be a random or staggered bond. It definitely should not look too uniform.
6. Where would be the best place to start?
- Generally practice first in the kitchen or guest room 😀?
- Any other tips?
7. Do you know whether tilers generally mind if you purchase the tiles yourself, or do they prefer to supply the tiles? The reason is that I would like to buy the tiles soon to avoid price increases and delivery delays, and also to use the bank loan before the interest-free period ends.
8. The general contractor will want to know the final floor height at some point, so they can adjust the screed height accordingly and ensure the doors fit properly. What is the best way to handle this? For example, the tile is 8mm (0.3 inches) thick, the adhesive 1mm (0.04 inches), so that would be about 9mm (0.35 inches) total 🙂 That sounds almost too simple.
Thanks in advance, thanks, thanks, thanks
 HausiKlausi26 Jul 2022 23:41
KlausBautHaus schrieb:
- I'm rather a beginner when it comes to DIY.The million-dollar question: What are you expecting? Financial savings? Time savings? The enjoyment of doing something yourself? Tiling is not rocket science, but especially with the 120x30cm (47x12 inches) format, I would strongly advise against attempting it yourself as a complete beginner over 85 square meters (915 square feet). The number of questions you’re asking suggests this. If it’s about money: it’s better to do what’s manageable and suits your skills as a DIYer—gardening, landscaping, plastering, painting...? But essential tasks, where a lack of experience can really cause problems, I wouldn’t recommend tackling right away.
KlausBautHaus schrieb:
The stair treads will probably be beech. I hope that doesn’t clash too much with the oak look. Hmm… beech looks different from oak. In my opinion, it doesn’t really match to have such key elements next to each other, like stairs and flooring.
KlausBautHaus schrieb:
Is it even reasonable for a layperson to take on such a surface? The move shouldn’t be delayed by 3 months because of this… KlausBautHaus schrieb:
I’m rather a beginner when it comes to DIY. I would actually advise against 30/60 tiles. If one tile is even 1 millimeter (0.04 inches) off, the entire row gets ruined along its length. The next row then has to adapt to that misalignment, and so on… You can’t just remove a row the next day and correct it again. Tilers charge extra for tiles of these dimensions because they are harder to install.
I once tiled the ground floor myself, but I’m blessed with two talented right hands. Let’s say I was very forgiving with myself. For a perfectionist, it’s quite painful over a long period of time, even if it was a second-hand house… until you learn to overlook a lot or cover imperfections with plants everywhere…
I also ended up with a slipped disc.
For a small rectangular area in a basement, though, I wouldn’t see any problem for practicing. Still, I would recommend a different type of flooring or have everything done by the tiler who’s also responsible for the kitchen and bathroom.

I would also recommend hiring a professional tiler. In our case, only the bathrooms and the utility room were tiled by the construction company. We decided not to have the rest done by them because of the high price for the tiles and installation. Instead, we found our own tiler, showed him the task, and asked whether he would source the tiles or if we should do it ourselves. He was actually glad not to have to deal with the tile selection process. “No, you go ahead,” he said.
He knew the tile sizes and then recommended the installation pattern. We also included two large expansion joints.
Everything worked out perfectly, and by sourcing the tiles ourselves and hiring our own tiler, we saved a significant amount of money. I can definitely recommend this approach to everyone.
He knew the tile sizes and then recommended the installation pattern. We also included two large expansion joints.
Everything worked out perfectly, and by sourcing the tiles ourselves and hiring our own tiler, we saved a significant amount of money. I can definitely recommend this approach to everyone.
E
Energieverbrat18 Aug 2022 10:20Hi, we have 256m2 (2750 sq ft) of tiles in a new build, plus 56m2 (600 sq ft) of tiles in the garage.
For large-format tiles, you need a leveling system, an angle grinder with variable speed control and constant electronics, a few diamond cutting discs, tile drill bits for sockets, flexible adhesive for large-format tiles (e.g., PCI CM 90). And importantly, a good manual tile cutter. Oh, and before that, vacuum thoroughly and prime the surface.
Tip for grout with wood-look tiles: Kiesel Servoperl Royal offers the most sand/brown tones and is also available as silicone.
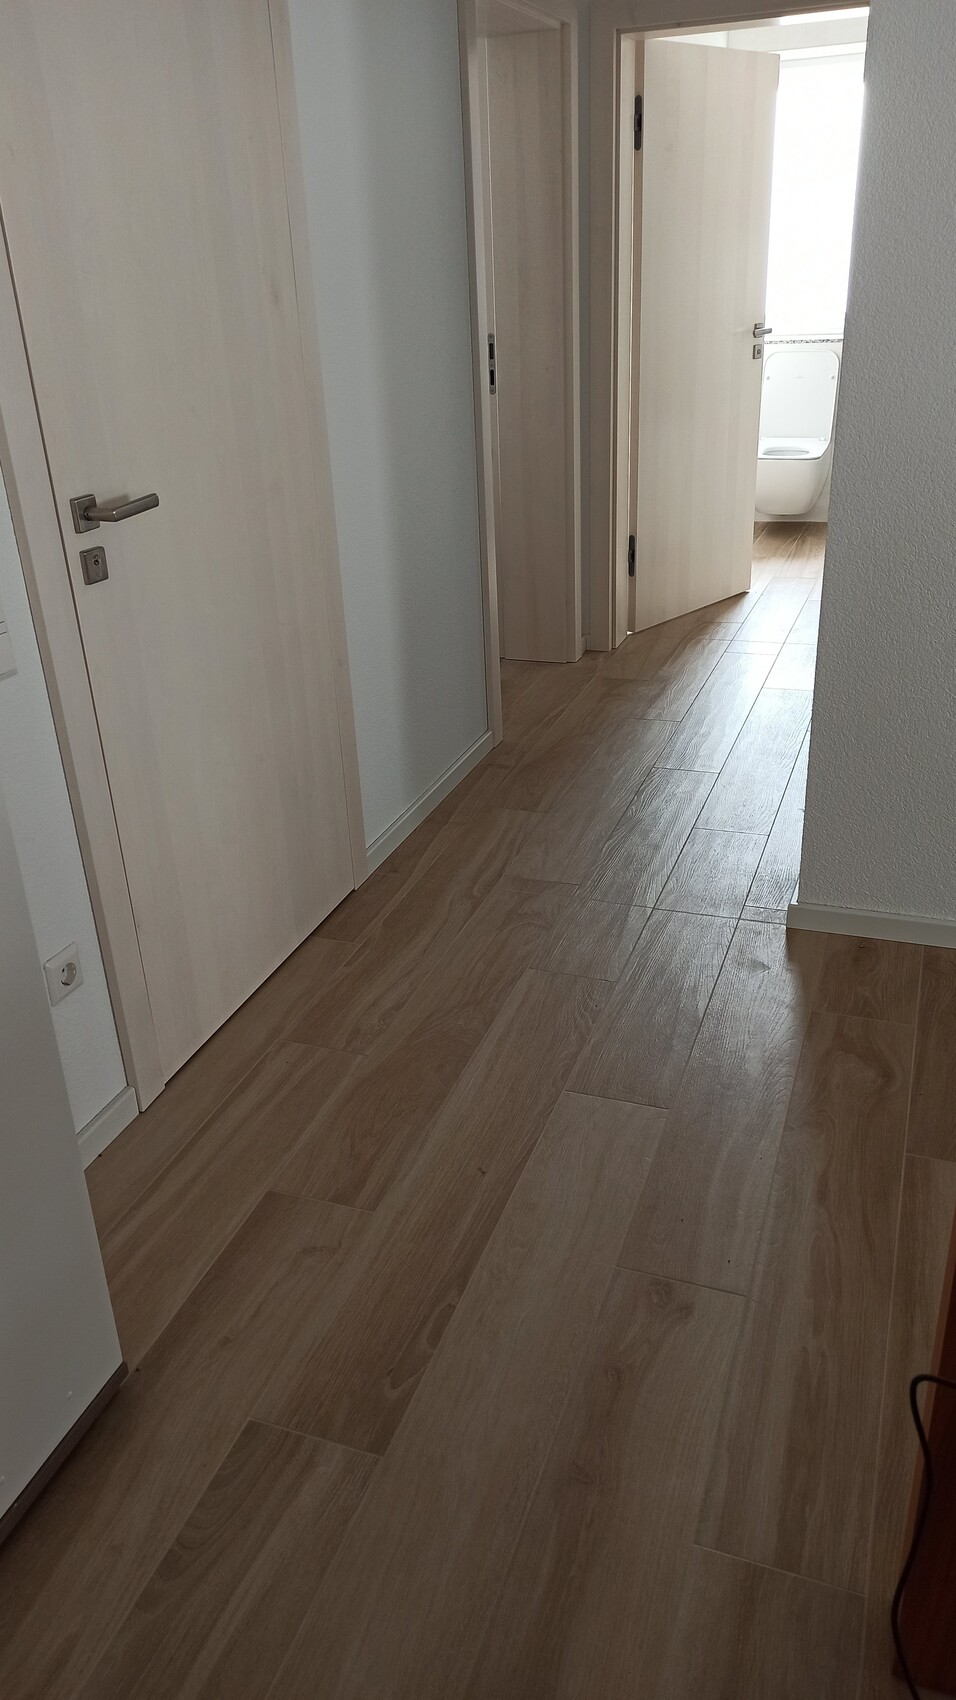
This is how it looks with us.
For large-format tiles, you need a leveling system, an angle grinder with variable speed control and constant electronics, a few diamond cutting discs, tile drill bits for sockets, flexible adhesive for large-format tiles (e.g., PCI CM 90). And importantly, a good manual tile cutter. Oh, and before that, vacuum thoroughly and prime the surface.
Tip for grout with wood-look tiles: Kiesel Servoperl Royal offers the most sand/brown tones and is also available as silicone.
This is how it looks with us.
K
KalterKaffee21 Apr 2023 18:22Energieverbrat schrieb:
For large-format tiles, you need a leveling system.I recently had wood-look tiles installed in the size 120 x 30 cm (47 x 12 inches), and the workmanship was below my expectations. Some tiles protrude by more than 1.3 mm (0.05 inches). I wasn’t sure if my expectations were too high or unrealistic, so I hired an expert to take a look.
He said that they had worked without a leveling system; with one, the results would have been better and these protrusions would not have occurred. He marked about 15 spots where the protrusion was 1.3 mm (0.05 inches) or more.
I informed my tiler about this. He said that a leveling system wouldn’t help much and would also involve additional costs. He also pointed out that the tolerance limit according to DIN is 2 mm (0.08 inches), not 1.3 mm (0.05 inches).
However, my expectations were high because I didn’t realize how "uneven" tiles are allowed to be and still considered top quality. The more warped the tiles are, the more the installer has to compensate. Additionally, a one-third offset pattern with warped tiles accentuates these differences even more.
And you have to expect some tiles to have a protrusion of 1.3 mm (0.05 inches) or 2 mm (0.08 inches). It doesn’t look very nice.
In the basement, I chose cheap tiles (25 Euro/sqm) in 20 x 120 cm (8 x 47 inches), also rectified. The tiler said these were better (less warped) than the high-quality ones that cost almost twice as much. I did not have such extreme protrusions there. These were also laid in a one-third offset pattern.
It seems the technology is still not advanced enough to produce such large tiles without warping.
And expensive does not necessarily mean less warped.
Similar topics