
Hello everyone,
In a few weeks, we will start building our dream house. During the foundation work, a significant amount of soil excavation will be necessary, mainly clay. Attached is a photo of the borehole profile.
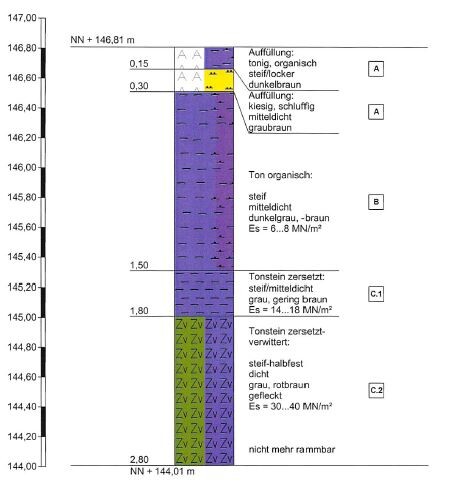
We had the soil tested as part of the geotechnical survey. Almost all components were classified as Z 0 according to LAGA standards. The only exception is the PAH measurement, which was classified as Z1.1 with 1.6 mg/kg (limit for Z 0 = 1 mg/kg).
We have a relatively large plot of about 1400 m² (0.35 acres) and the rear area lies approximately 0.5 m (20 inches) below street level.
The question is whether we need to have the excavated soil disposed of, or if it can be reused on the property, for example, to even out the level in the rear area?
Thank you in advance for your support.
Uwe
In a few weeks, we will start building our dream house. During the foundation work, a significant amount of soil excavation will be necessary, mainly clay. Attached is a photo of the borehole profile.
We had the soil tested as part of the geotechnical survey. Almost all components were classified as Z 0 according to LAGA standards. The only exception is the PAH measurement, which was classified as Z1.1 with 1.6 mg/kg (limit for Z 0 = 1 mg/kg).
We have a relatively large plot of about 1400 m² (0.35 acres) and the rear area lies approximately 0.5 m (20 inches) below street level.
The question is whether we need to have the excavated soil disposed of, or if it can be reused on the property, for example, to even out the level in the rear area?
Thank you in advance for your support.
Uwe
U
Uwe.Hausbaufo7 Jul 2019 08:20Thank you for your answers. If you want to improve the soil with sand and lime, what would be the ratio of clay/sand/lime?
U
Uwe.Hausbaufo7 Jul 2019 08:40I am a complete beginner when it comes to gardening or landscaping. At the moment, I am considering the following for our property.
Due to the previous use and condition, I would like to remove approximately 0.2 m (8 inches) of soil from the remaining area of the site. After that, I plan to reuse the excavated soil from the house foundation on this leveled area with a layer thickness of about 0.3 m (12 inches), and then reinstall the screened topsoil layer with about 0.1 m (4 inches) plus 0.2 m (8 inches) of topsoil on top.
Is this possible? Can I reuse the excavated clay soil in a layer thickness of around 0.3 m (12 inches) without any additional treatment?
Would I need to compact the clay soil using a plate compactor, or should I improve it with sand as described by Tom?
What ratio of clay/sand/lime should I maintain if I want to use the excavated material as a sub-base?
Due to the previous use and condition, I would like to remove approximately 0.2 m (8 inches) of soil from the remaining area of the site. After that, I plan to reuse the excavated soil from the house foundation on this leveled area with a layer thickness of about 0.3 m (12 inches), and then reinstall the screened topsoil layer with about 0.1 m (4 inches) plus 0.2 m (8 inches) of topsoil on top.
Is this possible? Can I reuse the excavated clay soil in a layer thickness of around 0.3 m (12 inches) without any additional treatment?
Would I need to compact the clay soil using a plate compactor, or should I improve it with sand as described by Tom?
What ratio of clay/sand/lime should I maintain if I want to use the excavated material as a sub-base?
H
hampshire7 Jul 2019 14:16Under no circumstances use a vibrating plate compactor. This will ruin your garden before it’s even established.
Ideally, incorporate mature compost, as it combines with clay soil to create a crumbly, nutrient-rich texture. A crumbly structure helps prevent drying out and improves aeration in the soil.
Mix in sand to improve soil permeability – this loosens the soil.
Before the first frost, dig or plow the soil deeply once. This helps prevent further compaction. Soil moisture freezes and “breaks up” the soil, increasing aeration.
I would also add Effective Microorganisms (EM) to the soil right from the start. EM are beneficial microbes that quickly and sustainably enhance soil quality and accelerate improved humus formation.
With good soil, you don’t need a “green thumb” anymore; lawn and plants will largely take care of themselves.
Ideally, incorporate mature compost, as it combines with clay soil to create a crumbly, nutrient-rich texture. A crumbly structure helps prevent drying out and improves aeration in the soil.
Mix in sand to improve soil permeability – this loosens the soil.
Before the first frost, dig or plow the soil deeply once. This helps prevent further compaction. Soil moisture freezes and “breaks up” the soil, increasing aeration.
I would also add Effective Microorganisms (EM) to the soil right from the start. EM are beneficial microbes that quickly and sustainably enhance soil quality and accelerate improved humus formation.
With good soil, you don’t need a “green thumb” anymore; lawn and plants will largely take care of themselves.
We have a fairly heavy, clayey and/or loamy soil, which was spread out on our rural building site using a mini excavator—not large machinery. Hand spreading would have been even better. We moved in September and decided to plant only some bushes and a hornbeam hedge before winter, leaving the lawn for spring. Initially, we let the weeds grow; there was also a lot of rapeseed in the soil since the area had previously been a rapeseed field. The emerging plants were treated once with glyphosate. Clean. After applying glyphosate, wait at least 48 hours before working the soil again. We then broke up the soil with a traditional German hoe (rheinische Feldhacke) and loosened it with a cultivator, aiming for a crumbly texture. Winter. In spring, we cultivated the soil again and seeded the lawn without adding topsoil, only mixing in a little sand here and there.
The lawn needed a starter fertilizer. We applied a mineral wheat fertilizer using a spreader. Then it really took off. We started mowing with a mulching mower. Thanks to the mulching mower, signs of soil life soon appeared—worms and so on. After 18 months under grass, a good humus layer has developed. I repeated the wheat fertilizer applications several times, roughly every six weeks; it contains nitrogen (N), magnesium (Mg), some sulfur, phosphorus, and a bit of potassium. By now, the lawn is fertilized naturally through mulching, so fertilizer use has become more economical. Since clayey soil tends to be slightly acidic, the land received garden lime in March this year. Check YouTube for how to apply it. Use slaked lime, as quicklime is too risky and can easily burn plants.
The hornbeam hedge and all shrubs and bushes have taken well, partly because they also received some fertilizer regularly. K.
The lawn needed a starter fertilizer. We applied a mineral wheat fertilizer using a spreader. Then it really took off. We started mowing with a mulching mower. Thanks to the mulching mower, signs of soil life soon appeared—worms and so on. After 18 months under grass, a good humus layer has developed. I repeated the wheat fertilizer applications several times, roughly every six weeks; it contains nitrogen (N), magnesium (Mg), some sulfur, phosphorus, and a bit of potassium. By now, the lawn is fertilized naturally through mulching, so fertilizer use has become more economical. Since clayey soil tends to be slightly acidic, the land received garden lime in March this year. Check YouTube for how to apply it. Use slaked lime, as quicklime is too risky and can easily burn plants.
The hornbeam hedge and all shrubs and bushes have taken well, partly because they also received some fertilizer regularly. K.
Similar topics