
ᐅ Bathroom and tiles are already installed, but they don’t fit together well.
Created on: 25 Jun 2015 20:37
W
willWohnenW
willWohnen25 Jun 2015 20:37Hello dear forum community,
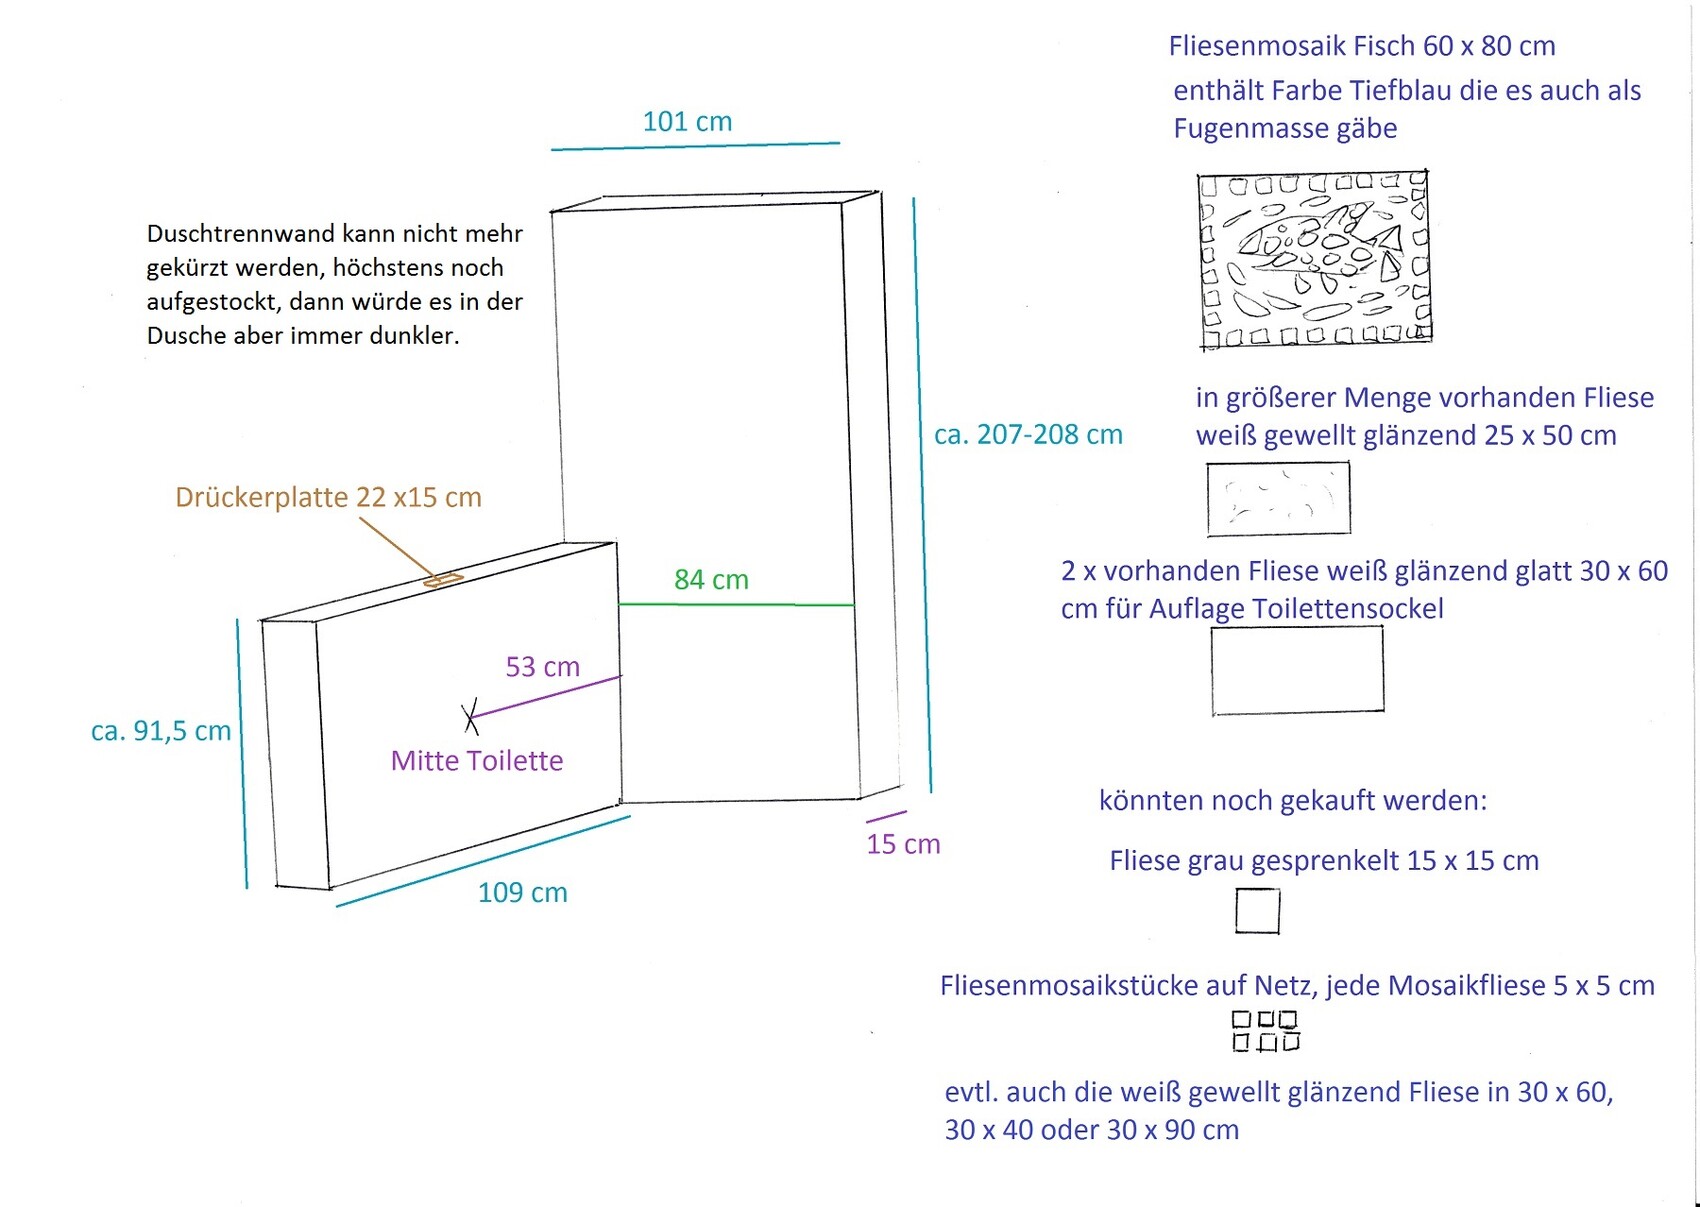
anyone who has time and interest in helping me in detail with my guest bathroom tiling plan is kindly invited. I have made an effort to create a clear sketch.
Background:
The bathroom already has screed, interior plaster, and the toilet wall build-up. I bought the wall tiles some time ago. I would have liked to consult the tiler very early on, but the general contractor did not respond to my inquiries. 🙄
At some point I had to buy tiles to avoid delaying construction progress. The staff at bathroom showrooms and tile stores advised me, but the tiler now sees things differently and considers cutting tiles problematic. Only where the cut edge would be in a silicone joint (where the wall meets the floor or in wall-to-wall corners) is it acceptable; otherwise, the difference to the factory edge would always be visible or could cause chipping.
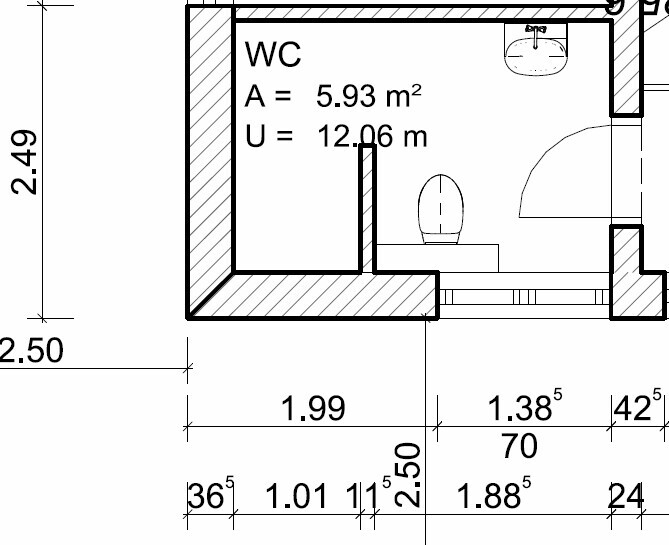
Unfortunately, with the tile format I bought, it is not possible to cover the toilet wall build-up and the shower partition (at least in height) entirely with whole, uncut tiles. 😳 To make it even more complicated, the toilet plumbing is not exactly centered in the wall build-up but shifted by 10mm (0.4 inches), and adding tiles on both sides will increase the asymmetry. I also have a picture mosaic measuring 60cm x 80cm (24in x 31in) (fish 🙂 ), which should be placed on the shower partition wall.
And if that’s not enough of a challenge: It would be great to use a grout color that exactly matches the mosaic tiles — but not on the shower partition itself, to avoid blurring the mosaic image’s contours. 😀
If I can’t think of another solution, I’ll have to buy mosaic tiles to cover the toilet wall build-up and partition differently than the other walls. (I would then use silver-gray grout 😉 while using blue grout for the walls. Too much contrast?)
However, I have some doubts whether the picture mosaic will look good surrounded by small mosaic tiles. It’s hard to imagine concretely. I’d feel more comfortable if, apart from the picture mosaic, only the one white tile in the same format is used consistently. Adding a second tile format or mosaic tile needs to be done carefully — but it could work?
Or should I just let the tiler work with the tiles I already have and accept cut edges at the top of the toilet wall build-up and wherever else necessary?
What I wouldn’t like are many more grout joints (mosaic tiles) or wall joints close to the floor around the toilet. When mopping there, those joints will probably get dirty quickly. 😡
Unfortunately, the tiler has only been on site once and is already hard to reach again. I get the impression he doesn’t want to plan much but rather start working and improvise. I would prefer to have a good plan. 🤨
Looking forward to opinions and ideas. I’ll sleep on it for a couple of nights...
Best regards
willWohnen
anyone who has time and interest in helping me in detail with my guest bathroom tiling plan is kindly invited. I have made an effort to create a clear sketch.
Background:
The bathroom already has screed, interior plaster, and the toilet wall build-up. I bought the wall tiles some time ago. I would have liked to consult the tiler very early on, but the general contractor did not respond to my inquiries. 🙄
At some point I had to buy tiles to avoid delaying construction progress. The staff at bathroom showrooms and tile stores advised me, but the tiler now sees things differently and considers cutting tiles problematic. Only where the cut edge would be in a silicone joint (where the wall meets the floor or in wall-to-wall corners) is it acceptable; otherwise, the difference to the factory edge would always be visible or could cause chipping.
Unfortunately, with the tile format I bought, it is not possible to cover the toilet wall build-up and the shower partition (at least in height) entirely with whole, uncut tiles. 😳 To make it even more complicated, the toilet plumbing is not exactly centered in the wall build-up but shifted by 10mm (0.4 inches), and adding tiles on both sides will increase the asymmetry. I also have a picture mosaic measuring 60cm x 80cm (24in x 31in) (fish 🙂 ), which should be placed on the shower partition wall.
And if that’s not enough of a challenge: It would be great to use a grout color that exactly matches the mosaic tiles — but not on the shower partition itself, to avoid blurring the mosaic image’s contours. 😀
If I can’t think of another solution, I’ll have to buy mosaic tiles to cover the toilet wall build-up and partition differently than the other walls. (I would then use silver-gray grout 😉 while using blue grout for the walls. Too much contrast?)
However, I have some doubts whether the picture mosaic will look good surrounded by small mosaic tiles. It’s hard to imagine concretely. I’d feel more comfortable if, apart from the picture mosaic, only the one white tile in the same format is used consistently. Adding a second tile format or mosaic tile needs to be done carefully — but it could work?
Or should I just let the tiler work with the tiles I already have and accept cut edges at the top of the toilet wall build-up and wherever else necessary?
What I wouldn’t like are many more grout joints (mosaic tiles) or wall joints close to the floor around the toilet. When mopping there, those joints will probably get dirty quickly. 😡
Unfortunately, the tiler has only been on site once and is already hard to reach again. I get the impression he doesn’t want to plan much but rather start working and improvise. I would prefer to have a good plan. 🤨
Looking forward to opinions and ideas. I’ll sleep on it for a couple of nights...
Best regards
willWohnen
This is basically very poorly planned. 😉
I would get more 30x60cm (12x24 inches) tiles and, at the toilet recess, place the toilet as the centerline, then lay 60cm (24 inch) tiles to the left and right, cutting the outer ones as needed. I would start tiling from the top, so at 91.5cm (36 inches). Add an edge, and from the center above, extend the 60cm (24 inch) tiles to the left and right.
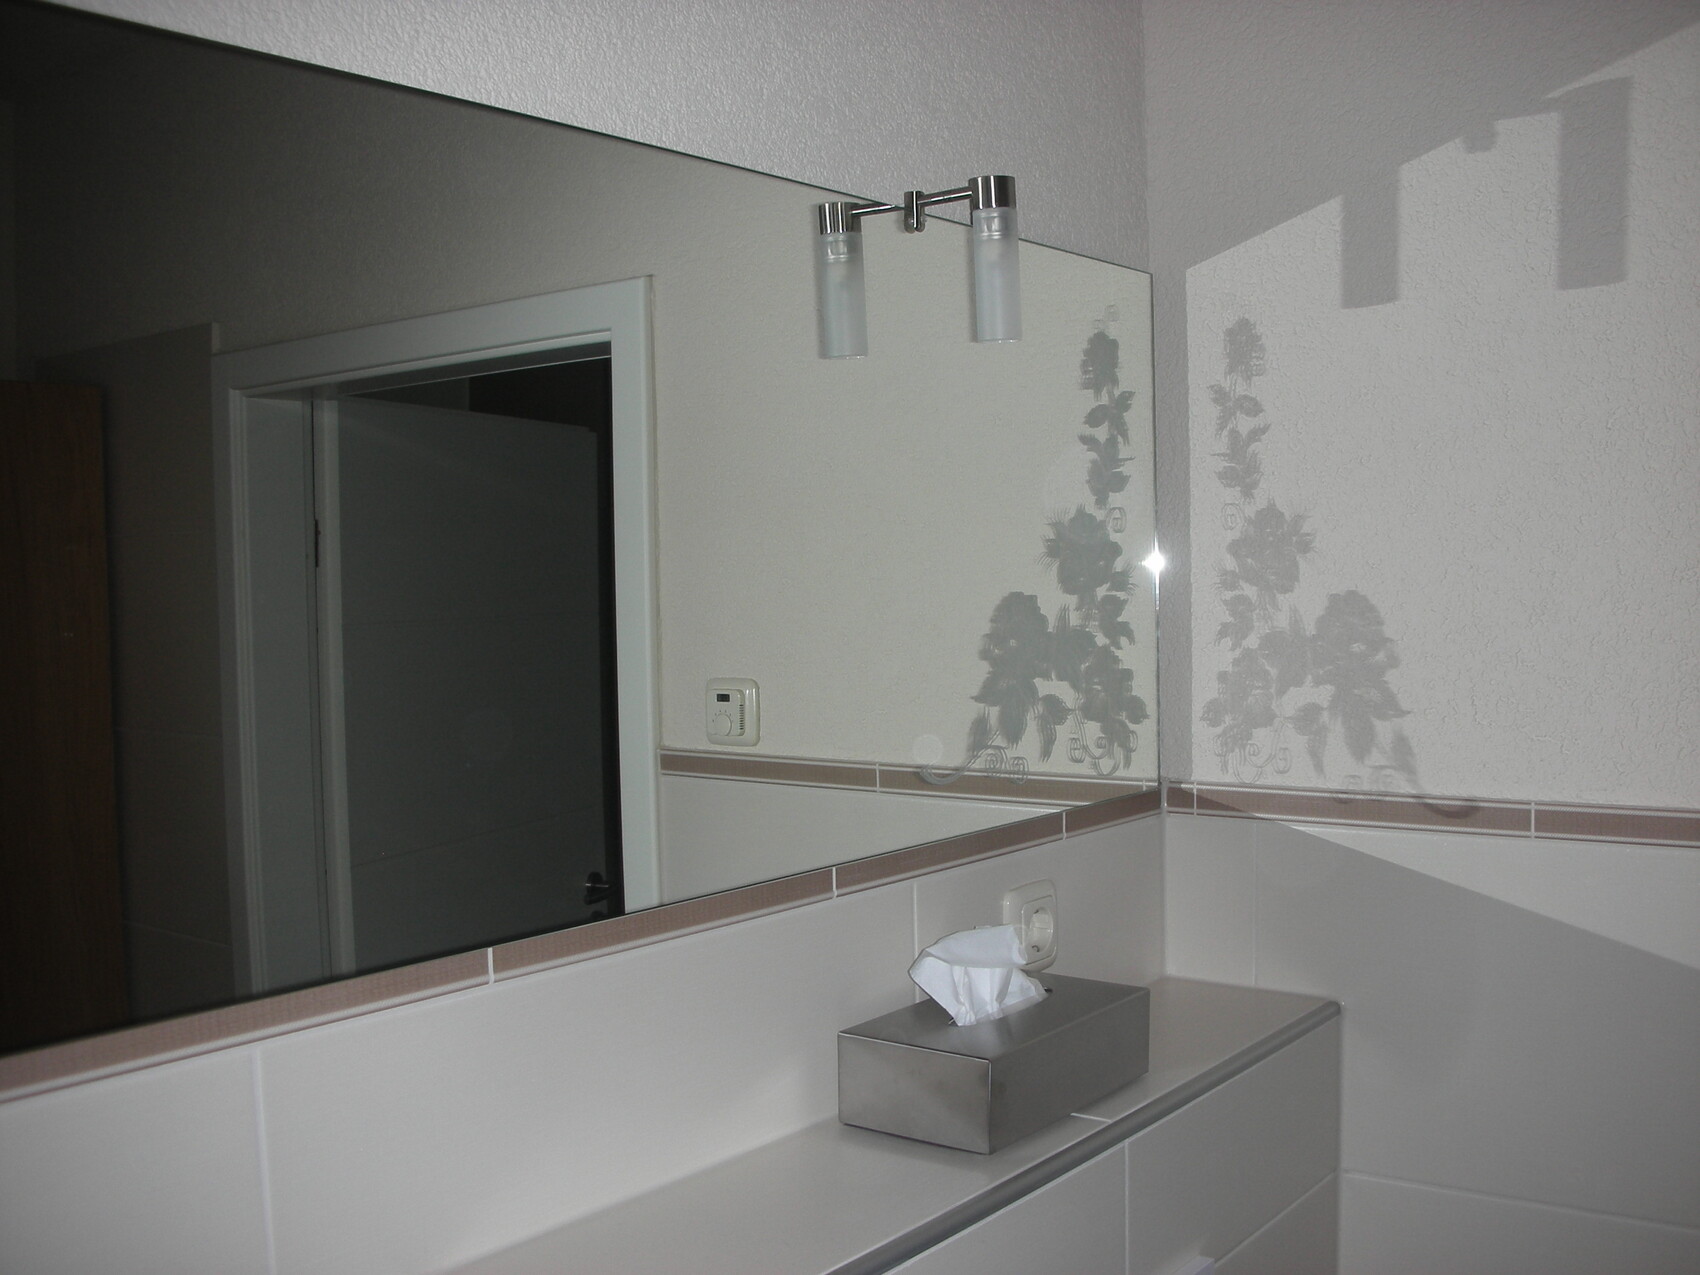
Here you can see the top edge of my toilet tank. However, there is a cut tile at the top.
Then cover the 101cm (40 inch) wall on the right at the same height lines as the toilet tank with 30x60cm (12x24 inch) tiles as well.
Somewhere in between, leave the recess for the mosaic.
Above all, I would recommend visualizing this first with a graphic program, assuming about 3mm (1/8 inch) grout joints.
I would get more 30x60cm (12x24 inches) tiles and, at the toilet recess, place the toilet as the centerline, then lay 60cm (24 inch) tiles to the left and right, cutting the outer ones as needed. I would start tiling from the top, so at 91.5cm (36 inches). Add an edge, and from the center above, extend the 60cm (24 inch) tiles to the left and right.
Here you can see the top edge of my toilet tank. However, there is a cut tile at the top.
Then cover the 101cm (40 inch) wall on the right at the same height lines as the toilet tank with 30x60cm (12x24 inch) tiles as well.
Somewhere in between, leave the recess for the mosaic.
Above all, I would recommend visualizing this first with a graphic program, assuming about 3mm (1/8 inch) grout joints.
W
willWohnen26 Jun 2015 14:33Hello @kbt09. Thanks for the photos, they look good. So it seems you don’t have any issues with the cut tile edges? Do you notice a difference?
Meanwhile, some changes have occurred regarding the conditions. First of all, I was mistaken—the tile I have is 25 x 40 cm (10 x 16 inches), not 25 x 50 cm (10 x 20 inches).
The other tiles we thought were the same just in different formats actually aren’t exactly the same. 🙄 Unlucky.
It’s better not to combine those with the tiles we currently have.
So I would either have to manage with the 25 x 50 cm (10 x 20 inches) tiles or buy contrasting mosaic tiles to go with them. The 5 x 5 cm (2 x 2 inches) mosaic tiles (mats) I saw, I estimate I’d need about 4 square meters (43 square feet), which already adds up to 160 euros extra, well. Still cheaper than buying completely new tiles for the whole bathroom.
A graphic representation, sure, that would be great, but I think anyone who has tried that knows how huge an effort it is. And it’s not necessarily guaranteed to produce the optimal result, or it can only be approximated rather than realistically shown. Have you thought of a specific program, or can you recommend one..?
Meanwhile, some changes have occurred regarding the conditions. First of all, I was mistaken—the tile I have is 25 x 40 cm (10 x 16 inches), not 25 x 50 cm (10 x 20 inches).
The other tiles we thought were the same just in different formats actually aren’t exactly the same. 🙄 Unlucky.
It’s better not to combine those with the tiles we currently have.
So I would either have to manage with the 25 x 50 cm (10 x 20 inches) tiles or buy contrasting mosaic tiles to go with them. The 5 x 5 cm (2 x 2 inches) mosaic tiles (mats) I saw, I estimate I’d need about 4 square meters (43 square feet), which already adds up to 160 euros extra, well. Still cheaper than buying completely new tiles for the whole bathroom.
A graphic representation, sure, that would be great, but I think anyone who has tried that knows how huge an effort it is. And it’s not necessarily guaranteed to produce the optimal result, or it can only be approximated rather than realistically shown. Have you thought of a specific program, or can you recommend one..?

I don’t quite understand the problem.
Edge trim is installed on all the corners anyway. So cutting shouldn’t be an issue, right? That means it shouldn’t be a problem for the toilet either. This is the solution suggested by @kbt09.
Our tiler measured the built-in shower in the main bathroom from above and planned accordingly. The bottom tile is the one that gets cut. This way, the top edges remain straight (which is more visible than the bottom), and the bottom tile needs to be cut anyway because there is a slope toward the drain channel.
All other wall tiles are then aligned based on the joints of these tiles.
Edge trim is installed on all the corners anyway. So cutting shouldn’t be an issue, right? That means it shouldn’t be a problem for the toilet either. This is the solution suggested by @kbt09.
Our tiler measured the built-in shower in the main bathroom from above and planned accordingly. The bottom tile is the one that gets cut. This way, the top edges remain straight (which is more visible than the bottom), and the bottom tile needs to be cut anyway because there is a slope toward the drain channel.
All other wall tiles are then aligned based on the joints of these tiles.
W
willWohnen26 Jun 2015 18:02@Jochen104 Hello.
So, our site manager definitely sees a problem with cut edges, even in places where stainless steel profiles will be installed later, as you rightly mentioned.
From what I understand, there is always grout between the profile and the tile, right? And his point is that the edge embedded in the grout would clearly show that it has been cut. That was also a discussion point in the upstairs bathroom. There, wood-patterned tiles are going to be installed along the edges of the built-in walls, and he said that there could be small surface chips in the design if the tile setter cuts them. I suspect they might have had issues with clients who were unhappy afterwards or had to order extra tiles because of this. In principle, the idea of making things easier for the tile setter and avoiding cuts that could cause problems is good and reasonable in my opinion.
We planned around this in the upstairs bathroom, but in the guest bathroom, with the toilet’s built-in wall, it’s almost impossible to avoid. If you start the whole tile on the left edge, then the toilet would neither be centered in the built-in wall nor centered on a tile or exactly on a grout joint. And I imagine that would look noticeably unattractive. Or am I being too strict? Would you find that acceptable?
There are two other points that bother me a bit.
If you do it the way you describe, you would have a horizontal grout joint running all around the room at about 15cm (6 inches) height. That’s still a height where I’m using the mop head when cleaning the floor. If there was a whole tile at the bottom, that joint would be at 25cm (10 inches) height and less likely to get smeared by me regularly. 🙂 The second point is that, to have the grout joints on the toilet’s built-in wall and the shower partition wall at the same height, the shower partition would need to be laid with whole tiles extended by about 15cm (6 inches) upwards. That’s quite a lot and would be unfortunate, because then hardly any daylight would enter the shower from above, which currently seems quite sufficient during the day without turning on the light.
So, our site manager definitely sees a problem with cut edges, even in places where stainless steel profiles will be installed later, as you rightly mentioned.
From what I understand, there is always grout between the profile and the tile, right? And his point is that the edge embedded in the grout would clearly show that it has been cut. That was also a discussion point in the upstairs bathroom. There, wood-patterned tiles are going to be installed along the edges of the built-in walls, and he said that there could be small surface chips in the design if the tile setter cuts them. I suspect they might have had issues with clients who were unhappy afterwards or had to order extra tiles because of this. In principle, the idea of making things easier for the tile setter and avoiding cuts that could cause problems is good and reasonable in my opinion.
We planned around this in the upstairs bathroom, but in the guest bathroom, with the toilet’s built-in wall, it’s almost impossible to avoid. If you start the whole tile on the left edge, then the toilet would neither be centered in the built-in wall nor centered on a tile or exactly on a grout joint. And I imagine that would look noticeably unattractive. Or am I being too strict? Would you find that acceptable?
There are two other points that bother me a bit.
If you do it the way you describe, you would have a horizontal grout joint running all around the room at about 15cm (6 inches) height. That’s still a height where I’m using the mop head when cleaning the floor. If there was a whole tile at the bottom, that joint would be at 25cm (10 inches) height and less likely to get smeared by me regularly. 🙂 The second point is that, to have the grout joints on the toilet’s built-in wall and the shower partition wall at the same height, the shower partition would need to be laid with whole tiles extended by about 15cm (6 inches) upwards. That’s quite a lot and would be unfortunate, because then hardly any daylight would enter the shower from above, which currently seems quite sufficient during the day without turning on the light.
Similar topics