

Hello dear forum members,
I need your advice regarding rainwater drainage. As someone who hasn’t really dealt with this topic before, I wasn’t fully aware of the issue until now.
At my brother’s new build, we extended the three existing downspouts by 2–3 meters (about 7–10 feet) to connect 15 meters (about 50 feet) of drainage pipe, which we then buried underground on the property. At the end of the drainage pipes, we installed a tank with several openings (approximately 200 liters (50 gallons)) designed to collect some of the rainwater during heavy showers and help with infiltration.
I know this might be considered “shoddy work” in this forum since it wasn’t professionally done, but to keep it short: it works! My brother has never experienced any water pooling, even during heavy rain. The house has exterior dimensions of about 12 x 12 meters (39 x 39 feet) including multiple dormers—so quite a large roof area.
For my new build, we did it the same way. The exterior dimensions here are 8 x 11 meters (26 x 36 feet). Again, there are three downspouts arranged as above. For the first few months, it worked perfectly for me as well. However, during the winter months, problems arose. Water backs up to the downspouts, and puddles form near the buried drainage pipes.
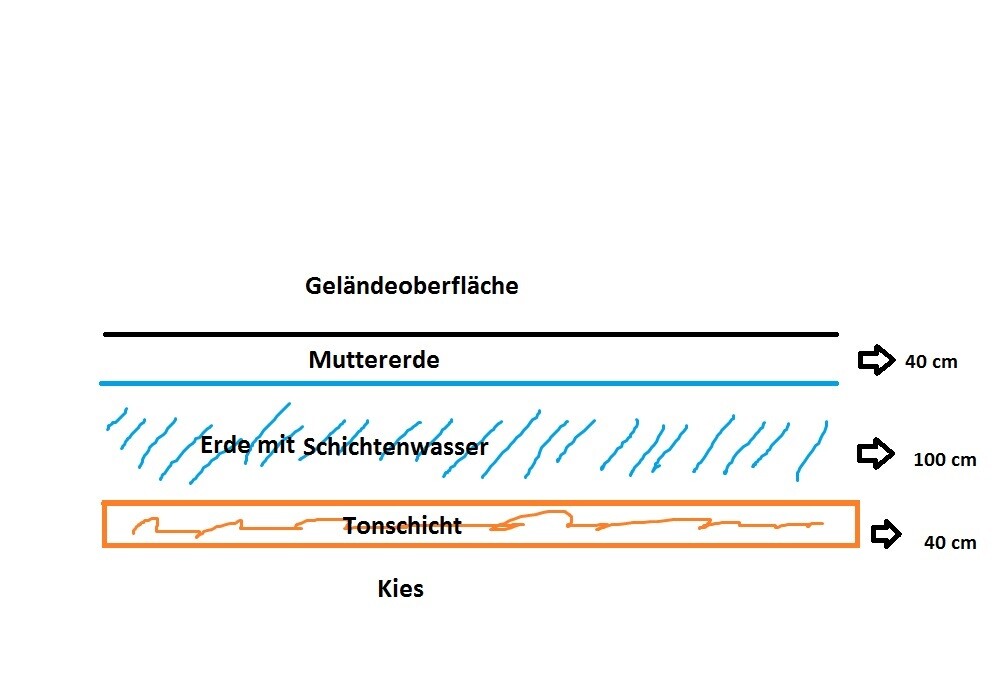
The soil either doesn’t absorb water or does so very slowly. According to the neighbor, this is due to seasonal groundwater layers that occur in winter. Since the property now looks more like a prehistoric swamp, I need to take further action. A local excavator, who has dealt with the same problem at a neighbor’s house a few houses down, explained the situation to me. I tried to illustrate it a bit using Paint (see attached file).
He said I need to penetrate the impermeable layer. Below it is gravel that allows water to infiltrate. That makes sense to me... I will likely have to invest more time and probably money.
Who has experience with this?
Should I distribute several infiltration points across the property to ensure proper drainage?
I have also considered installing a sump (perhaps using concrete rings) where only the roof rainwater collects. There, it could infiltrate through the broken layer... or would the seasonal groundwater also back up there by pushing from below?
I need your advice regarding rainwater drainage. As someone who hasn’t really dealt with this topic before, I wasn’t fully aware of the issue until now.
At my brother’s new build, we extended the three existing downspouts by 2–3 meters (about 7–10 feet) to connect 15 meters (about 50 feet) of drainage pipe, which we then buried underground on the property. At the end of the drainage pipes, we installed a tank with several openings (approximately 200 liters (50 gallons)) designed to collect some of the rainwater during heavy showers and help with infiltration.
I know this might be considered “shoddy work” in this forum since it wasn’t professionally done, but to keep it short: it works! My brother has never experienced any water pooling, even during heavy rain. The house has exterior dimensions of about 12 x 12 meters (39 x 39 feet) including multiple dormers—so quite a large roof area.
For my new build, we did it the same way. The exterior dimensions here are 8 x 11 meters (26 x 36 feet). Again, there are three downspouts arranged as above. For the first few months, it worked perfectly for me as well. However, during the winter months, problems arose. Water backs up to the downspouts, and puddles form near the buried drainage pipes.
The soil either doesn’t absorb water or does so very slowly. According to the neighbor, this is due to seasonal groundwater layers that occur in winter. Since the property now looks more like a prehistoric swamp, I need to take further action. A local excavator, who has dealt with the same problem at a neighbor’s house a few houses down, explained the situation to me. I tried to illustrate it a bit using Paint (see attached file).
He said I need to penetrate the impermeable layer. Below it is gravel that allows water to infiltrate. That makes sense to me... I will likely have to invest more time and probably money.
Who has experience with this?
Should I distribute several infiltration points across the property to ensure proper drainage?
I have also considered installing a sump (perhaps using concrete rings) where only the roof rainwater collects. There, it could infiltrate through the broken layer... or would the seasonal groundwater also back up there by pushing from below?
E
elVincent10 Mar 2016 15:53I’m not a professional in this field either, but I have already looked into the topic of infiltration during our planning. Basically, there are the following options:
- Direct runoff water into a stormwater or combined sewer
- Infiltration with a soakaway trench
- Infiltration with a soakaway pit
With a soakaway pit, a hole about 3.5–4 m (11.5–13 ft) deep is excavated, into which concrete rings are placed. These rings are then filled about 1 m (3.3 ft) high with gravel. The runoff water is directed into this and gradually infiltrates into the ground. If the soil is saturated, you have approximately 0.8 m³ (28 cubic feet) of buffer volume per square meter of shaft with an internal diameter of 1 m (3.3 ft). For example, with a 2.5 m (8.2 ft) shaft, which is below the downpipe connection, that would be about 2 m³ (71 cubic feet) of water that you would first need to fill with your 88 m² (947 sq ft) roof area.
With a soakaway trench, it’s basically done as you described, except the drainage pipe is laid on a bed of gravel or coarse sand, and the collection tank is surrounded by similar material. Here, you can control the buffer volume by adjusting the dimensions of the trench.
As I said, I’m not a professional. This is more or less uncited knowledge that I’m happy to be corrected on.
- Direct runoff water into a stormwater or combined sewer
- Infiltration with a soakaway trench
- Infiltration with a soakaway pit
With a soakaway pit, a hole about 3.5–4 m (11.5–13 ft) deep is excavated, into which concrete rings are placed. These rings are then filled about 1 m (3.3 ft) high with gravel. The runoff water is directed into this and gradually infiltrates into the ground. If the soil is saturated, you have approximately 0.8 m³ (28 cubic feet) of buffer volume per square meter of shaft with an internal diameter of 1 m (3.3 ft). For example, with a 2.5 m (8.2 ft) shaft, which is below the downpipe connection, that would be about 2 m³ (71 cubic feet) of water that you would first need to fill with your 88 m² (947 sq ft) roof area.
With a soakaway trench, it’s basically done as you described, except the drainage pipe is laid on a bed of gravel or coarse sand, and the collection tank is surrounded by similar material. Here, you can control the buffer volume by adjusting the dimensions of the trench.
As I said, I’m not a professional. This is more or less uncited knowledge that I’m happy to be corrected on.
G
Gartenfreund11 Mar 2016 06:27Rainwater can also be collected and used to irrigate the garden when needed. This is a bit challenging, for example, when the water is collected in autumn, a time when watering is usually not necessary. The water can also be slowly allowed to infiltrate the surface over time. This definitely works, as I can confirm from my own experience. However, there is no perched water table at this depth in my area.

As you have noticed, the possibility of water infiltration always depends on the soil conditions.
We also have soil where water drains poorly (according to the soil report and from the puddles behind the house).
However, we are fortunate that we can channel all the surface water into a small stream.
Maybe there is a similar option available for you as well.
We also have soil where water drains poorly (according to the soil report and from the puddles behind the house).
However, we are fortunate that we can channel all the surface water into a small stream.
Maybe there is a similar option available for you as well.
elVincent schrieb:
A soakaway consists of digging a hole about 3.5–4m (11.5–13 feet) deep into which concrete rings are placed. The concrete rings are then backfilled about 1m (3 feet) high with gravel. The runoff water is directed into this, where it gradually soaks away. If the ground becomes saturated, you still have about 0.8 m³ (28 cubic feet) of buffer volume per shaft meter with an internal diameter of 1m (3 feet). For example, for a 2.5m (8 feet) shaft located below the connection of the downpipes, that would mean around 2 m³ (70 cubic feet) of water you would first have to fill with your 88 m² (947 square feet) roof area.
That’s exactly what I meant in my last paragraph... a deep shaft with concrete rings... do you have any idea how much one of those rings costs?
elVincent schrieb:
For a soakaway trench, it’s basically done like you described, except the drainage pipe is also laid on a bed of gravel or coarse sand, and there is also a suitable material around your collection container. Here you can control the buffer volume by adjusting the dimensions of the trench.
We did something similar… first the trench, then gravel and crushed stone – on top of that the drainage pipe – which was then covered again with gravel and crushed stone. Unfortunately, it doesn’t work in winter because the soil gets so saturated by groundwater that essentially no water flows out of the pipe.
Gartenfreund schrieb:
You can also collect the rainwater and use it to water the garden as needed. It’s a bit tricky when the water is collected in autumn, for example, when you normally don’t water. You can also gradually let the water infiltrate over the surface. That definitely works from my own experience. However, I don’t have groundwater at this depth here.Surface infiltration is hardly possible with our groundwater and soil conditions… the water remains standing for days with larger amounts. It hasn’t rained for 5 days now, and the water level in the downpipe has only dropped by about 10–15cm (4–6 inches).
Jochen104 schrieb:
As you’ve noticed, the infiltration capacity always depends on the soil conditions. We also have soil where water infiltrates poorly (according to the soil report and also based on the puddles behind the house).
However, we are lucky that we can direct all the surface water into a small stream nearby. Maybe there’s a similar option available for you.Unfortunately, that’s not possible for us... there is a road at the front and left side of the property, a neighbor on the right, and farmland behind the property.
B
Baustelle201612 Mar 2016 08:04Usually, you need a permit from the local water protection authority to build an infiltration trench. This permit is granted if the sizing of the trench is done by a specialized company. Additionally, a hydrogeological report must be submitted to the authority—which you need anyway for the sizing. Costs: 350-450€ (about 375-510 USD) for the report, around 150€ (about 170 USD) for the permit, and depending on the design, the trench costs approximately 1,500-4,500€ (about 1,600-5,100 USD) including excavation work. If a combination of a concrete ring cistern with gravel bedding is allowed, the cost could be as low as 1,000€ (about 1,140 USD). However, this depends on the required size. In some cases, infiltration tunnels with filtration shafts may also be necessary, pushing the costs toward the higher end. Enjoy… If you live in a drinking water protection area, additional filters may be required; however, usually a sedimentation tank (which can be replaced by the cistern’s function) is sufficient. Best regards
Similar topics