
ᐅ Building a Pool with a Roof – Attaching a Concrete Wall to the Top with a Concrete Lid
Created on: 8 May 2026 06:33
B
BigbuhHello and good morning everyone.
I am currently in the construction phase of a concrete pool measuring 6 x 3.5 m (internal dimensions), which has already been built up with 24 cm (9.5 inch) concrete form blocks, reinforced with rebar, and fully concreted. The total width is therefore about 4 m (13 feet).
The exterior walls are coated with a reactive waterproofing membrane and insulated with 6 cm (2.4 inch) XPS (currently up to about 50 cm (20 inch) below the top edge level). The pit itself (1.8 m (5.9 feet) deep) will be backfilled in the coming days.
Now, the pool is going to have a sliding enclosure attached, and the rails for this need to be mounted on a concrete foundation. Unfortunately, the sliding enclosure was planned at a later stage.
Each rail, located on the left and right sides, has a width of 21 cm (8.3 inch). The total width of the enclosure including the rails is 407 cm (13.35 feet), and the length, including the rail extension (allowing the enclosure to slide behind the pool), is 8.5 m (27.9 feet). Accordingly, part of the rail will be on the concrete form blocks and part will extend beyond them.
Since the total width currently only allows for 4 m (13 feet), there is a shortfall of 3.5 cm (1.4 inch) on both the left and right sides. I was considering attaching concrete pads along the entire length of the enclosure (6.5 m / 21.3 feet) at these edges or creating a strip footing.
My questions are:
What would be the correct technical procedure in this case?
Should I drill into the form blocks at intervals of, for example, 25 cm (10 inch), insert 10 mm (0.4 inch) rebar and bond it, and then construct a strip footing at frost protection depth including a blinding layer?
How should I handle the reactive waterproofing membrane already applied up to the top? I would prefer not to compromise it.
Would it be necessary to separate both structural elements because of the waterproofing membrane and seal the joint at the top with a joint tape/swelling tape or similar? Also, should the strip footing be waterproofed on the sides and top and the insulation continued around the exterior?
Or, since it is only 3.5 cm (1.4 inch) on each side, is a strip footing unnecessary and is there another technical solution?
Topping up the entire width with concrete is unfortunately no longer possible, as it has already been fitted to the existing terrace and garden shed, and skimmers and other components are already installed.
Alternatively:
What would the correct construction be to ensure that the pool and the enclosure are stable and water-tight from the outside?
I am attaching a drawing, as I currently do not have a photo.
I hope my situation is clear and I look forward to any constructive suggestions.
Thank you in advance.
Best regards,
Andi
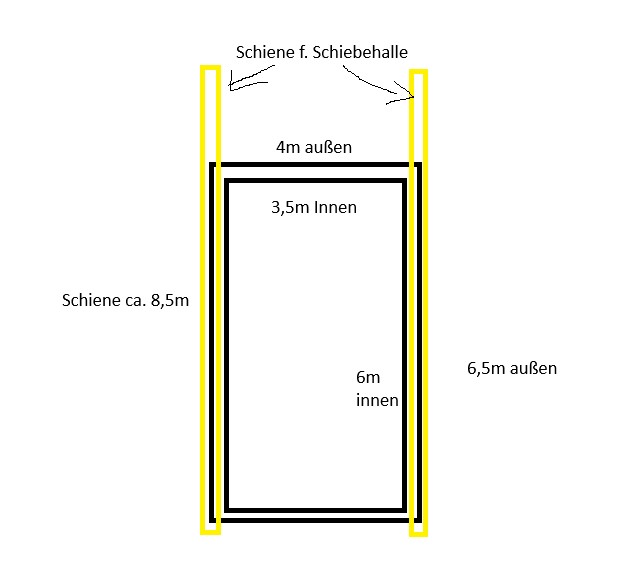
I am currently in the construction phase of a concrete pool measuring 6 x 3.5 m (internal dimensions), which has already been built up with 24 cm (9.5 inch) concrete form blocks, reinforced with rebar, and fully concreted. The total width is therefore about 4 m (13 feet).
The exterior walls are coated with a reactive waterproofing membrane and insulated with 6 cm (2.4 inch) XPS (currently up to about 50 cm (20 inch) below the top edge level). The pit itself (1.8 m (5.9 feet) deep) will be backfilled in the coming days.
Now, the pool is going to have a sliding enclosure attached, and the rails for this need to be mounted on a concrete foundation. Unfortunately, the sliding enclosure was planned at a later stage.
Each rail, located on the left and right sides, has a width of 21 cm (8.3 inch). The total width of the enclosure including the rails is 407 cm (13.35 feet), and the length, including the rail extension (allowing the enclosure to slide behind the pool), is 8.5 m (27.9 feet). Accordingly, part of the rail will be on the concrete form blocks and part will extend beyond them.
Since the total width currently only allows for 4 m (13 feet), there is a shortfall of 3.5 cm (1.4 inch) on both the left and right sides. I was considering attaching concrete pads along the entire length of the enclosure (6.5 m / 21.3 feet) at these edges or creating a strip footing.
My questions are:
What would be the correct technical procedure in this case?
Should I drill into the form blocks at intervals of, for example, 25 cm (10 inch), insert 10 mm (0.4 inch) rebar and bond it, and then construct a strip footing at frost protection depth including a blinding layer?
How should I handle the reactive waterproofing membrane already applied up to the top? I would prefer not to compromise it.
Would it be necessary to separate both structural elements because of the waterproofing membrane and seal the joint at the top with a joint tape/swelling tape or similar? Also, should the strip footing be waterproofed on the sides and top and the insulation continued around the exterior?
Or, since it is only 3.5 cm (1.4 inch) on each side, is a strip footing unnecessary and is there another technical solution?
Topping up the entire width with concrete is unfortunately no longer possible, as it has already been fitted to the existing terrace and garden shed, and skimmers and other components are already installed.
Alternatively:
What would the correct construction be to ensure that the pool and the enclosure are stable and water-tight from the outside?
I am attaching a drawing, as I currently do not have a photo.
I hope my situation is clear and I look forward to any constructive suggestions.
Thank you in advance.
Best regards,
Andi
H
hanghaus20238 May 2026 19:56And what if you attach an L-shaped steel profile on both sides? Preferably hot-dip galvanized.
What advantages would result from that?
I would still need to seal it somehow anyway.
It should also be considered that with the rail, I have to go about 2.3m (7.5 feet) behind the pool, since the roof retracts behind the pool when opened.
I imagine it would be difficult to have a steel profile extend more than 2m (6.5 feet) to the rear?!
I would still need to seal it somehow anyway.
It should also be considered that with the rail, I have to go about 2.3m (7.5 feet) behind the pool, since the roof retracts behind the pool when opened.
I imagine it would be difficult to have a steel profile extend more than 2m (6.5 feet) to the rear?!
H
hanghaus20238 May 2026 22:46Bigbuh schrieb:
What advantages would that bring? You save 12m (39 feet) of foundation.
Hi Andi,
The 3.5cm (1.4 inches) initially seems very small, but structurally it’s exactly the zone where the load from the rail must be properly transferred later on. Simply attaching it there doesn’t work very well because you are combining two components with different settlement behaviors, and that’s exactly where the subtle problems appear that are not visible at the start.
Drilling into the formwork blocks and gluing in 10mm (0.4 inches) rebar can be done, but honestly, with such a narrow connection the composite action is limited. You create more of an attached edge rather than a truly equivalent foundation. Once any movement occurs, it acts right on the joint, and the waterproofing is usually the first element to fail.
The reactive waterproofing makes things more complicated because you are basically already “finished.” I wouldn’t cut it anymore, as it rarely seals properly after that. It’s better to see the new strip footing as a separate element and deliberately separate it, working with a joint instead of desperately trying to connect it. Swelling tape can be used, but only if the joint is clearly defined and not fuzzy.
What is often underestimated: the rails require not only load-bearing capacity but also flatness within a few millimeters over 6.5m (21 feet). If your attached foundation settles even slightly, you will notice it immediately in the hall’s operation.
Thinking purely structurally, it would almost be cleaner to resolve the 4cm (1.6 inches) completely with a continuous topping layer, creating a new level on top instead of patching in sideways. It is more effort but more structurally honest.
The 3.5cm (1.4 inches) initially seems very small, but structurally it’s exactly the zone where the load from the rail must be properly transferred later on. Simply attaching it there doesn’t work very well because you are combining two components with different settlement behaviors, and that’s exactly where the subtle problems appear that are not visible at the start.
Drilling into the formwork blocks and gluing in 10mm (0.4 inches) rebar can be done, but honestly, with such a narrow connection the composite action is limited. You create more of an attached edge rather than a truly equivalent foundation. Once any movement occurs, it acts right on the joint, and the waterproofing is usually the first element to fail.
The reactive waterproofing makes things more complicated because you are basically already “finished.” I wouldn’t cut it anymore, as it rarely seals properly after that. It’s better to see the new strip footing as a separate element and deliberately separate it, working with a joint instead of desperately trying to connect it. Swelling tape can be used, but only if the joint is clearly defined and not fuzzy.
What is often underestimated: the rails require not only load-bearing capacity but also flatness within a few millimeters over 6.5m (21 feet). If your attached foundation settles even slightly, you will notice it immediately in the hall’s operation.
Thinking purely structurally, it would almost be cleaner to resolve the 4cm (1.6 inches) completely with a continuous topping layer, creating a new level on top instead of patching in sideways. It is more effort but more structurally honest.