ᐅ What type of plaster is this? Repairing a breakthrough in Liapor masonry (built in 2019)
Created on: 25 Dec 2025 22:20
P
putzer0819P
putzer081925 Dec 2025 22:20Hello dear experts,
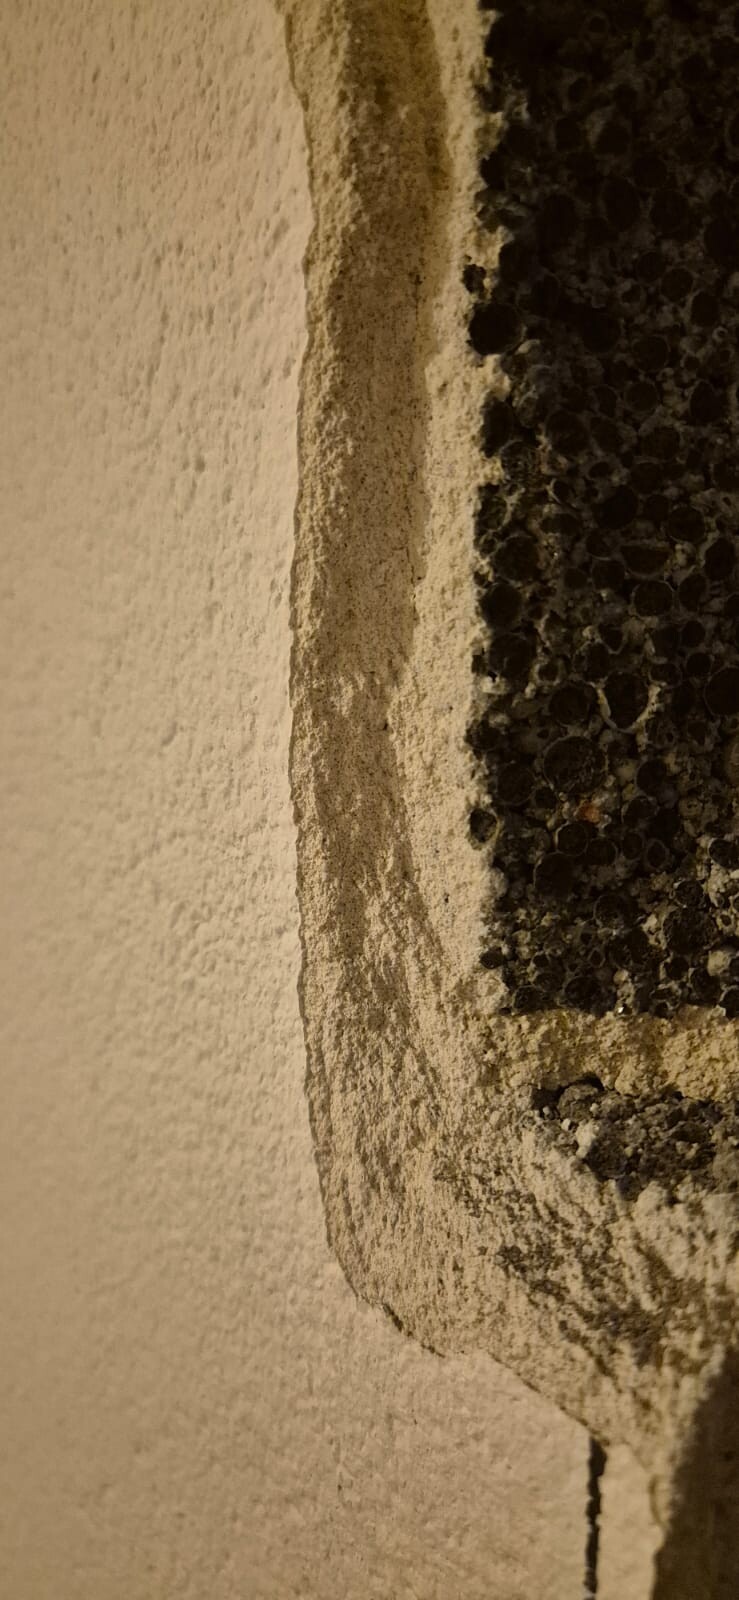
we bought a house built in 2019 and recently made an opening for the children’s room. So far, so good. Of course, now I need to repair the plaster – but the original craftsman seems to be no longer available.
Therefore, my question is:
can someone estimate what type of plaster this is and possibly how it was applied? It is about 12mm (0.5 inches) thick. The masonry is made of Liapor / expanded clay.
Thank you very much for any tips!
Merry Christmas!
Hi,
Built in 2019 fits almost perfectly for lime-gypsum or traditional gypsum machine plaster, 10 to 12mm (0.4 to 0.5 inches) is about right. The fine-pored surface suggests it’s less likely to be lime-cement plaster, which would be rougher and darker. Back then, bonding primer was almost always used on Liapor, otherwise it only sticks out of pure goodwill. When patching, don’t use standard DIY filler from hardware stores, the color difference will probably always be visible later. Use MP75 or something similar, moisten well beforehand, apply smoothly, and only sand after it has set. But first, tap and check whether the old plaster really holds firmly or just seems to, especially around openings where it tends to be hollow. Will it be painted or wallpapered afterward, or do you want to allow some tolerance?
Merry Christmas and good luck!
P
putzer081925 Dec 2025 22:58Hello Nauer,
After that, it should be repainted to match how it was before.
Regarding tapping off: I plan to measure the widest part of the damaged area and then mark a complete line around the opening at that height. Then I will use the multi-tool—it cuts through like butter—and chip out the plaster. That way, I’ll have a straight edge all around.
What grit do you recommend for sanding? 120 grit?
What is the best way to get the new plaster to the same level as the existing plaster? I still have about one millimeter (0.04 inches) of paint left...
When using paint as the finish, the wall does not forgive any imperfections, which usually only becomes noticeable after the second coat. Sanding with 120-grit sandpaper is sufficient; finer grit hardly makes a difference if the surface transition isn’t properly leveled. More important than the grit is achieving a perfectly even surface using a long trowel or straightedge, otherwise you’ll be chasing the last half millimeter later on. I would ignore a millimeter of old paint, as it balances out visually; anything else becomes overly picky. Thoroughly pre-wet the existing plaster, otherwise the new plaster will dry too quickly and leave slight recesses, which will still be visible even after painting.
P
putzer081925 Dec 2025 23:23Alright, then I’ll get started on that after the holidays.
Apparently, the MP75 L is practically the only one left to buy – I assume that will work as well? 🙂
Apparently, the MP75 L is practically the only one left to buy – I assume that will work as well? 🙂
P
putzer08193 Jan 2026 11:22I have now evenly removed the old paint on the outside, so that any visible difference later on will at least be uniform and not patchy.
In some spots, I was able to peel off the paint quite easily, or scrape it off in one strip with the putty knife. That felt a bit odd to me. Is this normal? Or was some kind of fleece layer applied if it comes off in strips like that?
Now I’m going to apply the new paint (I have classic Alpine white)… is that acceptable? Should I apply it directly onto the plaster? Probably with a fairly coarse roller to roughly match the old texture?
Similar topics