ᐅ Should the gap between the roof soffit and the masonry be sealed or left open?
Created on: 23 Aug 2019 08:03
P
Patkia
Good morning,
I hope this is the right subforum.
We have a townhouse with a hip roof (cold roof).
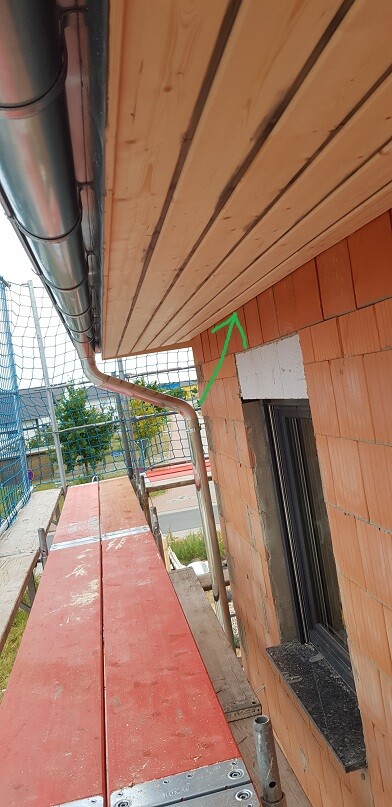
There is an (irregular) gap of about 0.5–1.5 cm (0.2–0.6 inches) between the roof overhang cladding and the masonry.
We are building without external thermal insulation composite system (ETICS).
I have the following questions:
When the masonry is plastered, how is this gap treated? Does the plasterer seal it beforehand and then plaster over it? Or does the plaster simply fill in the gap automatically? Or should it remain open for physical building reasons?
It might be important to mention the reason behind my question. I want to install lighting around the house that only indirectly illuminates the joint between the soffit and the exterior wall. There are different ways to do this, for example:
- 1. Later attaching a strip onto the plaster, with the lighting directed upwards. However, this strip would be quite noticeable.
- 2. Sealing the masonry 2–3 cm (0.8–1.2 inches) below the soffit with, for example, tile adhesive, then attaching the strip and only plastering underneath it. This would hide the lighting strip quite discreetly in the plaster, as it would simply rest on top (and could be painted). But this again raises the issue of the gap between the masonry and the soffit...
So now I would like to know if this gap can/should/must be closed, and how the plasterer would typically handle it when plastering normally.
Unfortunately, I cannot ask the plasterer directly right now, but I need to advance the planning as time is pressing.
Thank you in advance for your help.
I have attached sketches so you can get an idea of what I mean. The red lines indicate the gap in question.

I hope this is the right subforum.
We have a townhouse with a hip roof (cold roof).
There is an (irregular) gap of about 0.5–1.5 cm (0.2–0.6 inches) between the roof overhang cladding and the masonry.
We are building without external thermal insulation composite system (ETICS).
I have the following questions:
When the masonry is plastered, how is this gap treated? Does the plasterer seal it beforehand and then plaster over it? Or does the plaster simply fill in the gap automatically? Or should it remain open for physical building reasons?
It might be important to mention the reason behind my question. I want to install lighting around the house that only indirectly illuminates the joint between the soffit and the exterior wall. There are different ways to do this, for example:
- 1. Later attaching a strip onto the plaster, with the lighting directed upwards. However, this strip would be quite noticeable.
- 2. Sealing the masonry 2–3 cm (0.8–1.2 inches) below the soffit with, for example, tile adhesive, then attaching the strip and only plastering underneath it. This would hide the lighting strip quite discreetly in the plaster, as it would simply rest on top (and could be painted). But this again raises the issue of the gap between the masonry and the soffit...
So now I would like to know if this gap can/should/must be closed, and how the plasterer would typically handle it when plastering normally.
Unfortunately, I cannot ask the plasterer directly right now, but I need to advance the planning as time is pressing.
Thank you in advance for your help.
I have attached sketches so you can get an idea of what I mean. The red lines indicate the gap in question.
I don’t understand the answers! Right now it’s unplastered and you have a gap. After plastering, there will be no gap.
A base plaster with a specific thickness is applied to the brick, followed by the finish coat. So I wonder why you think there would still be a usable gap?
Point 2: Why didn’t you ask the plasterers about this after 5 days already?
A base plaster with a specific thickness is applied to the brick, followed by the finish coat. So I wonder why you think there would still be a usable gap?
Point 2: Why didn’t you ask the plasterers about this after 5 days already?
After plastering, the gap will no longer be visible.
I would recommend discussing the issue with the plasterer regarding the track.
Perhaps it could be a good idea to apply the base coat plaster continuously (to cover the gap and protect the bricks), then install the track directly onto the base coat, and finally apply the finish coat plaster. The finish coat would be recessed around the track. This would be a combination of options A and B.
Please make sure to discuss this with the plasterer. They might also have other suggestions concerning the lighting.

I am aware that the gap would no longer be visible after plastering.
I had already spoken with the plasterer. He suggested option 2.
He recommended sealing the brick in the upper area with tile adhesive, then installing the strip for the lighting, which at the same time serves as a plaster guide. He would plaster against it, and then I would insert the lighting from above, and that would be it.
My intention was to get a second opinion. As far as I can judge, my plasterer does very good work and knows what he’s doing. But a second opinion never hurts, especially when it comes to special cases that could potentially cause damage to the house.
That is basically why I wanted to know exactly what happens with the gap at the top in his proposed option 2. Because it wouldn’t be closed off by the plaster anymore. And I simply don’t know whether this gap is important for ventilation or if it shouldn’t even exist at all.
The combination of options 1 and 2, which you mentioned, @rbommes, wouldn’t be very useful to me, I think. It’s not worth the effort to install the strips beforehand, have him plaster against them, and then possibly have to clean them afterwards, just for the 2mm (0.08 inches) overlap of the strip.
M
Mottenhausen2 Sep 2019 09:47According to the relevant standards (DIN), the roof structure can be either ventilated or sealed. The key is consistency. So, if the roofers installed the underlayment membrane at the ridge as ventilated (meaning it is laid overlapping but not glued), then the ventilation opening at the eaves is usually left open, often protected by a mesh, to allow airflow from bottom to top between the rafters.
I prefer a fully sealed roof. Any gaps tend to become nesting places for spiders and pests, which then dirty the facade up there. The vapor permeability of the underlayment membrane is sufficient for an unused attic space.
I prefer a fully sealed roof. Any gaps tend to become nesting places for spiders and pests, which then dirty the facade up there. The vapor permeability of the underlayment membrane is sufficient for an unused attic space.
Thank you for your replies @Domski and @Mottenhausen.
A few days ago, I was wondering why our neighbors have a vent grille there and we don’t.
We don’t have a ventilation grille, but instead, there are roof vents from Braas installed centrally on the roof underlay membrane.
So, that means to me our roof is sufficiently ventilated, and I can seal the gap?
My plan would be:
- Mix cement plaster, press it into the gap, and smooth it out (clean reflective surface), then possibly paint it.
- Apply a thin layer of plaster on the masonry.
- Attach an aluminum profile to the thin plaster strip with two-component adhesive or mounting glue.
- Have the plasterer apply a finishing coat over it.
- Install my lighting fixtures.
Be happy.
Any objections?
Similar topics