
Hello,
I wanted to give a brief, ongoing report on the renovation of our old farmstead. Basically, a little diary for ourselves – with maybe some added value for others with similar projects. Our budget: 340,000 EUR including everything, plus ongoing expenses covered from salary, for: modernization of the attic, renovation of the ground floor, with a total of around 190 m² (2,045 sq ft) of living space.
I'll start at the beginning:
We searched for a suitable plot for a long time; there are one or two posts about this in the forum. Unfortunately, plots are also scarce in our area. The older new development areas are sold out, except for the less desirable plots; the “new” development area, which was supposed to come to market 1.5 years ago, is still delayed. The city administration can’t agree on a developer [...]
A great plot that we wanted was unfortunately bought by a competitor. Then our wish list changed: we now wanted two adjacent plots (or one large one that could be divided): one for my parents, one for us. We hoped for certain advantages if Grandma and Grandpa later lived next door. Also, we could better support them in old age. The new development area continued to be delayed. My mom’s and sister’s horses fell ill with lead poisoning where they were kept, so my mom wanted to bring the horses to her place. We then searched in the rural zone for a large plot either close to a stable or ideally with permission to build one. Ha! If only it were that simple...
Although, despite good contacts with the building authority and mayor through my parents, we experienced a fairly reasonable approach to public law (though maybe the contacts didn’t even affect that), nothing really fit. In the end, I expanded my search to old farmsteads that, judging by their layout, could be divided into two living units or were already divided in part. That also took time. Sometimes we hesitated too long. I come from the real estate industry and had difficulty committing to a property immediately without a building surveyor (technical due diligence, as we say) involved.
Then we found our current farmstead, and it fit the bill: just under 400 m² (4,306 sq ft) of living space on paper, realistically a bit less; about 6,200 m² (1.53 acres) plot; a small stable/shed in the outdoor area; carport for 5 cars; division into two theoretical semi-detached units possible or partly already done; DSL 200 Mbps available (! – rare in rural areas here); well-developed road access. What was missing was pasture/land for the horses. What didn’t fully meet our wishes was the state road running along the property with a speed limit of 100 km/h (62 mph) and a large number of crows. But – we liked the house immediately; it had that certain something. My mom agreed spontaneously. No negotiation on the purchase price, which hurt our budget, but that way no one else saw the house and the risk of wild bargaining was eliminated. This does happen here now, especially when wealthy people from the south look for vacation homes on the Baltic coast.
To-dos:
Subdivision of the floor plan into two semi-detached units
Decide who gets the fully renovated semi-detached unit and who still has to renovate
Division of purchase price and incidental costs
Pasture
Outdoor facilities, etc.
TBC
Fun fact: We later learned the hairdresser of my husband’s used to live here with her parents. Our village is small.
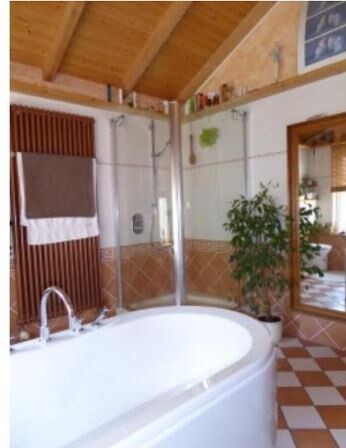
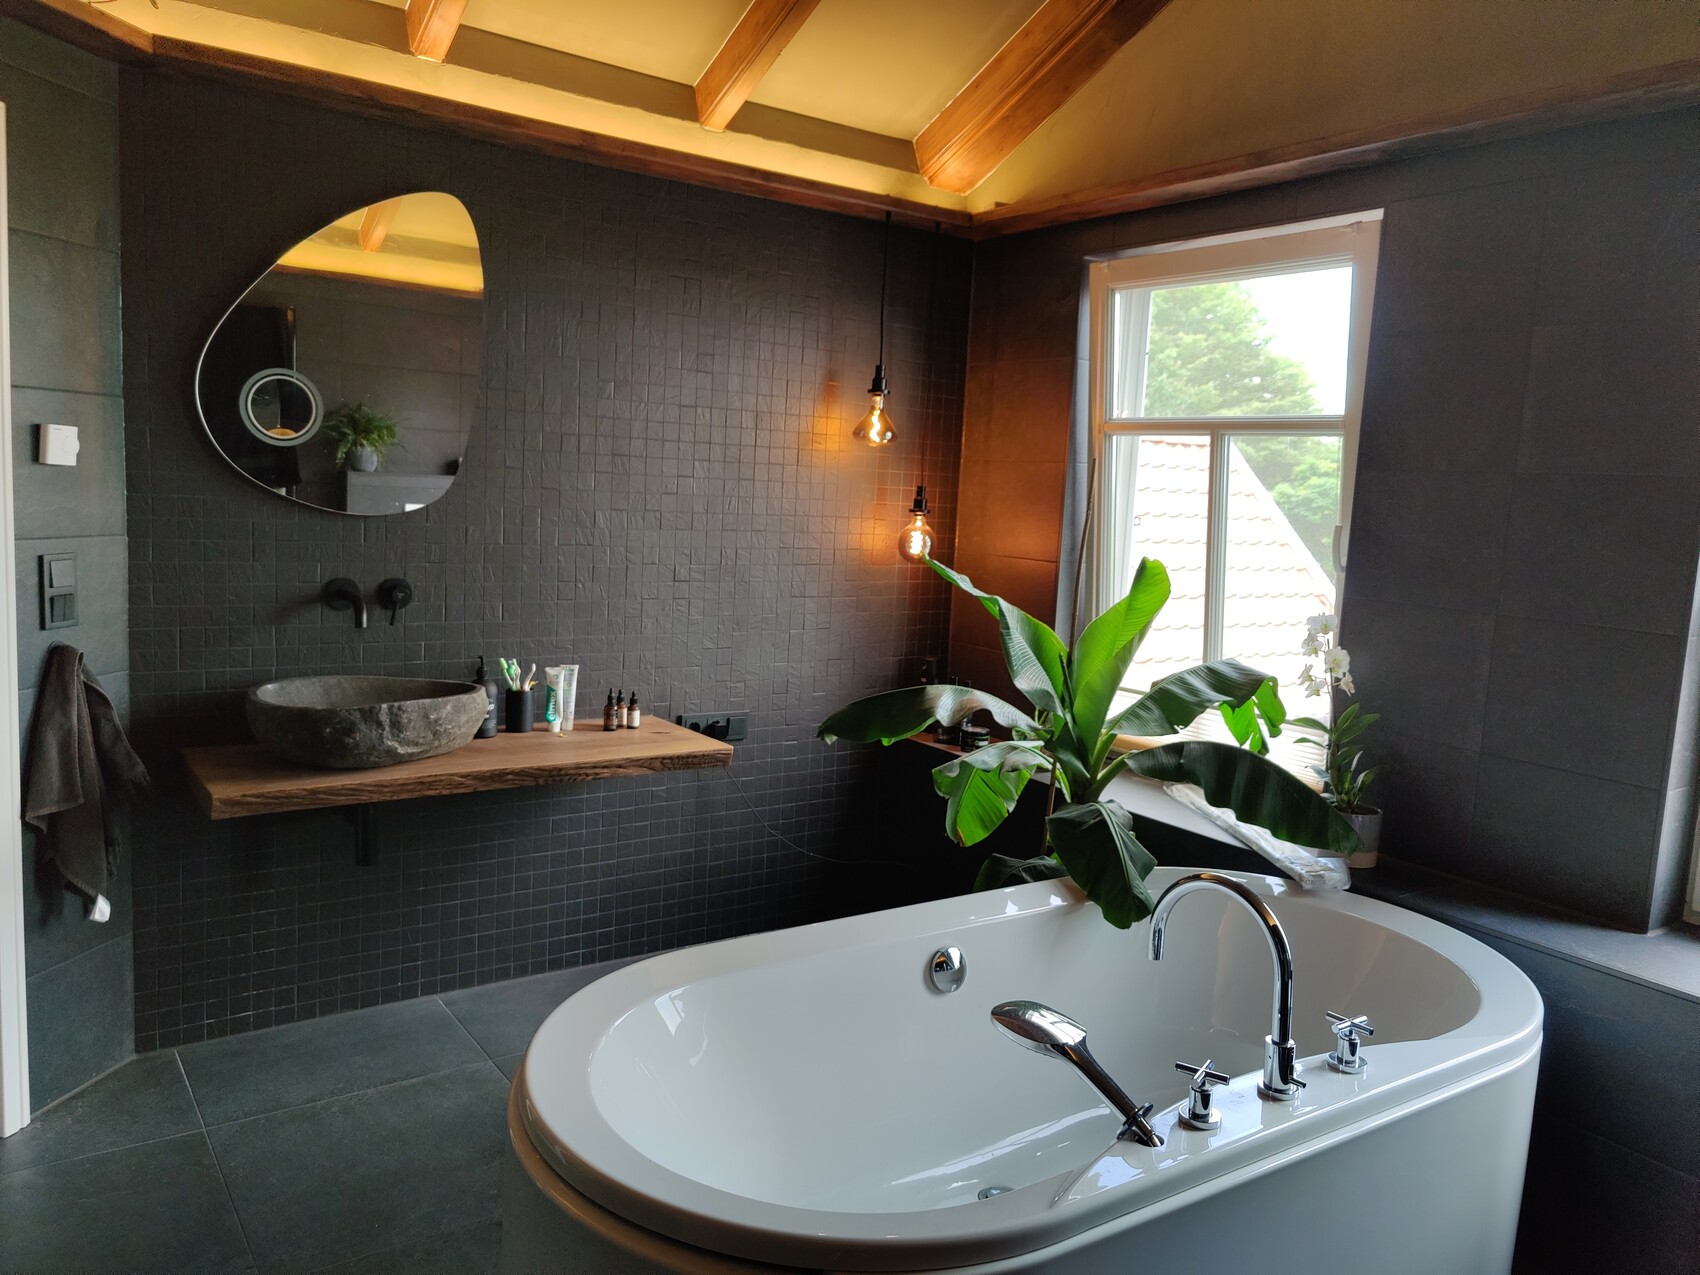
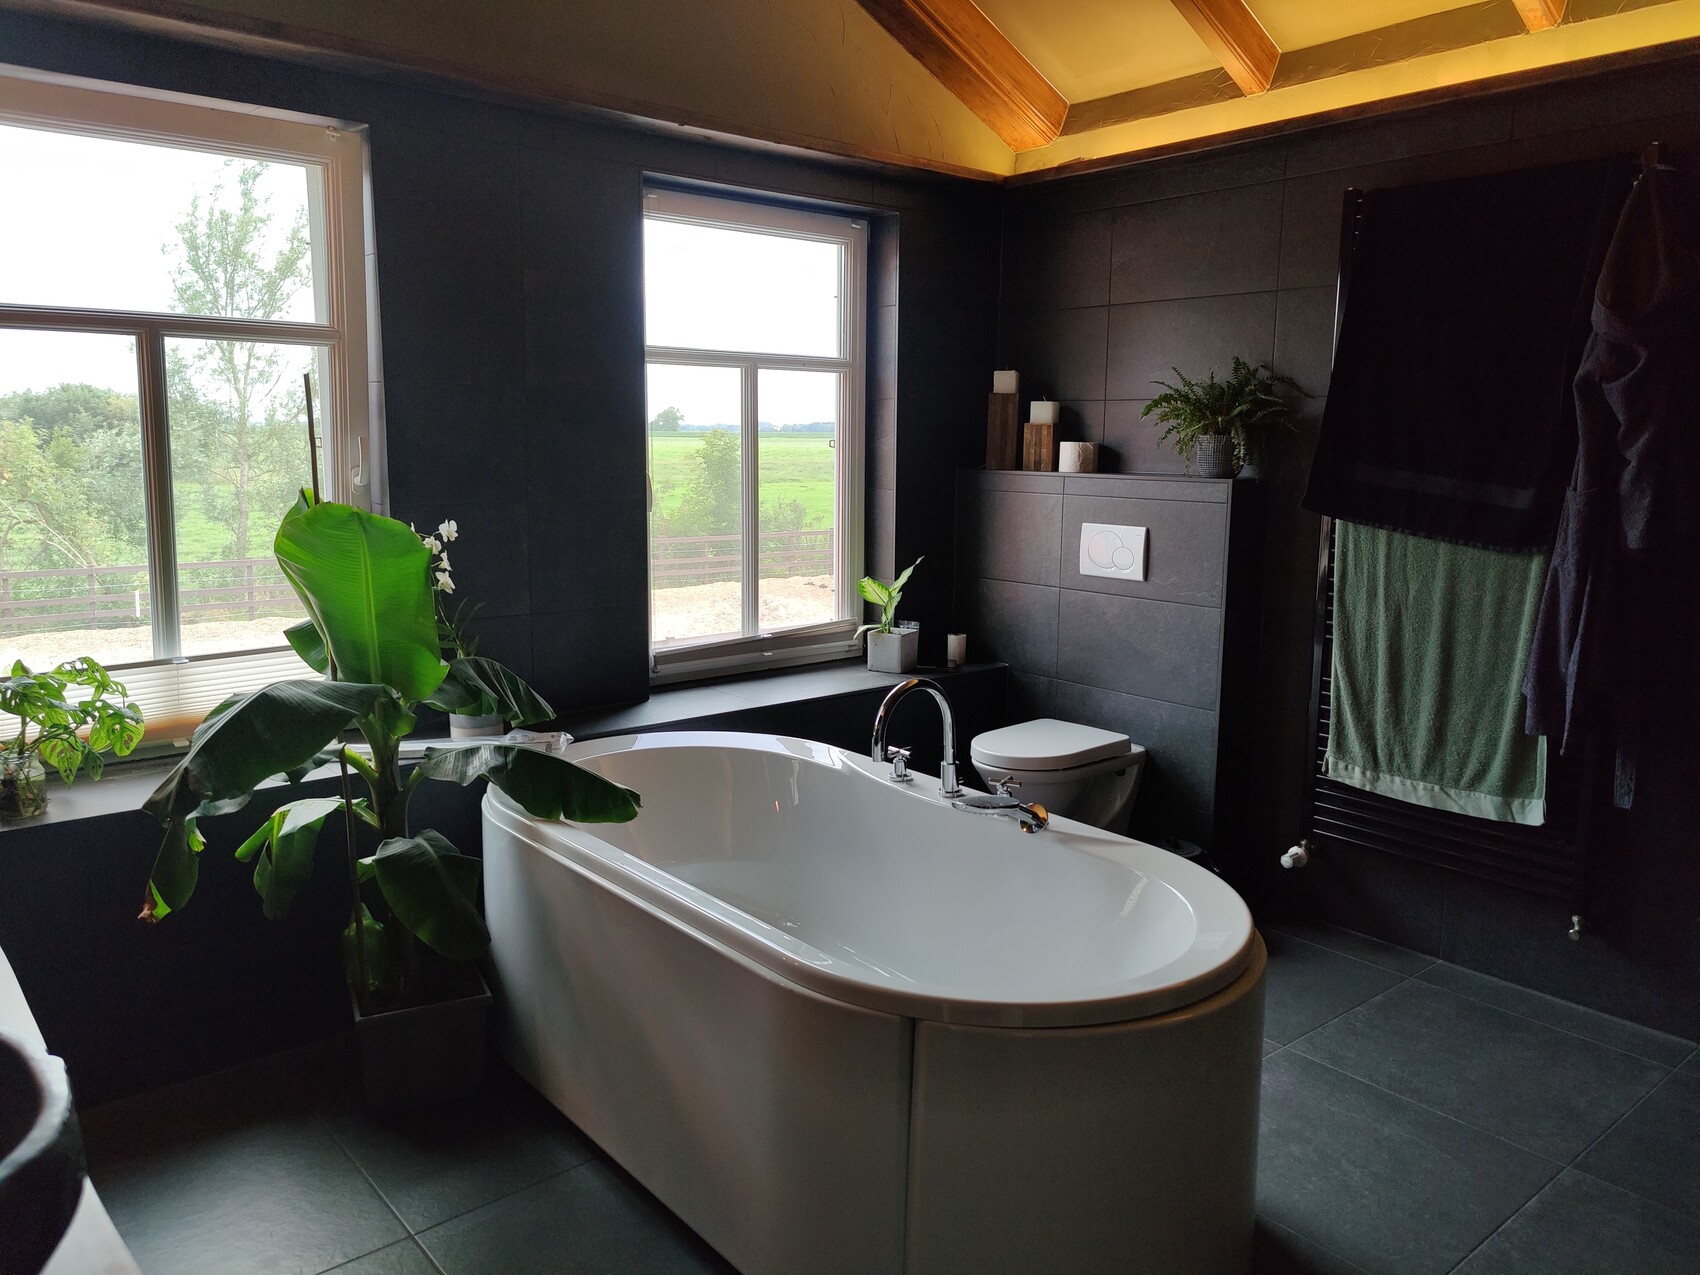
To avoid just having boring text, I’ll pause my monologue and share a few pictures showing the current status. The small photo is from the property listing and shows our bathroom before renovation. The other pictures show the bathroom after the renovation. A white base cabinet is still missing to the right of the washbasin, a large light fixture is yet to be installed, some minor touch-ups are still needed here and there, and our plant wall could use a bit more greenery. In relation to the floor plan, the bathroom is en suite, and right next to the bathroom entrance there is a tiny storage room for cleaning supplies, towels, etc.
By the way, the ceiling looks quite odd in the photos. It is actually a green tone with a grayish tint, without any yellow hue. And yes, we are already living here, and before taking the pictures I neither felt like cleaning nor tidying up.
Cost: roughly 20,000 EUR (definitely NOT on a budget...)
Retained:
Freestanding bathtub
Toilet (new WC seat/lid)
Changed:
Opening to the walk-in closet, which at 1.40 m (4 ft 7 in) was barely accessible and had no natural light
Extended ledge in front of the windows, now you can sit there (once I finally move the plants away…)
New tiles
New shower
New washbasin, mirror
New screed
Ceiling renewed (beams painted, drywall installed)
Done by a contractor:
Tiles and screed
Installation of double Aquapanel boards in the shower area (both for warranty reasons in case of damage, especially due to drywall)
New drain and supply line in the shower area; despite the building being from 2002, they were no longer adequately sized for our new showerhead
DIY:
Demolition work
Dismantling sanitary fixtures
Creating opening to the walk-in closet
Window bench
Rebuilding drywall (new OSB, gypsum boards, reinforced timber frame structure)
Electrical work
Ceiling cladding with gypsum board, sanding and painting beams
Ordered sanitary fixtures online
If we hadn’t done so much ourselves, the bathroom with its current size and features wouldn’t have been financially feasible. Even now, the amount is painful for us and ended up about 5,000 EUR over the planned budget. The most expensive was the tiler at 13,000 EUR, but considering the square meter price, we found it reasonable. I may provide more detailed information on the renovation later if I find time.
Fun fact: Behind the tiles and drywall in the shower, the OSB board was happily rotting away. Poorly sealed, not using moisture-resistant drywall panels (let alone Aquapanel) and then OSB behind it... well.
Fun fact #2: I’m sure the setup in the potential kids’ bathroom (not yet renovated nor really planned) was done the same way [...]

So, last post for today; for more, we need to get back to work first.
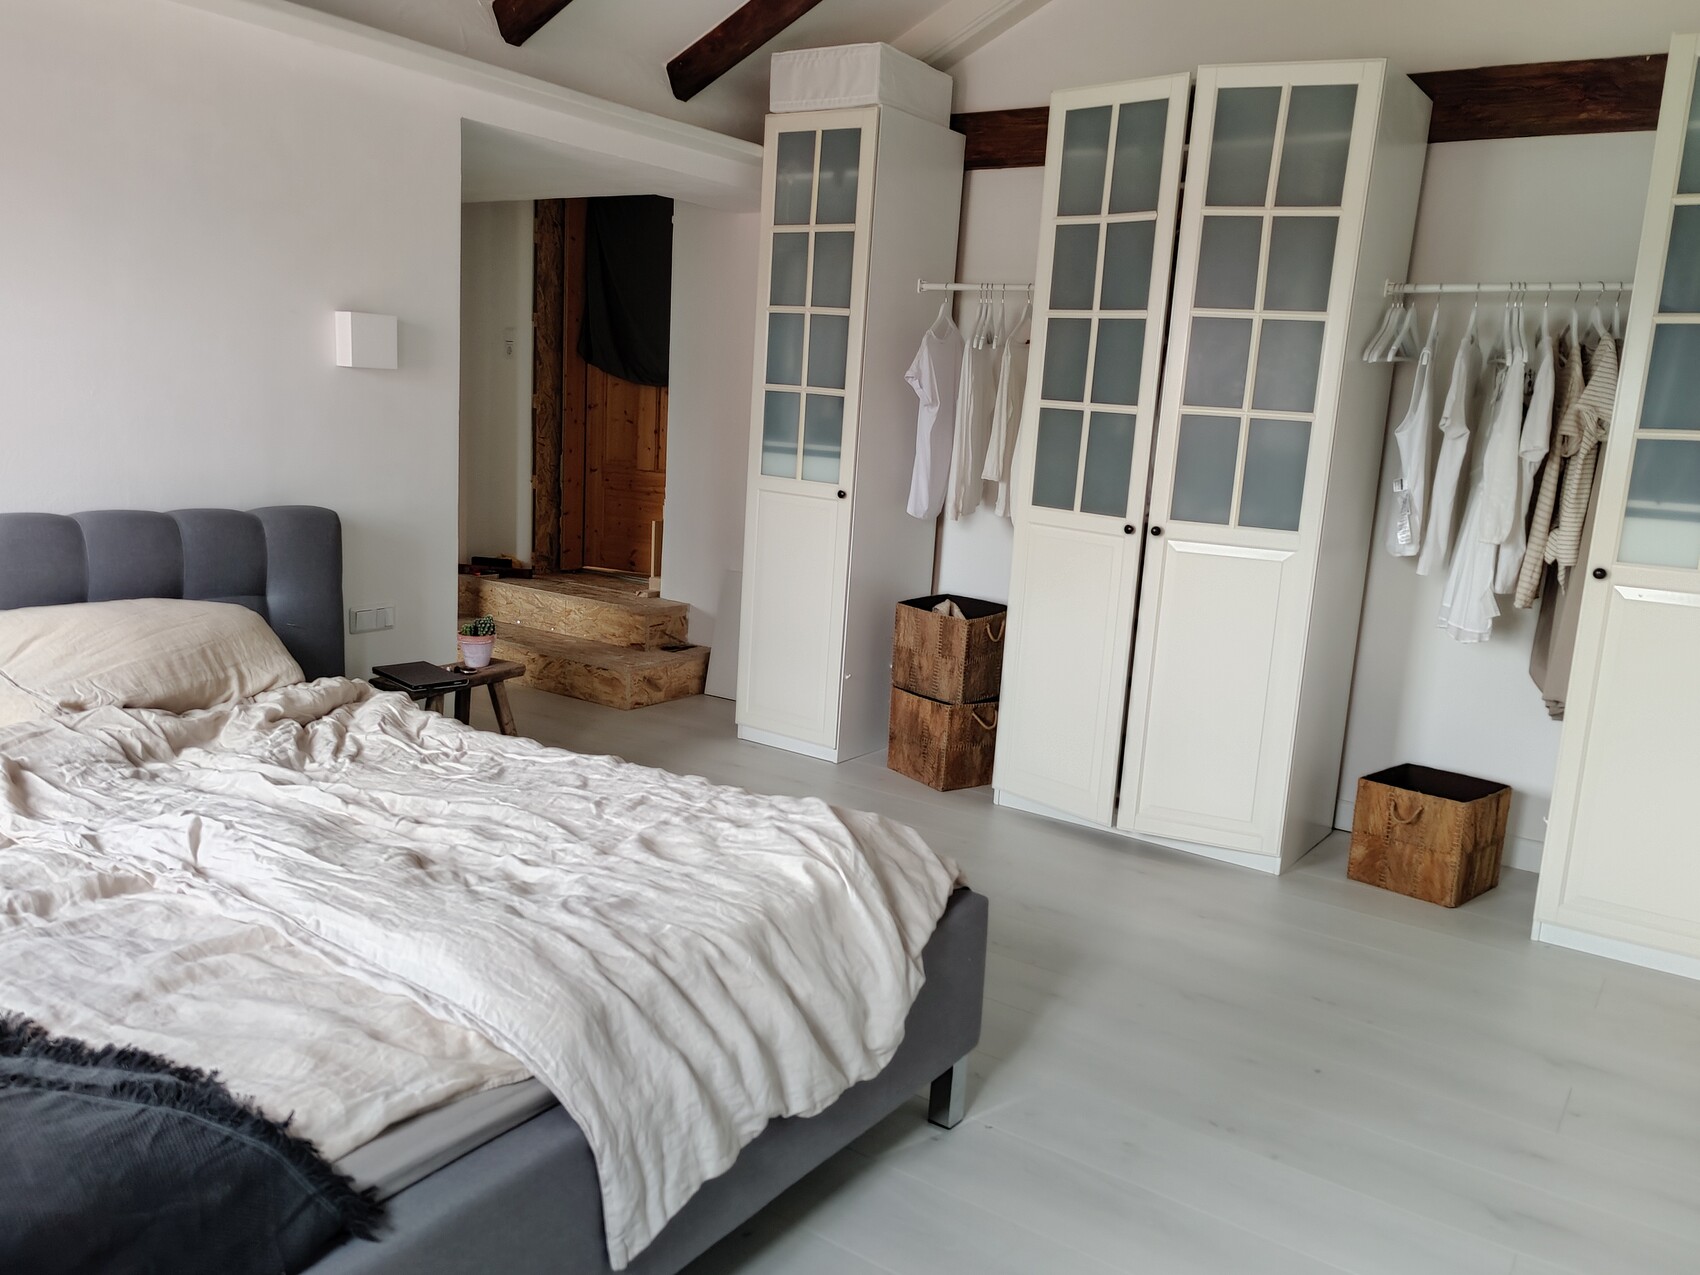
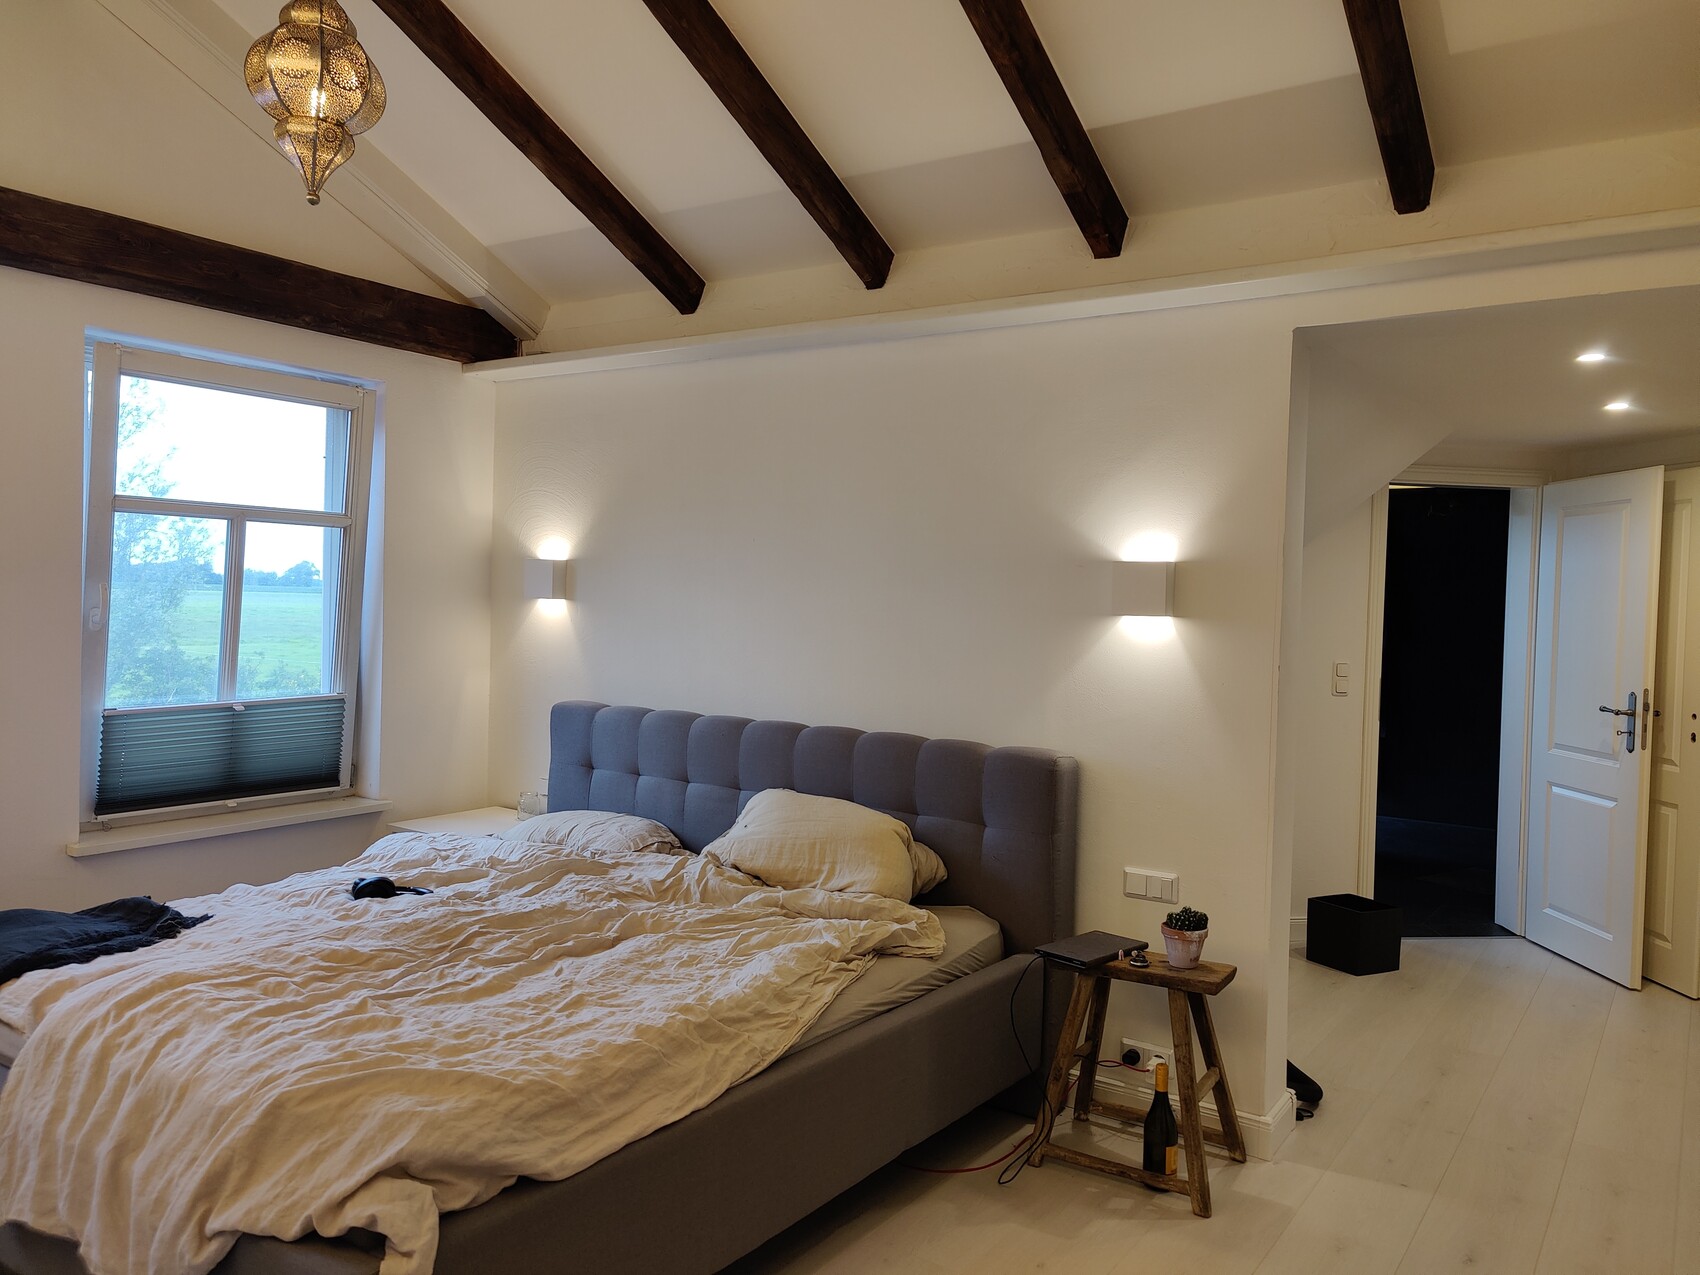
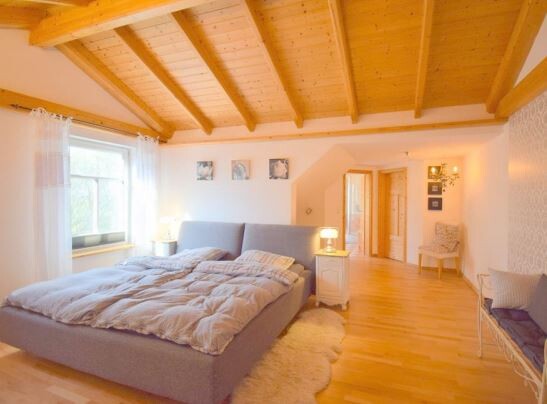
Bedroom: The small picture from the listing (before) and the new picture next to it after the "modernization."
We didn’t do much, and what we did, we probably made harder than it needed to be. There are still finishing touches to be done, and many furniture pieces and decorations are missing. Since I really like the interior style of Paulina Arcklin, this will take a while—“vintage” items aren’t easy to find, especially within my budget. The furniture you see is our old stuff. The bed frame will be replaced eventually, and I’d like to repaint the wardrobe fronts. (But I must not mention this to my husband; for him “They are cream, not white. That doesn’t work” unfortunately is not a valid argument.)
The hallway including the stairs, as you can clearly see, is not yet finished. We first need to install stair coverings, then the new door will be fitted. I’ll write more about the hallway separately. Among other things, the height difference of about 35cm (14 inches) after a new opening had to be overcome with a low ceiling at the same time.
And yes, still not tidied up. Shame on me.
Regarding the floor plan: Separate sleeping area with en suite bathroom, a small storage room next to the bathroom, a large storage room adjacent (door next to the wardrobe). Access to the upstairs hallway via a small landing staircase.
Cost: around 2,000 EUR. Slightly less than the budgeted amount.
Preserved:
Leave the shell construction as is
Changed:
Wall behind the bed extended (otherwise no bedside table would fit)
Partial electrical work renewed
New door installed
Clay paint applied
Ceiling renewed (beams painted, drywall installed)
Floor replaced
Before, there was parquet flooring, quite high quality actually, but it absolutely did not fit my design concept, neither in shape nor color. So out with it. Yes, I admit I’m a bit peculiar here. Otherwise, we might have sanded, painted, and resealed it. Unfortunately, we don’t know what adhesive was used, but credit to the builder, he really went all out. We couldn’t remove the parquet with either a carpet stripper or a crowbar. In painstaking, detailed work, we cut the parquet into very small sections with a circular saw and then chipped it out with chisels and a hammer. Real manual labor. I’m sure I spent more than 20 hours removing the parquet. Now we have white laminate. Well.
Then there’s the issue with the clay paint on the ceiling. There is indirect lighting pointing towards the ceiling/beams—and no matter how many times we painted, it never covered 100% evenly, despite careful priming. When the indirect lighting is off, it looks perfect. With it on... well, many say they wouldn’t notice, but we know exactly where to look. After the fifth coat, we had enough. We didn’t want advice anymore; we just wanted to stop. This is definitely a point where others might show more enthusiasm than we did.
The sanding work also dragged on because I wanted these beams to look “vintage,” matching the rest. We used an angle grinder to smooth the straight edges and sanded off all the oil so we could stain them. This area needs the most follow-up: removing white paint splatters that we missed, touching up small spots with stain, and whitening the silicone where the stain ran in. In retrospect, I would have just had them stained and applied a dark glaze—the visual difference is not significant and it would have saved a lot of sanding.
@Pinky0301: Thank you very much. The “younger” generation is usually quite enthusiastic. For the “older,” the bathroom often feels too dark. I like the cozy cave feeling. To complement it, rainforest sounds play when you enter.
@Tamstar Indeed, the image seems to have gotten lost along the way. I have re-uploaded it here.
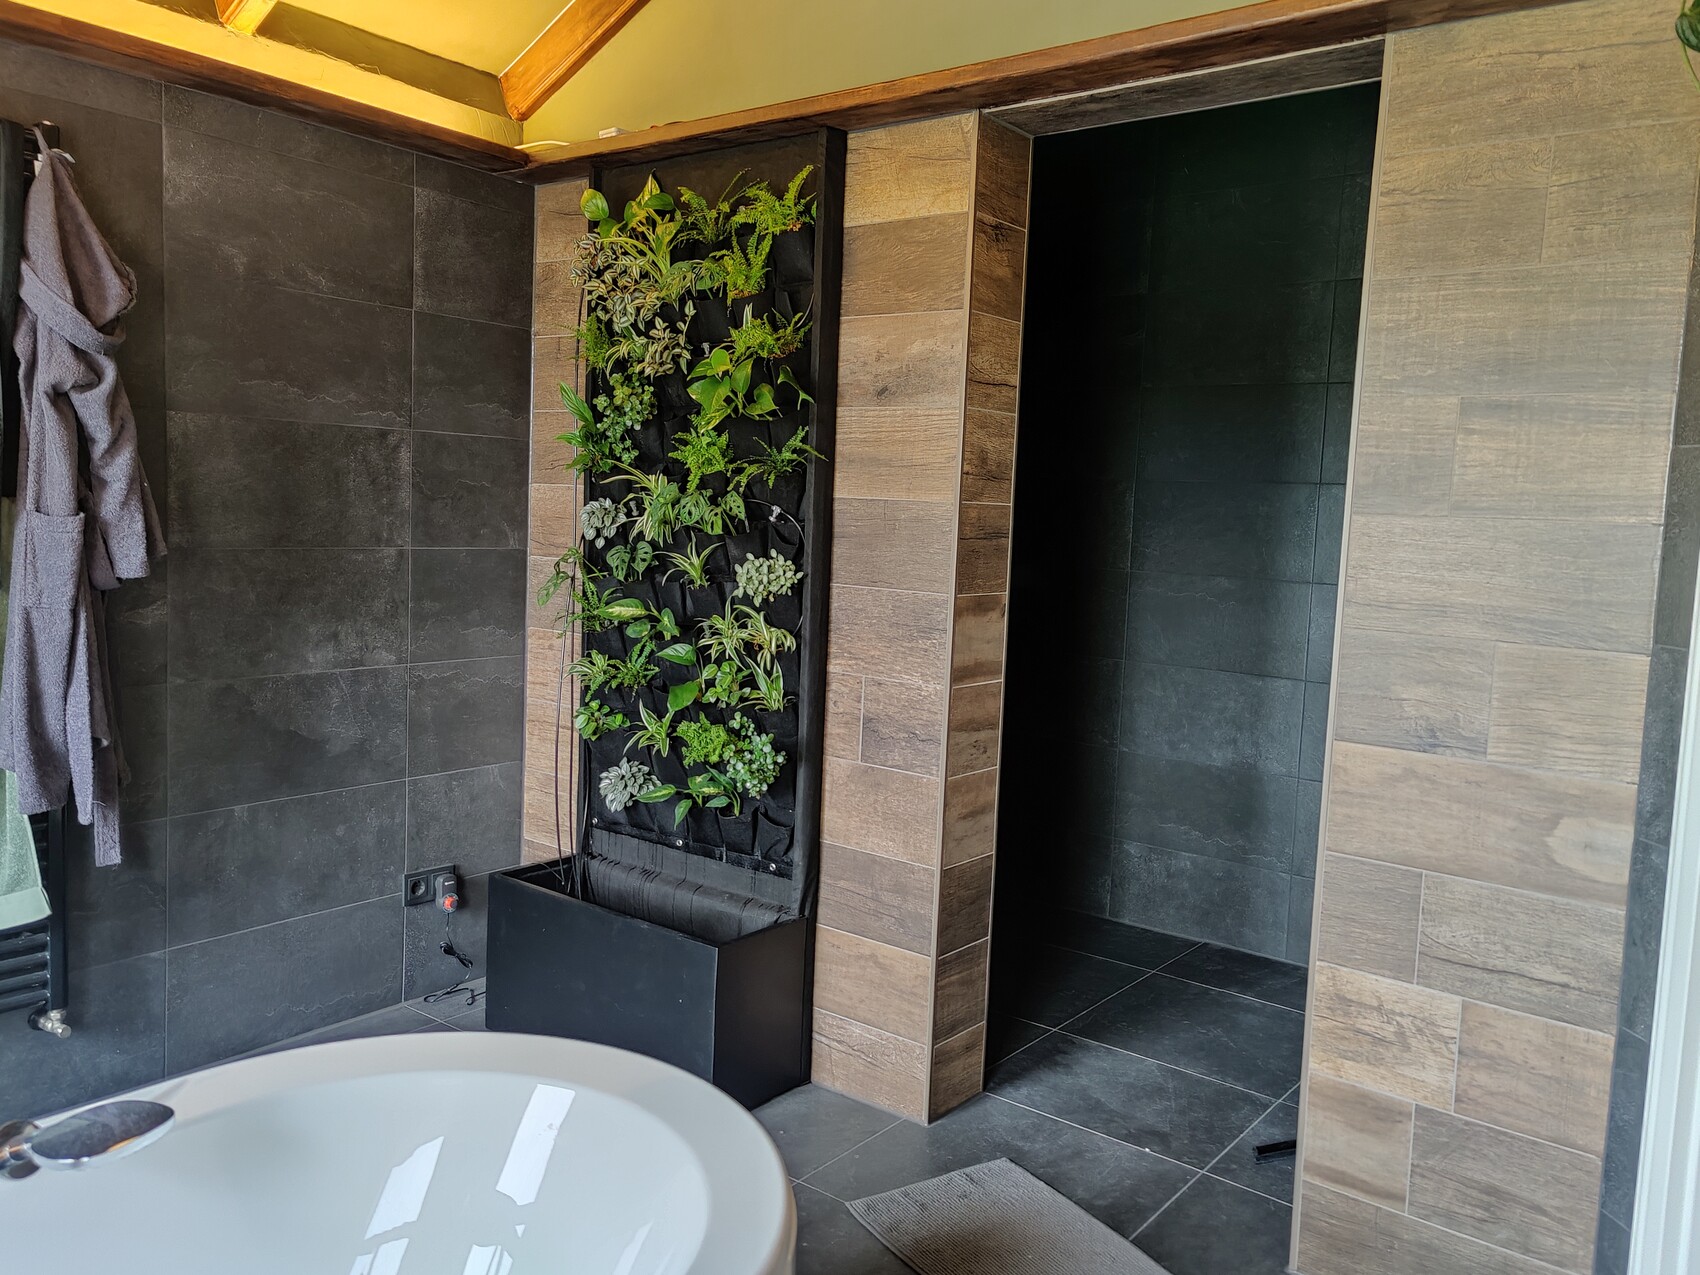
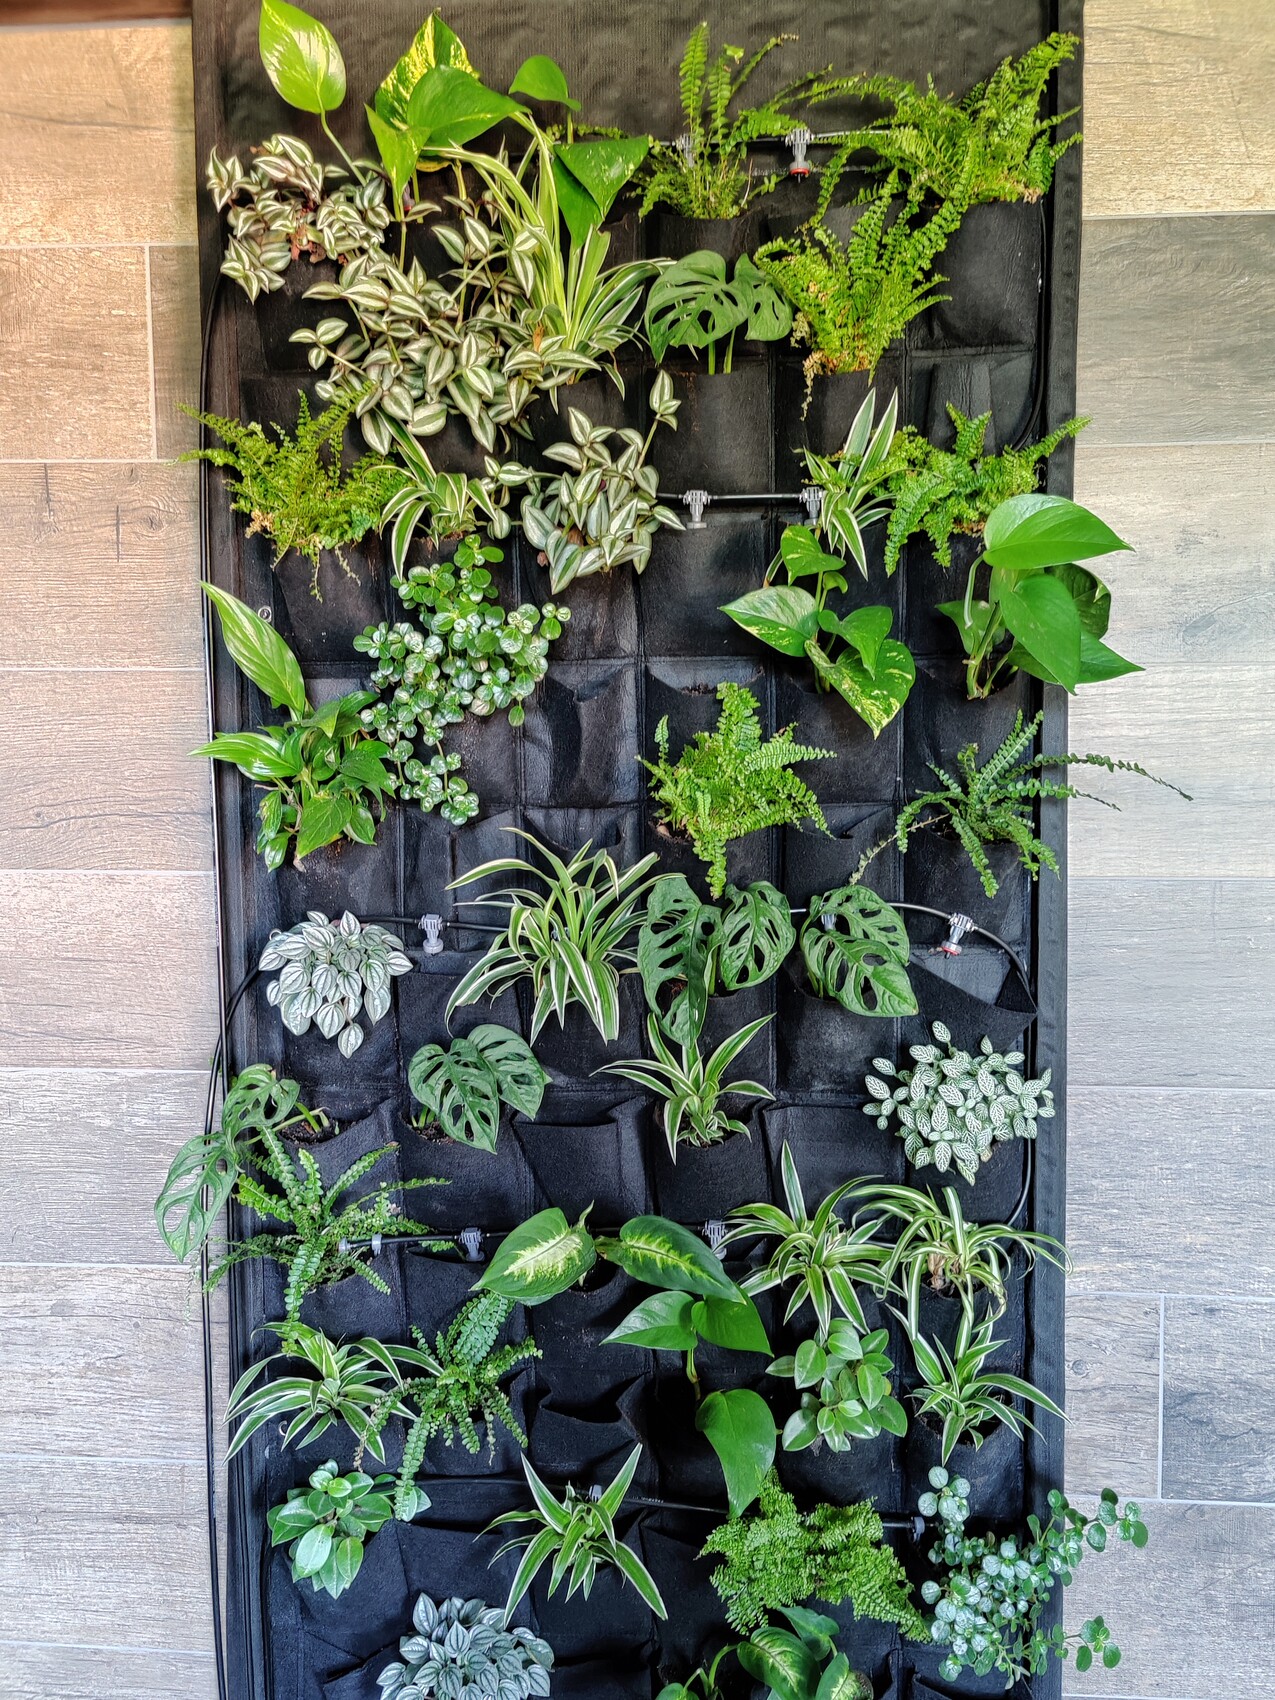
The structure of the plant wall was built as follows:
OSB board, additionally reinforced on the sides with strips of OSB (the same type of membrane shown below is sandwiched in between) – waterproof membrane – felt pockets.
Everything was glued. In a forum, we were recommended waterproof all-purpose glue (UHU), but we didn’t like the results, so we also used waterproof silicone. Now I’m confident that it won’t come loose over time. We chose to glue rather than screw because of the OSB board behind as a supporting panel. We were concerned that screws, even when the drill holes were sealed with silicone, might still let water through.
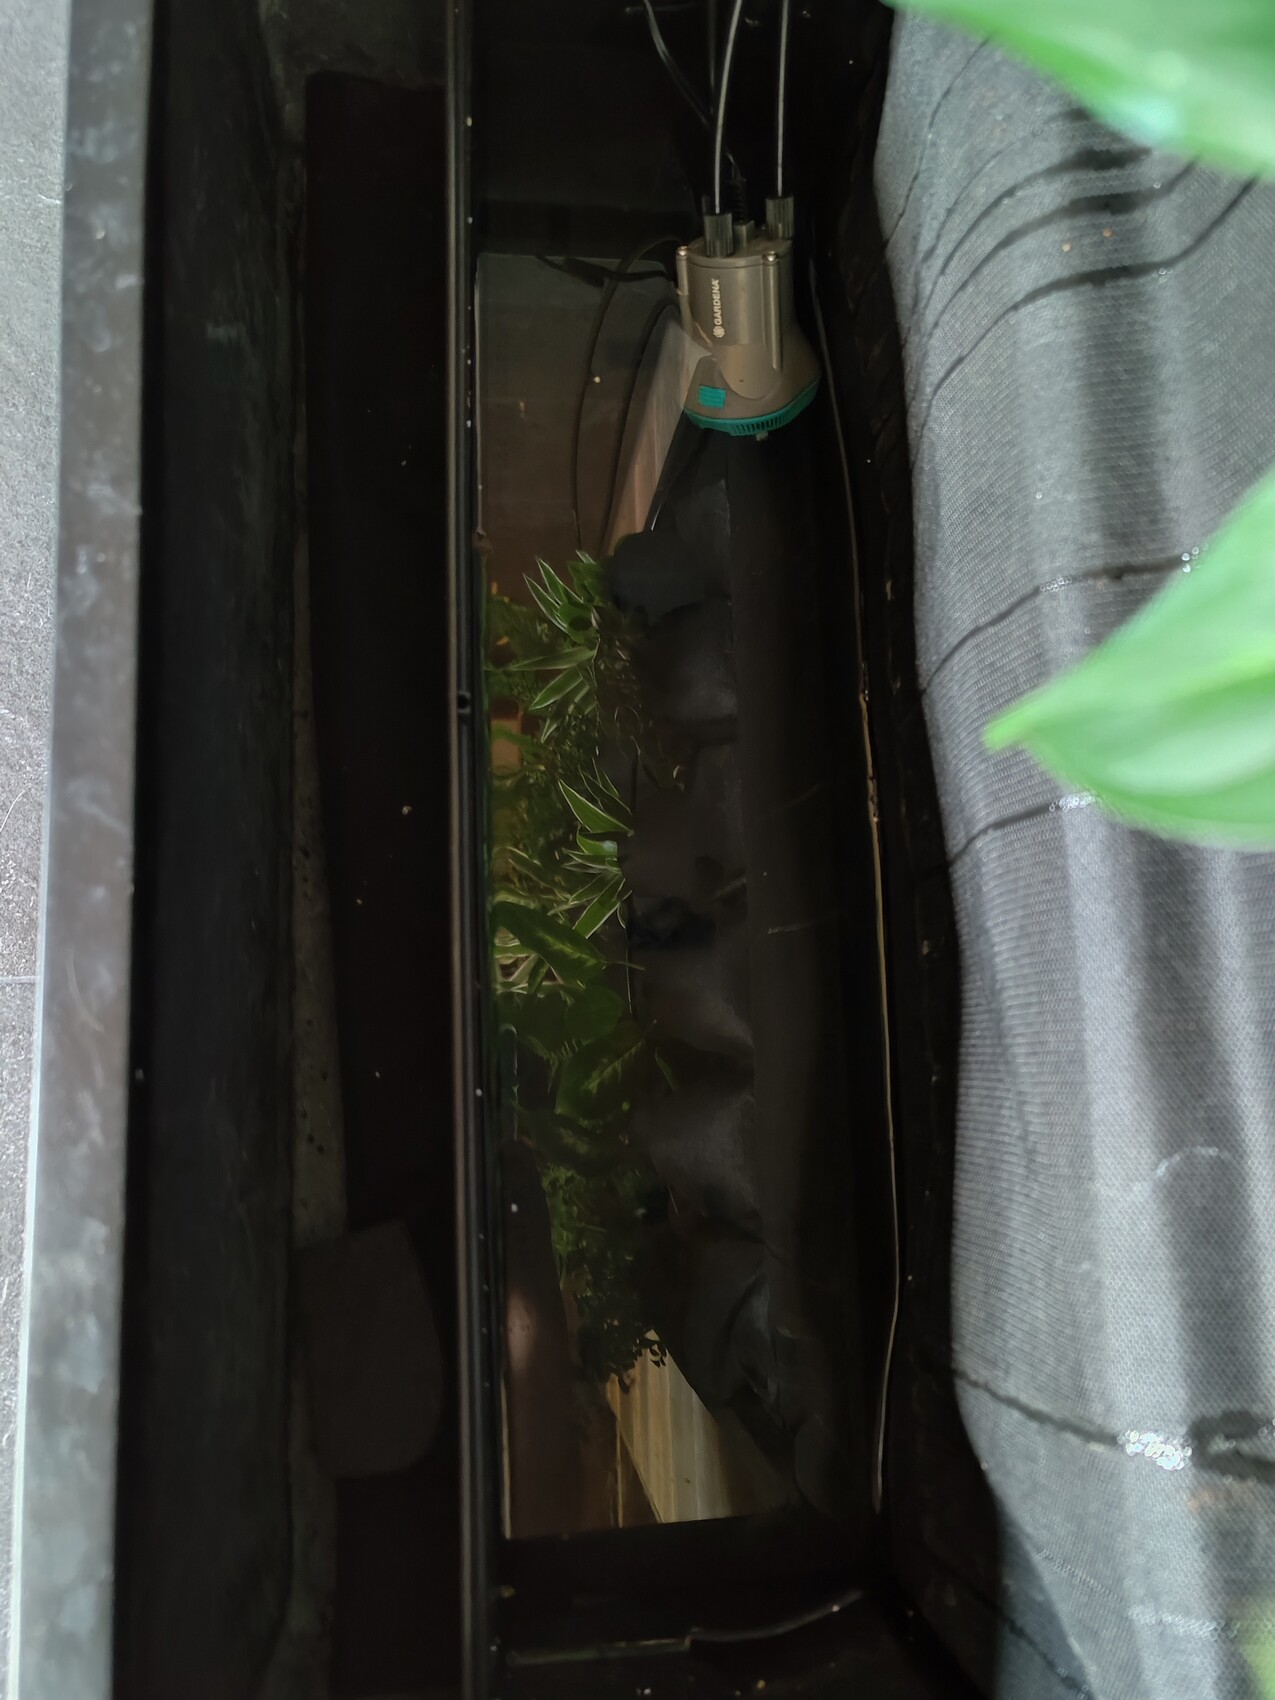
At the bottom, we used a regular flower pot as a catch tray. It’s attached to the OSB board with appropriate screws and hex nuts and mainly serves a visual purpose. The membrane overlaps the attachment inside a separate plastic flower pot, which collects excess water. The construction aligns so precisely with the wooden panel above that it is basically stable by itself. For safety, though, we used two brackets for fixation. Drilling into the tiles was an option but we wanted to avoid it.
Irrigation is automated using a Gardena watering system with a timer. The pump is placed inside the plastic catch tray, which holds a certain amount of water as a reservoir for the automatic watering. Currently, watering is scheduled once daily for 6 minutes. Three minutes wasn’t enough, because one irrigation hose supplies two rows of pockets and the lower row wasn’t getting sufficient water. I swapped the end drippers for self-cleaning versions, hoping they won’t calcify for a long time. The hoses are still laid out rather temporarily; we want to wait and see if the plants establish themselves well first.
Plant selection – everything I liked. I tried to choose plants that prefer moist and dark conditions. The latter was only moderately successful: I’m sure the Monstera isn’t too happy about it. We will probably install a plant lamp later. It remains to be seen if the plants can thrive with daily 6-minute watering and if the substrate is sufficient. The size of the pockets is unfortunately not very generous. The plants have grown quite unevenly within one month. Depending on the species, we left adjacent pockets free so they won’t overgrow each other in the long run.
If anyone has suggestions on how to fill the empty pockets, feel free to share. I’m still looking for dark green plants.
By the way, you can buy something like this for about 1,000 to 1,500 EUR if you don’t want to do the work yourself. It’s even cheaper without automatic irrigation. But since we need to save wherever we can, we decided to take on this DIY project at around 200 EUR material costs (excluding plants).

The structure of the plant wall was built as follows:
OSB board, additionally reinforced on the sides with strips of OSB (the same type of membrane shown below is sandwiched in between) – waterproof membrane – felt pockets.
Everything was glued. In a forum, we were recommended waterproof all-purpose glue (UHU), but we didn’t like the results, so we also used waterproof silicone. Now I’m confident that it won’t come loose over time. We chose to glue rather than screw because of the OSB board behind as a supporting panel. We were concerned that screws, even when the drill holes were sealed with silicone, might still let water through.
At the bottom, we used a regular flower pot as a catch tray. It’s attached to the OSB board with appropriate screws and hex nuts and mainly serves a visual purpose. The membrane overlaps the attachment inside a separate plastic flower pot, which collects excess water. The construction aligns so precisely with the wooden panel above that it is basically stable by itself. For safety, though, we used two brackets for fixation. Drilling into the tiles was an option but we wanted to avoid it.
Irrigation is automated using a Gardena watering system with a timer. The pump is placed inside the plastic catch tray, which holds a certain amount of water as a reservoir for the automatic watering. Currently, watering is scheduled once daily for 6 minutes. Three minutes wasn’t enough, because one irrigation hose supplies two rows of pockets and the lower row wasn’t getting sufficient water. I swapped the end drippers for self-cleaning versions, hoping they won’t calcify for a long time. The hoses are still laid out rather temporarily; we want to wait and see if the plants establish themselves well first.
Plant selection – everything I liked. I tried to choose plants that prefer moist and dark conditions. The latter was only moderately successful: I’m sure the Monstera isn’t too happy about it. We will probably install a plant lamp later. It remains to be seen if the plants can thrive with daily 6-minute watering and if the substrate is sufficient. The size of the pockets is unfortunately not very generous. The plants have grown quite unevenly within one month. Depending on the species, we left adjacent pockets free so they won’t overgrow each other in the long run.
If anyone has suggestions on how to fill the empty pockets, feel free to share. I’m still looking for dark green plants.
By the way, you can buy something like this for about 1,000 to 1,500 EUR if you don’t want to do the work yourself. It’s even cheaper without automatic irrigation. But since we need to save wherever we can, we decided to take on this DIY project at around 200 EUR material costs (excluding plants).
Similar topics