Hello everyone,
We moved into our new house last summer (oh God, that already sounds so long ago). Since then, there has been a lot to do—and there still is. Now, however, the remaining work is increasingly shifting outdoors.
The well has already been drilled. At that spot, I installed a small pit, and the garden shed will be placed on top of it. Now I’ve been thinking about the irrigation system again and realized that it will be difficult to access the pit underground once the garden shed is in place, as I would then be undermining the base slab.
So, I’ve been giving it some thought and reading a lot, but not everything is clear to me yet.
Firstly: before I pour the base slab, I need to run the necessary pipes out of the pit. That means drilling a hole through the pit ring and laying 1 to x PVC pipes (KG pipes) extending 1 to 2 meters (3 to 6.5 feet) beyond the edge of the base slab, so that I can later feed the water line through them when the time comes.
By the way, the garden shed will also house the sub-distribution for the outdoor electrical system. So, I also need to run a cable from the pit through the base slab to the distribution board in the garden shed for the pump. Additionally, I need 2 to 3 PVC pipes from inside where the distribution board is mounted, under the base slab to the outside, for all the electrical wiring on the driveway—such as the gate, lighting, and control cables for the irrigation valves, etc.
Now to the main topic: the automatic irrigation system
In this forum, it seems @rick2018 has good knowledge about this subject. Maybe you could give me some tips as well.
Below is a plan of our property:
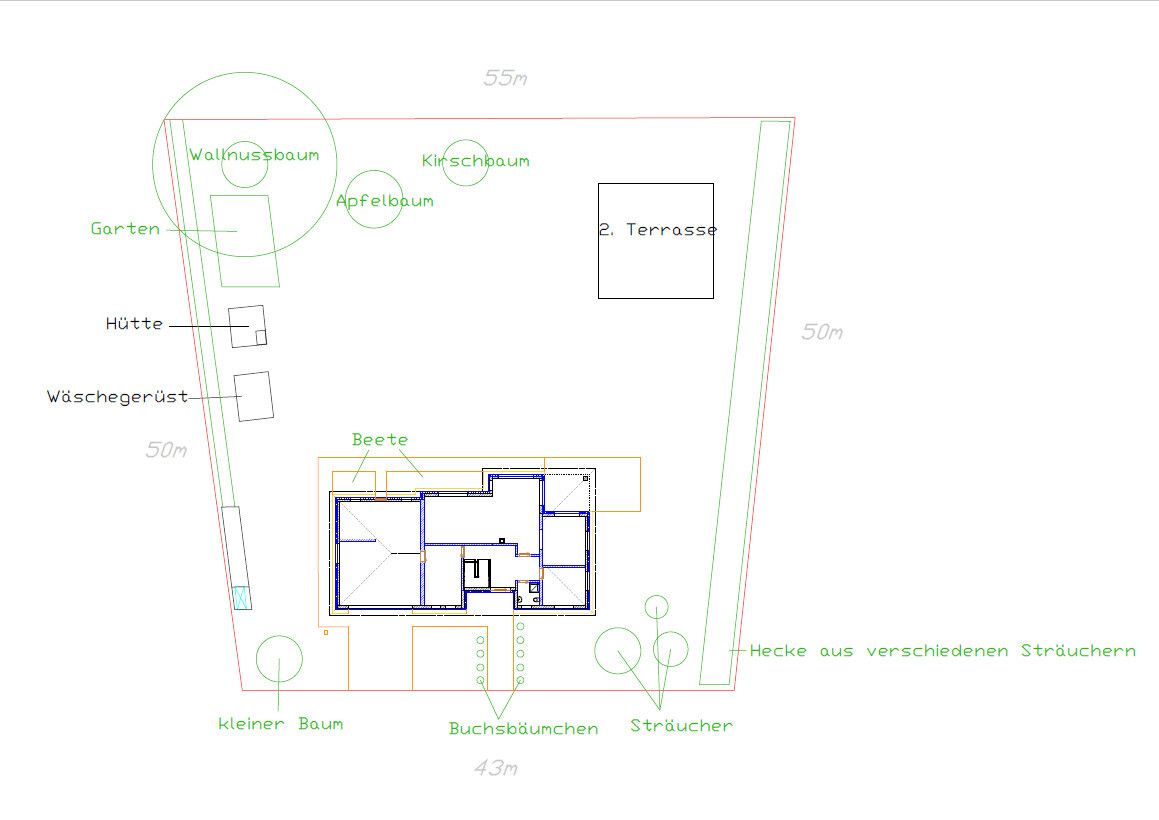
Except for the house, none of this has actually been implemented yet. The plants are just planned and may still change. The second terrace on the drawing is currently 10 x 10 meters (33 x 33 feet). It won’t actually be that large; that’s just a placeholder for the approximate future location. However, it definitely won’t be built in the next five years. That brings me to my first point:
1. How do you take that into account now? For example, regarding the second terrace, I would mostly plan the sprinklers as if the terrace will never be built, since it’s still uncertain whether and where exactly it will be placed. What about the trees? If I install the sprinklers now and then plant a tree 1 or 2 meters (3 to 6.5 feet) away next year, there will be shade along the axis behind the tree. In the first few years, this is probably negligible due to the small trunk diameter, but what happens when the trunk gets thicker?
2. What exactly should be irrigated? Lawn, flower beds, and vegetable garden are clear. I’ve read differing opinions about hedges, especially regarding adaptation to watering. What about trees? They should be able to cope on their own, right? Is it really overkill to install irrigation just for the first and maybe the second year?
3. For my large lawn areas, I’m considering Hunter gear-driven rotors. However, these are said to be rather sensitive to wind. Here, it’s usually windy because we’re on a small hill. But once everything around is planted, there shouldn’t be much wind close to the ground, right? @rick2018, why do you prefer rotators like the MP3000 over gear-driven rotors like the I20, for example?
4. My father-in-law took care of the well. I believe a Grundfos SQ2-55 pump is installed “in the hole.” The borehole depth was about 20 meters (66 feet) and the pump hangs at roughly 15 meters (49 feet) depth. The property slopes upwards by almost one meter (3 feet) to the right, so the pump has to push water up about 16 meters (52 feet). The pump is capable of 54 meters (177 feet) total head. So that leaves about 38 meters (125 feet), which corresponds to roughly 3.8 bar (55 psi) and, unfortunately, only about 2 cubic meters per hour (around 880 gallons per hour).
If I understand correctly, I can only operate two gear-driven I20 rotors with the 4.0 nozzle on one zone, since each requires 0.81 m³/h (about 360 gallons/hr) at 2.5 bar (36 psi) with a 11.9-meter (39 feet) radius (planning uses 10.5 meters). That will mean a lot of zones. Alternatively, I could try to return the pump to the well driller (as it wasn’t used before) and get one with 4 m³/h (about 1760 gallons/hr) or more. The question is whether that would make my well wear out faster (clogging?).
5. Let’s say I keep the existing pump and end up with 30 zones. How would that work in practice? Would each lawn irrigation zone run for 30 minutes? And every 3 days? That would cause problems with my planned robotic mower that will almost always be running over the large area. In the end, I won’t have time to enjoy the yard because either the mower is running or the sprinklers are on.
6. It is recommended to start the design in a corner of the property. So, for example, I start at the top right and place the first sprinkler in front of the hedge. The thing is: the hedge is currently very narrow, but will become 1 to 2 meters (3 to 6.5 feet) wide over time.
7. The sprinklers extend during operation and retract afterwards. How durable are these if someone steps on them? It looks like I will eventually have a “carpet” of pop-up sprinklers. The children should, of course, still be able to play freely.
That’s enough for now. Have a nice rest of the Sunday!
We moved into our new house last summer (oh God, that already sounds so long ago). Since then, there has been a lot to do—and there still is. Now, however, the remaining work is increasingly shifting outdoors.
The well has already been drilled. At that spot, I installed a small pit, and the garden shed will be placed on top of it. Now I’ve been thinking about the irrigation system again and realized that it will be difficult to access the pit underground once the garden shed is in place, as I would then be undermining the base slab.
So, I’ve been giving it some thought and reading a lot, but not everything is clear to me yet.
Firstly: before I pour the base slab, I need to run the necessary pipes out of the pit. That means drilling a hole through the pit ring and laying 1 to x PVC pipes (KG pipes) extending 1 to 2 meters (3 to 6.5 feet) beyond the edge of the base slab, so that I can later feed the water line through them when the time comes.
By the way, the garden shed will also house the sub-distribution for the outdoor electrical system. So, I also need to run a cable from the pit through the base slab to the distribution board in the garden shed for the pump. Additionally, I need 2 to 3 PVC pipes from inside where the distribution board is mounted, under the base slab to the outside, for all the electrical wiring on the driveway—such as the gate, lighting, and control cables for the irrigation valves, etc.
Now to the main topic: the automatic irrigation system
In this forum, it seems @rick2018 has good knowledge about this subject. Maybe you could give me some tips as well.
Below is a plan of our property:
Except for the house, none of this has actually been implemented yet. The plants are just planned and may still change. The second terrace on the drawing is currently 10 x 10 meters (33 x 33 feet). It won’t actually be that large; that’s just a placeholder for the approximate future location. However, it definitely won’t be built in the next five years. That brings me to my first point:
1. How do you take that into account now? For example, regarding the second terrace, I would mostly plan the sprinklers as if the terrace will never be built, since it’s still uncertain whether and where exactly it will be placed. What about the trees? If I install the sprinklers now and then plant a tree 1 or 2 meters (3 to 6.5 feet) away next year, there will be shade along the axis behind the tree. In the first few years, this is probably negligible due to the small trunk diameter, but what happens when the trunk gets thicker?
2. What exactly should be irrigated? Lawn, flower beds, and vegetable garden are clear. I’ve read differing opinions about hedges, especially regarding adaptation to watering. What about trees? They should be able to cope on their own, right? Is it really overkill to install irrigation just for the first and maybe the second year?
3. For my large lawn areas, I’m considering Hunter gear-driven rotors. However, these are said to be rather sensitive to wind. Here, it’s usually windy because we’re on a small hill. But once everything around is planted, there shouldn’t be much wind close to the ground, right? @rick2018, why do you prefer rotators like the MP3000 over gear-driven rotors like the I20, for example?
4. My father-in-law took care of the well. I believe a Grundfos SQ2-55 pump is installed “in the hole.” The borehole depth was about 20 meters (66 feet) and the pump hangs at roughly 15 meters (49 feet) depth. The property slopes upwards by almost one meter (3 feet) to the right, so the pump has to push water up about 16 meters (52 feet). The pump is capable of 54 meters (177 feet) total head. So that leaves about 38 meters (125 feet), which corresponds to roughly 3.8 bar (55 psi) and, unfortunately, only about 2 cubic meters per hour (around 880 gallons per hour).
If I understand correctly, I can only operate two gear-driven I20 rotors with the 4.0 nozzle on one zone, since each requires 0.81 m³/h (about 360 gallons/hr) at 2.5 bar (36 psi) with a 11.9-meter (39 feet) radius (planning uses 10.5 meters). That will mean a lot of zones. Alternatively, I could try to return the pump to the well driller (as it wasn’t used before) and get one with 4 m³/h (about 1760 gallons/hr) or more. The question is whether that would make my well wear out faster (clogging?).
5. Let’s say I keep the existing pump and end up with 30 zones. How would that work in practice? Would each lawn irrigation zone run for 30 minutes? And every 3 days? That would cause problems with my planned robotic mower that will almost always be running over the large area. In the end, I won’t have time to enjoy the yard because either the mower is running or the sprinklers are on.
6. It is recommended to start the design in a corner of the property. So, for example, I start at the top right and place the first sprinkler in front of the hedge. The thing is: the hedge is currently very narrow, but will become 1 to 2 meters (3 to 6.5 feet) wide over time.
7. The sprinklers extend during operation and retract afterwards. How durable are these if someone steps on them? It looks like I will eventually have a “carpet” of pop-up sprinklers. The children should, of course, still be able to play freely.
That’s enough for now. Have a nice rest of the Sunday!
Thank you. One more question about the filter. There are mesh filters and disc filters.
Disc filters are supposedly better and only cost slightly more. I have now selected one with 120 mesh. Since a filtration of 125 microns is recommended for the drippers, this should be fine. It is probably also better to have filtered water for the MP rotators. Since I still have enough space in the well shaft, I would install the filter there directly in the main line, as mentioned before. I don’t need to install a separate filter for each valve box that supplies drippers, right?
The filters need to be cleaned from time to time. You can check this by observing the spray range of the sprinklers or by installing a pressure gauge before and after the filter.
I probably won’t see the spray range very often because the irrigation is mainly scheduled between 3 and 6 a.m. However, I don’t have enough space for two pressure gauges, and they would also cause additional pressure loss.
So, I would need to clean the filters based on a fixed interval. How does this work in practice?
I would probably clean the filter for the first time after one month, and then extend the interval depending on the level of contamination (as far as I can judge as a layperson).
Best regards
Back then, we were also looking for which filter to choose. We decided on the Gardena pump pre-filter with a capacity of 6000 liters per hour (l/h). This is a mesh filter but unfortunately has a transparent plastic housing. Algae kept growing inside, which caused the irrigation system to stop working, so we had to clean it regularly. In the second year, we bought a disc filter from Rainbird. It was significantly cheaper, had a black plastic housing (so no more algae), great flow rate (around 4000 liters per hour (l/h)), and was very easy to clean (unscrew, pour out into the sink, rinse with water... done).
In the end, it doesn’t really matter if it’s a disc or mesh filter. Much more important is that no sunlight reaches it. But in terms of cleaning, I really like the disc filter.
In the end, it doesn’t really matter if it’s a disc or mesh filter. Much more important is that no sunlight reaches it. But in terms of cleaning, I really like the disc filter.

Basically, the type of filter does not matter. What’s important is to install it in a place that is easy to access. How often you need to clean it depends on the water source, the filter itself, and the usage.
For our family properties, we clean it once at the start of the season. We always use cisterns with mid-level water extraction. If you use water directly from the mains, you will likely have even fewer problems or may not need an additional filter at all.
For wells, it depends on how sandy the water is.
Probably 2-3 flushings of the filter during the season will be enough.
Just avoid using filters meant for “home use” like Gardena, and instead use ones designed for professional use, such as Hunter, Rainbird...
I have less light for algae growth in the well shaft anyway. But the filter I selected is also black and from the company Irritec. It should be suitable for professional use, right?
I’ve been thinking and researching for quite a while about how to make the transition. Maybe you have a tip.
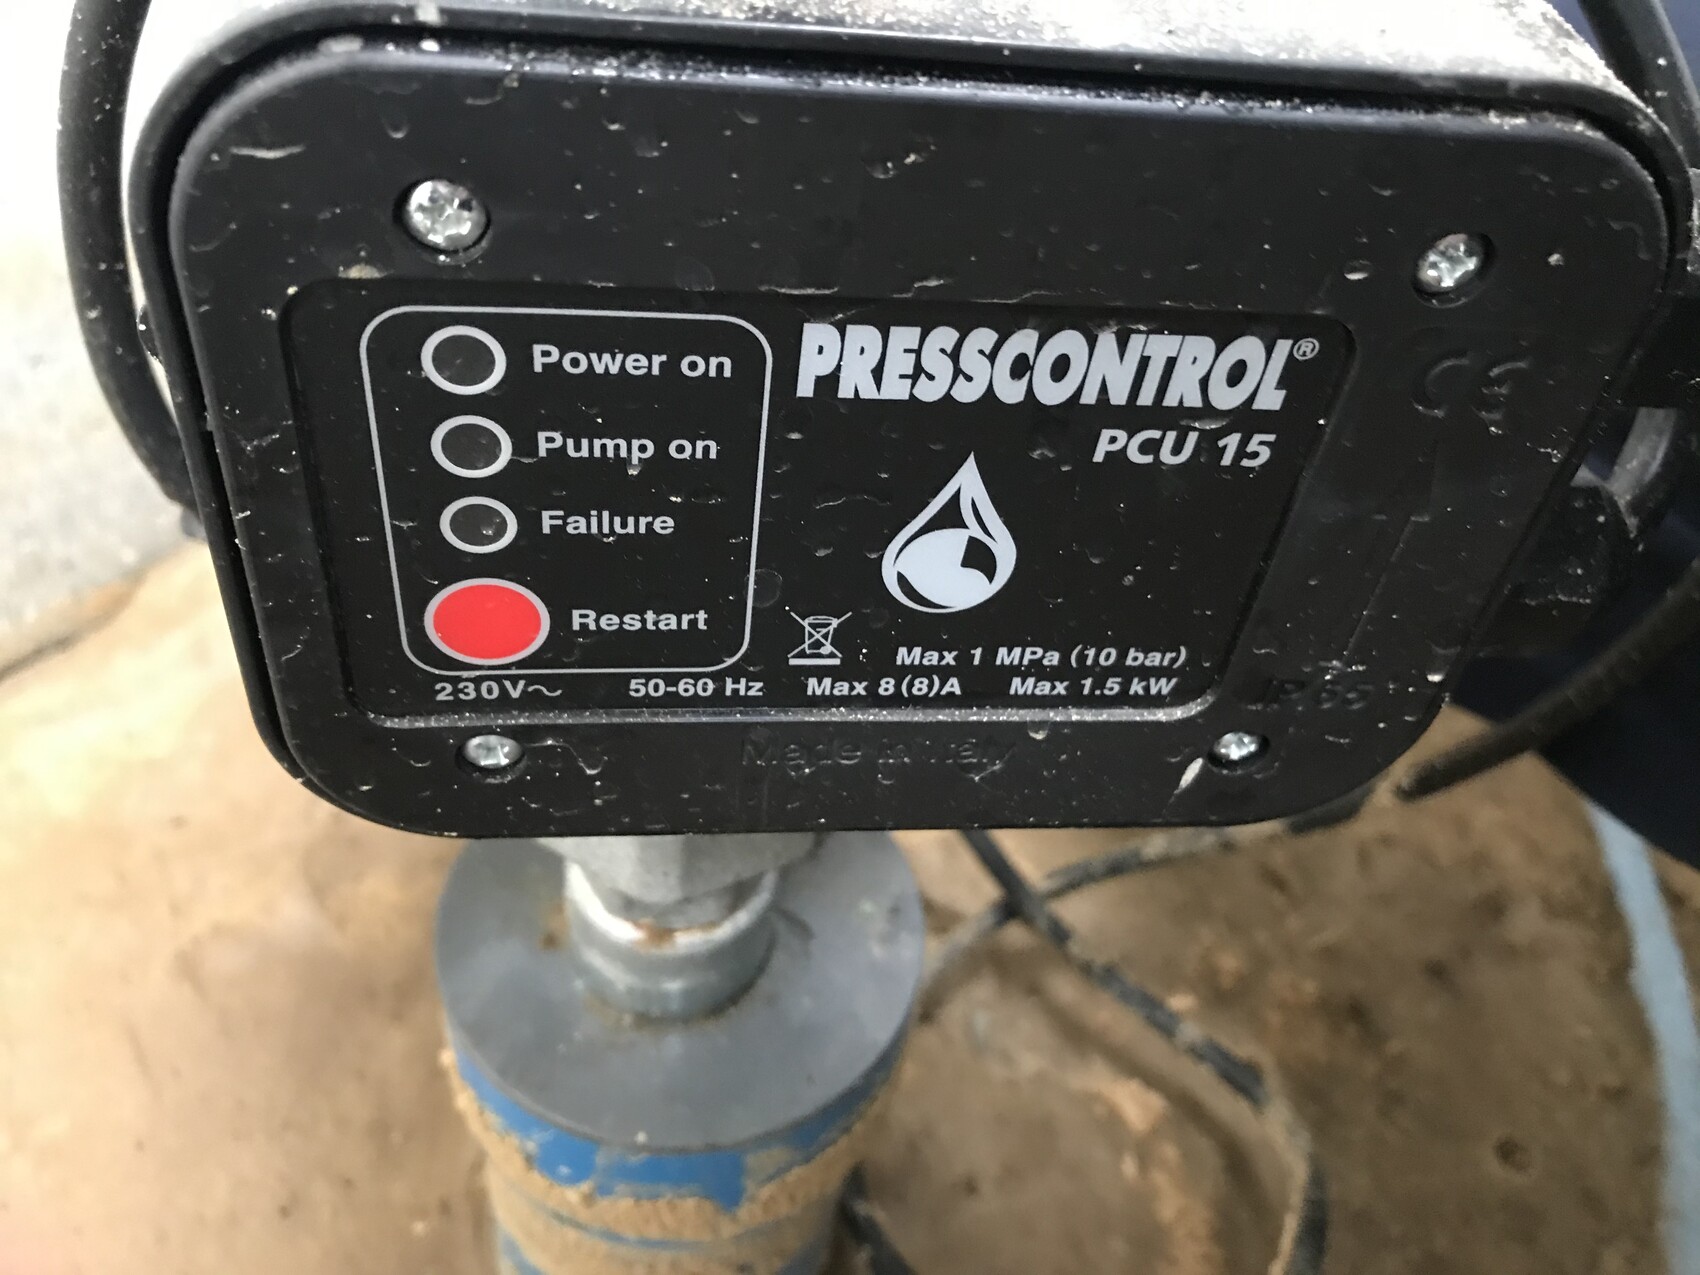
Unfortunately, I only have close-up shots.
The well pipe comes in at the bottom. Then it goes through a tapered (self-sealing) threaded fitting to the press control unit.
At the top there is again a tapered threaded fitting, and then it continues with a 90° reducer from 1" to 1/2":

Finally, there is the shut-off valve.
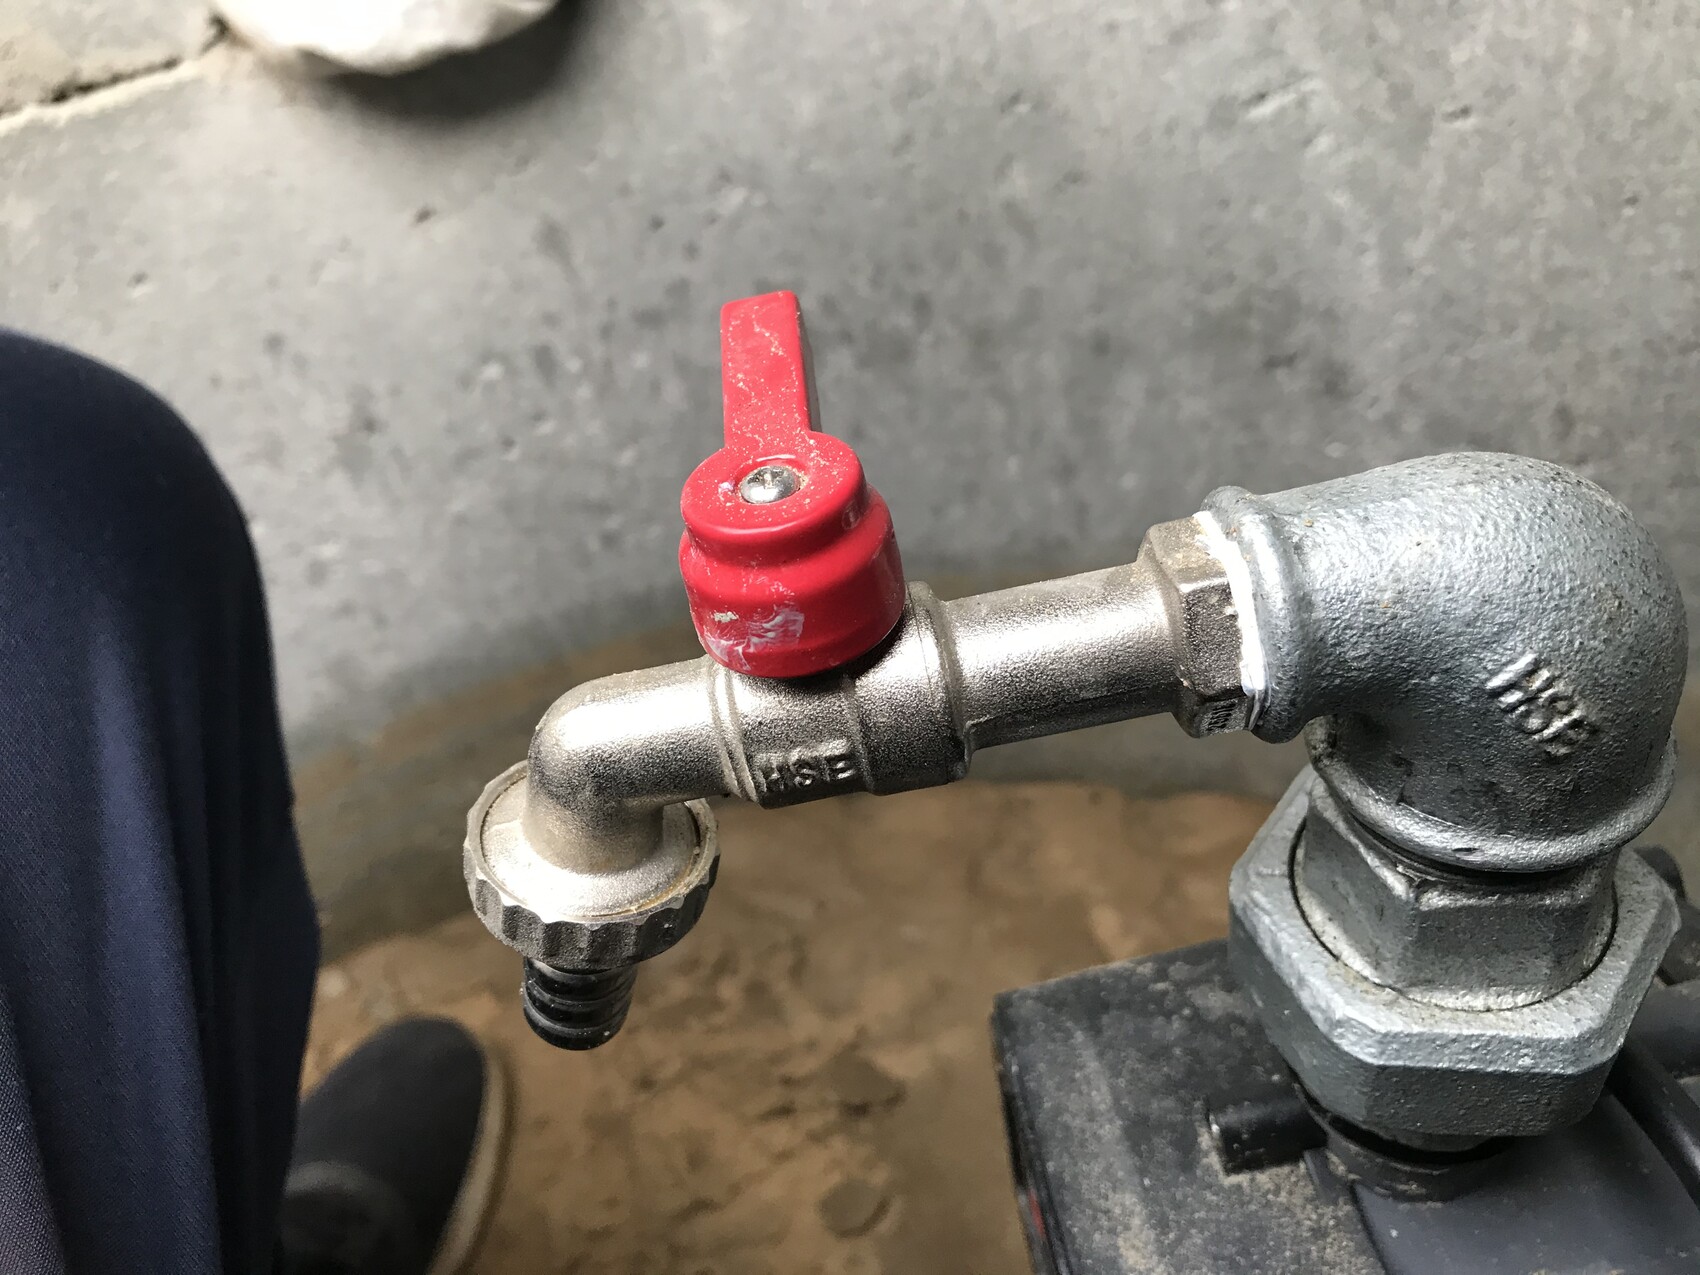
Now my idea is to remove the valve and the 90° reducer.
Then I want to install a standard 90° elbow (a), followed by a T-piece (b) with a reduced center outlet, where the 1/2" valve will be attached. During the renovation phase I can still draw water normally here, and later in winter I can drain the remaining water from the line.
After the T-piece, I would connect (c) with two screw fittings with union nuts made of PVC. Then comes the filter, followed again by a screw fitting with union nut, then a PE pipe male-thread adapter, and finally continuing with the PE pipe.
I’m having some trouble deciding on the materials for parts a, b, and c.
Which material should a and b be? At this point, I would guess galvanized malleable iron.
Can I just screw on the union nut connection? Will it seal properly with Teflon tape?
I have also seen transition fittings from PE clamp connectors to stainless steel screw fittings, but not from PVC to malleable iron.
Regards
I’ve been thinking and researching for quite a while about how to make the transition. Maybe you have a tip.
Unfortunately, I only have close-up shots.
The well pipe comes in at the bottom. Then it goes through a tapered (self-sealing) threaded fitting to the press control unit.
At the top there is again a tapered threaded fitting, and then it continues with a 90° reducer from 1" to 1/2":
Finally, there is the shut-off valve.
Now my idea is to remove the valve and the 90° reducer.
Then I want to install a standard 90° elbow (a), followed by a T-piece (b) with a reduced center outlet, where the 1/2" valve will be attached. During the renovation phase I can still draw water normally here, and later in winter I can drain the remaining water from the line.
After the T-piece, I would connect (c) with two screw fittings with union nuts made of PVC. Then comes the filter, followed again by a screw fitting with union nut, then a PE pipe male-thread adapter, and finally continuing with the PE pipe.
I’m having some trouble deciding on the materials for parts a, b, and c.
Which material should a and b be? At this point, I would guess galvanized malleable iron.
Can I just screw on the union nut connection? Will it seal properly with Teflon tape?
I have also seen transition fittings from PE clamp connectors to stainless steel screw fittings, but not from PVC to malleable iron.
Regards
Well, the well pipe comes straight up from the ground, and I need to divert it sideways somehow. So, I have no choice but to use a 90° bend. This fitting to connect to the PE pipe is correct, but first, I need to connect the metal pipe to the filter with something, and then from the filter to the PE pipe.
Similar topics