Hello dear small home building community,
In the next two weeks, work will be done on the outdoor area at our place.
For next year, we are also planning to buy a garden shed (maybe 2x2 m (6.5x6.5 ft)). However, we want to prepare the ground for it now.
And now to the topic:
How would you build the "base layer"?
I am thinking of a gravel layer (which we would have delivered now). Should this layer extend beyond the shed by X cm (Y inches)?
My father also suggested a strip foundation. Not so much because of stability, but more due to potential wind uplift effects he once observed at a neighbor’s place (he recommends additional anchoring in the concrete).
My wife wants to add geotextile fabric underneath. This is a stronger type of weed barrier fabric, also used, for example, for slope stabilization.
What do you think? What makes sense? What should be considered (e.g., regarding the extension of the gravel layer)?

S
stefanb1236 Oct 2019 12:04One00 schrieb:
We based our self-build on the following construction:
[ATTACH alt="hpl-Aufbau-pflaster-Sturm-gartenhaeuschen-Mindestabstand-118979-1.jpg"]7922[/ATTACH] Hello One00!
Although this thread is a bit older, I have been searching for a suitable garden shed for several weeks now. As you mentioned, the available HPL garden sheds from Gardomo and Garten-Q are extremely expensive. The HPL material and the wooden structure can be found cheaply online or at hardware stores. I want to build a garden shed measuring 5 m (width) x 1 m (depth) x over 2.30 m (height). You wrote that you designed the garden shed yourself. How did you go about that? Do you have some tips for me?
Best regards, Steve from Lake Constance
Hello Steve,
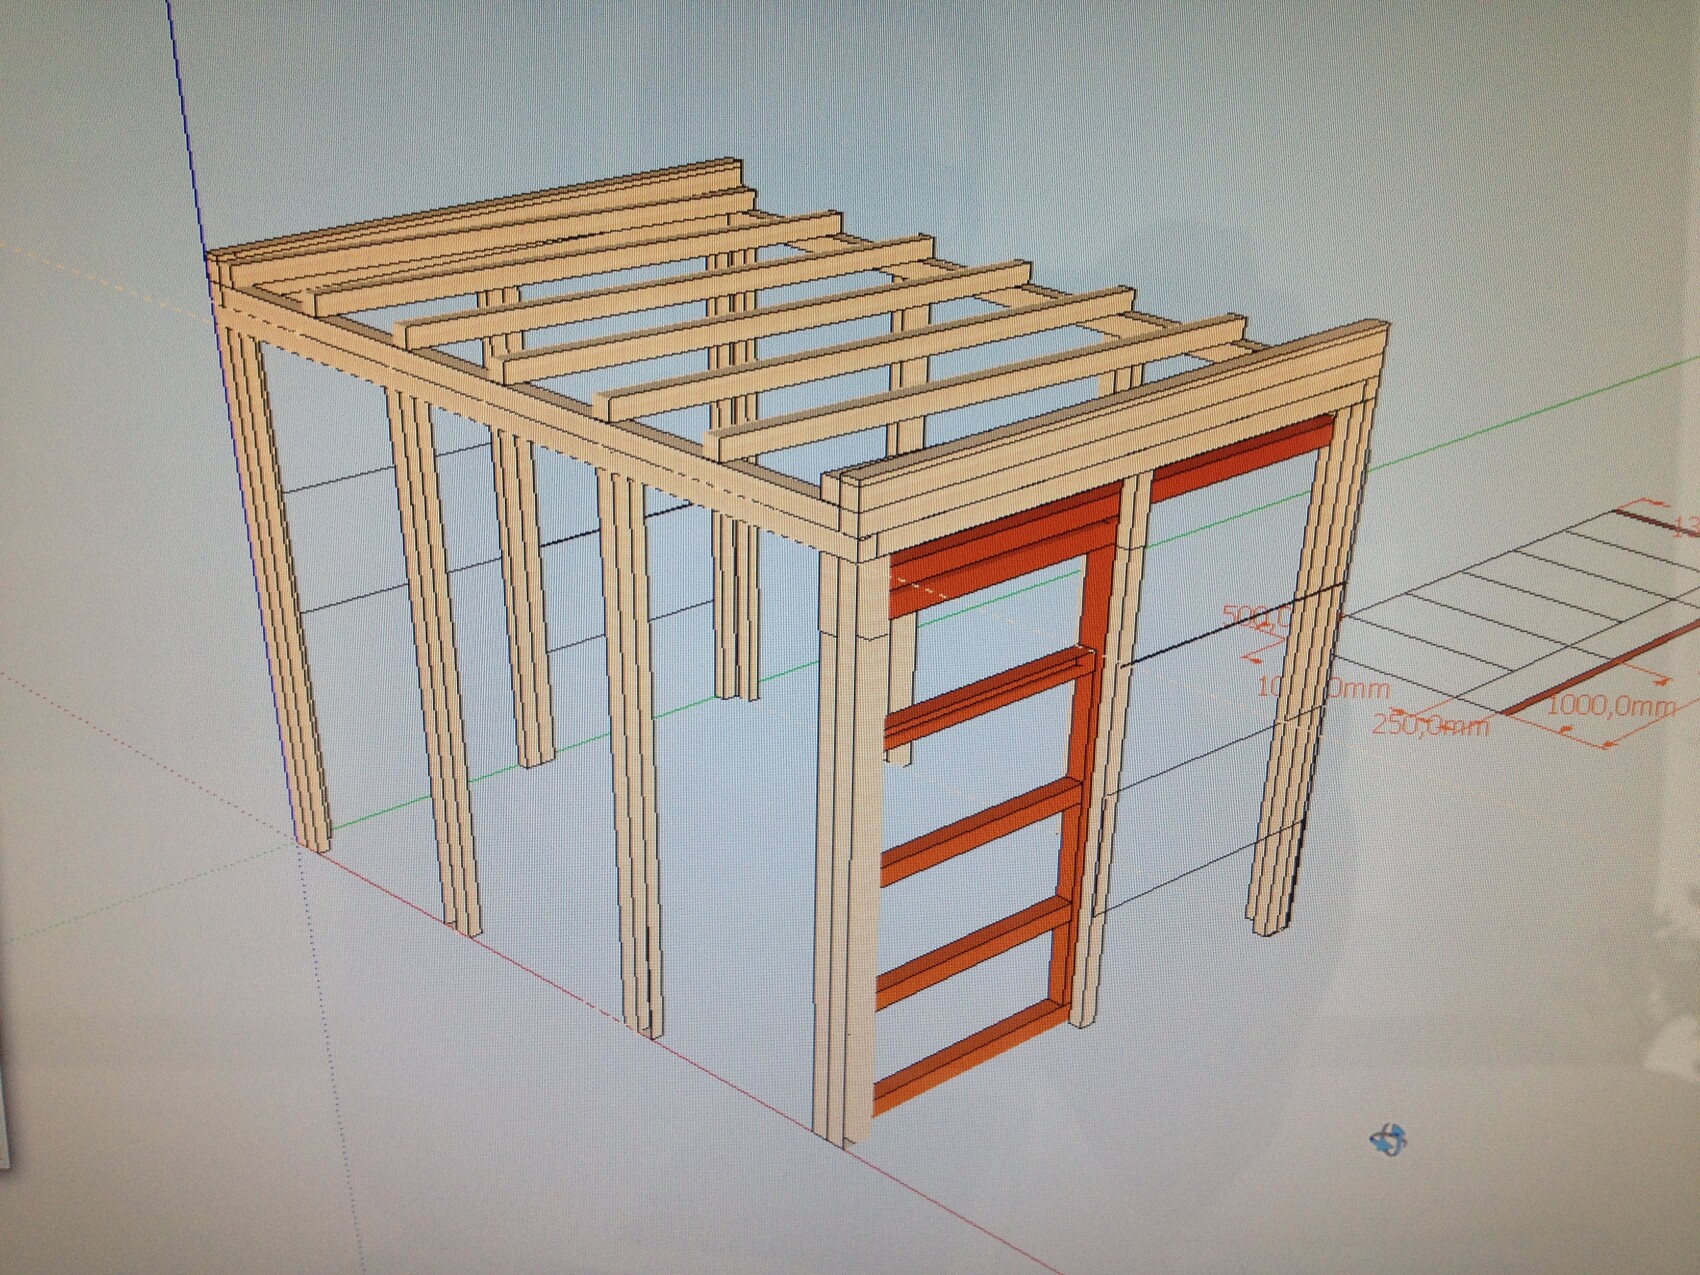
I designed the house in SketchUp, but I would say that’s not really necessary. A few hand sketches for the details (maybe the roof connection?) should be enough, assuming you have some technical knowledge and spatial imagination.
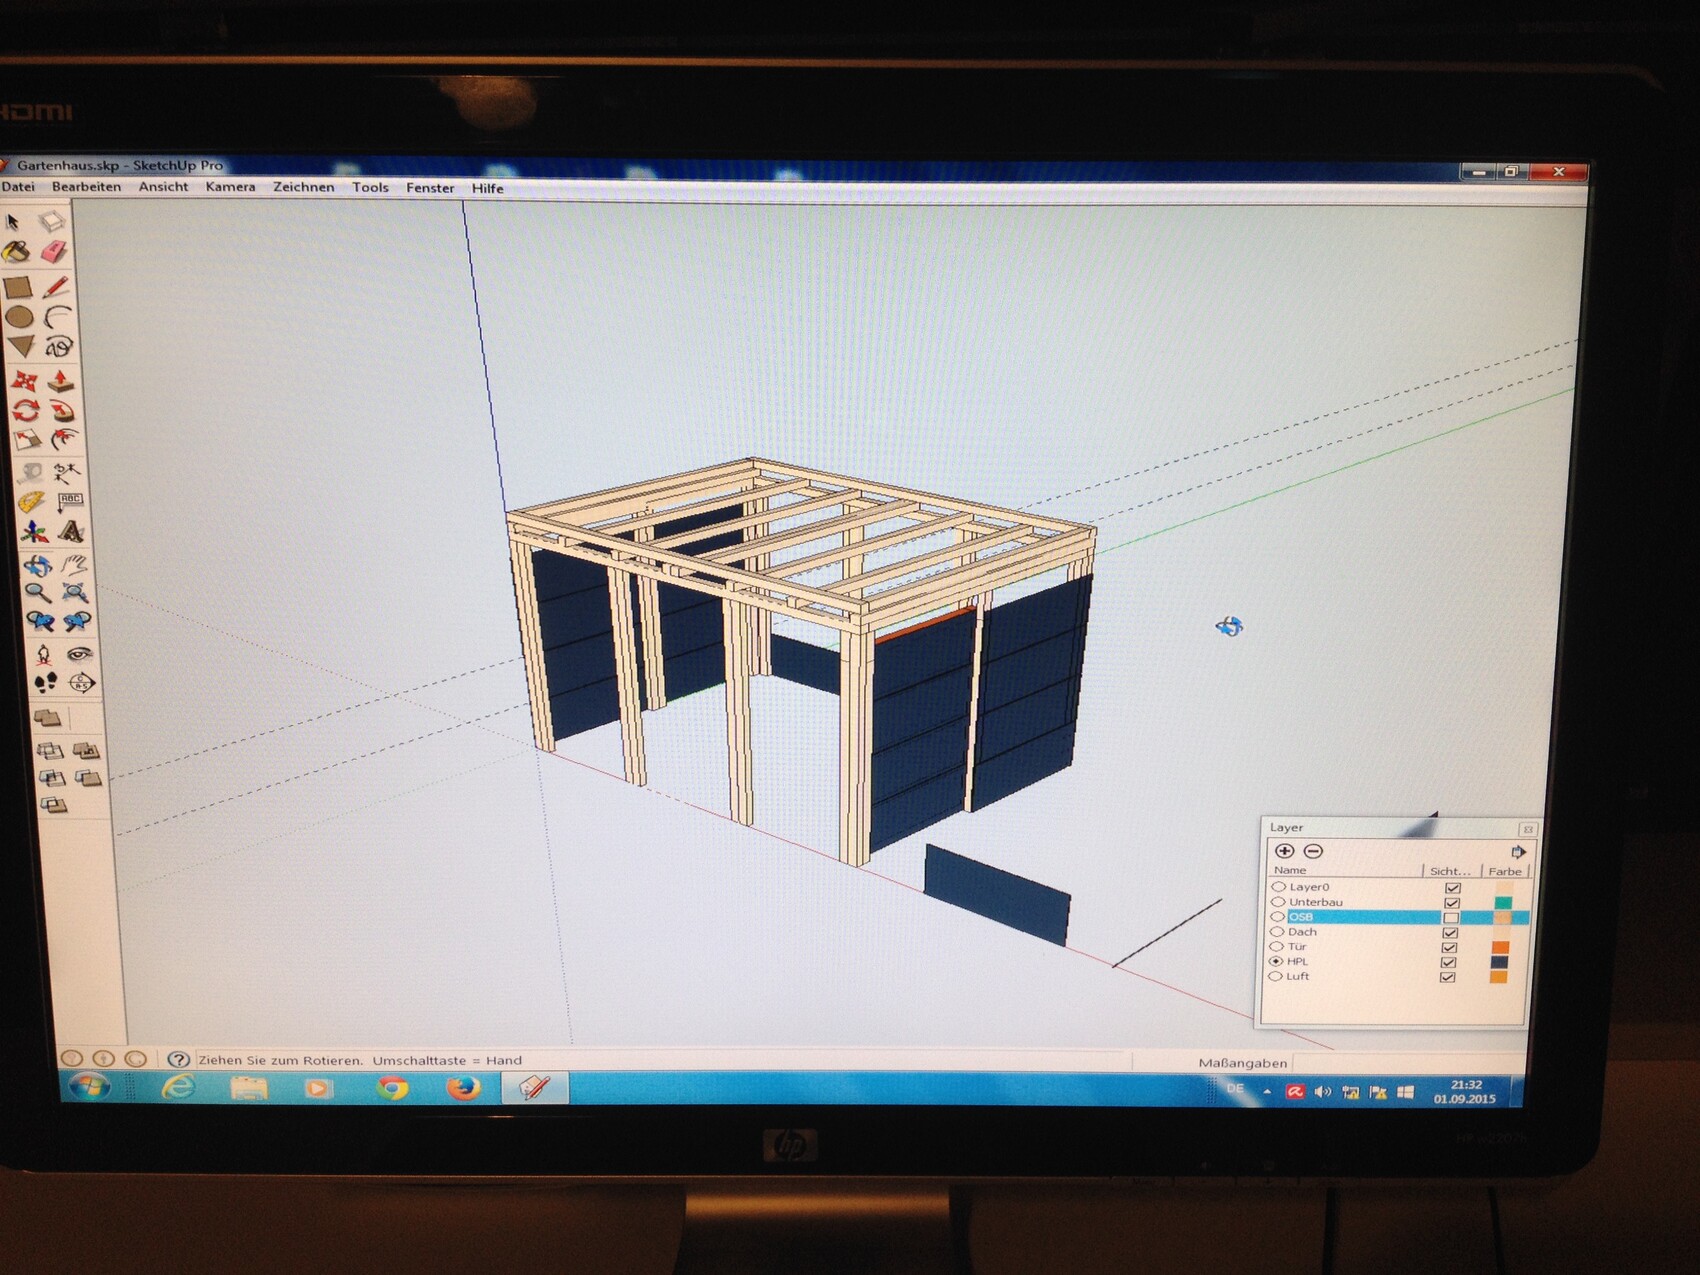
The substructure of my house consists of simple, planed softwood beams (I think they were 6x8 cm (2.4x3.1 inches)), with a fully adhered black underlay membrane on the outside, and then HPL panels.
Inside, I screwed on OSB boards.
The roof (a kind of “parapet” created by the overhanging HPL panels, which makes the roof look flat from the outside) is also made from these beams and OSB, with a glued-on waterproof roofing membrane (a rubber-like sheet) on top, and a gutter at the back. The whole roof has a slight slope, I believe it’s 3° (3°), and it works perfectly.
I built the frame in a modular way, meaning the individual side panels were preassembled, then put together and screwed to each other—basically a timber frame construction. Then there’s a kind of ring beam made from additional horizontal beams, which connect the modules to each other again.
For the sliding door, I ordered a kit that includes the top hanger with rollers and a rail, and a “fin” guide at the bottom. Inside, I added a simple anti-lift device, basically just a thick beam that the door slides along.
The windows are simple Makrolon panels.
I designed the house in SketchUp, but I would say that’s not really necessary. A few hand sketches for the details (maybe the roof connection?) should be enough, assuming you have some technical knowledge and spatial imagination.
The substructure of my house consists of simple, planed softwood beams (I think they were 6x8 cm (2.4x3.1 inches)), with a fully adhered black underlay membrane on the outside, and then HPL panels.
Inside, I screwed on OSB boards.
The roof (a kind of “parapet” created by the overhanging HPL panels, which makes the roof look flat from the outside) is also made from these beams and OSB, with a glued-on waterproof roofing membrane (a rubber-like sheet) on top, and a gutter at the back. The whole roof has a slight slope, I believe it’s 3° (3°), and it works perfectly.
I built the frame in a modular way, meaning the individual side panels were preassembled, then put together and screwed to each other—basically a timber frame construction. Then there’s a kind of ring beam made from additional horizontal beams, which connect the modules to each other again.
For the sliding door, I ordered a kit that includes the top hanger with rollers and a rail, and a “fin” guide at the bottom. Inside, I added a simple anti-lift device, basically just a thick beam that the door slides along.
The windows are simple Makrolon panels.
S
stefanb1238 Oct 2019 10:29Hello! I really appreciate your quick and detailed reply! Your garden shed looks great. That’s exactly how I imagined it. You also have the shed placed on an angled retaining wall. Is it attached to it in any way, or does it just stand on the slab foundation? Do you still remember where you ordered the sliding door? I’m going to try to build the shed myself. I’m not exactly a technical expert, but with your sketch, I feel confident giving it a try. Thanks again so much, One00!
Best regards from Lake Constance
Best regards from Lake Constance
Hello,
the shed stands freely and is therefore not attached to the neighbor’s wall. I connected it to the paving in two places, but in my opinion, that’s not really necessary, especially since it only rests on one or two paving stones anyway. Does it really make a difference? With a slightly different substructure it might be different, but in my case, nothing moves. The shed is also quite sheltered from the wind.
The parts for the sliding door... hmm. I couldn’t find anything in my inbox. Just try searching online; you’ll find plenty of information. The key factor in choosing components is really the expected weight of the door.
Regarding tools:
- Miter saw
- Good cordless screwdriver
- Good cordless impact driver
- Drill for drilling the HPL panels; a drill press is recommended here. I wouldn’t want to drill this freehand, but it’s probably possible.
- Circular saw with guide rail and a blade suitable for hard materials
I think that covers the essentials…
I ordered the panels already cut to size, but you still have to make some adjustments here and there, for example for the strips on the door.
I found a private message I once sent to someone:
The frame is entirely made of spruce wood beams measuring 58x78mm (2.3x3.1 inches). I wrapped this substructure with a black underlay membrane to make it windproof and to have a black joint at the seams of the HPL panels later on.
The HPL panels were by far the most expensive item, costing around €780. I ordered them pre-cut in sizes 1000x500mm (39x20 inches) and 1000x250mm (39x10 inches). The remaining narrow HPL strips for the door I cut myself from offcuts, which works very well with a good handheld circular saw and a suitable saw blade. The windows are tinted Makrolon panels. I installed the panels using roofing screws. Accuracy in the substructure is very important. If it is not precise, the panels or joints will not fit properly later, so always work carefully!
The roof is covered with 22mm (7/8 inch) OSB boards, and a flat roof sealant was glued on top. The roof has a slope of about 4 degrees so that water can run off to the back into a gutter and then drain through a downpipe. The back side of the house is only covered with roofing felt.
The door leaf is self-made, but I bought the sliding mechanism. It is a roller system mounted above the door in a rail.
You could also use a ready-made door leaf, but I couldn’t find one in the desired width and height.
Installing the lock was also not a problem.
The total cost, excluding foundation and paving, was approximately €1500.
Similar topics