Hello
I have a question. When we built, we installed a cement screed in the garage, about 7 cm (3 inches) thick. Now, after 14 years, it has cracked, water has penetrated, and the screed is bulging upwards.
I want to install a new floor now. What would you recommend?
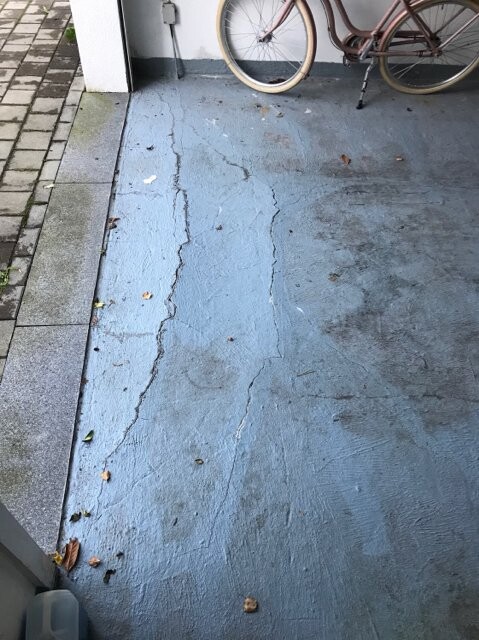
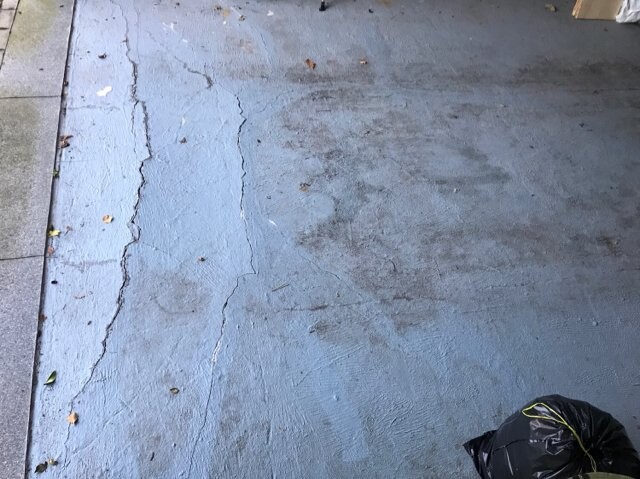
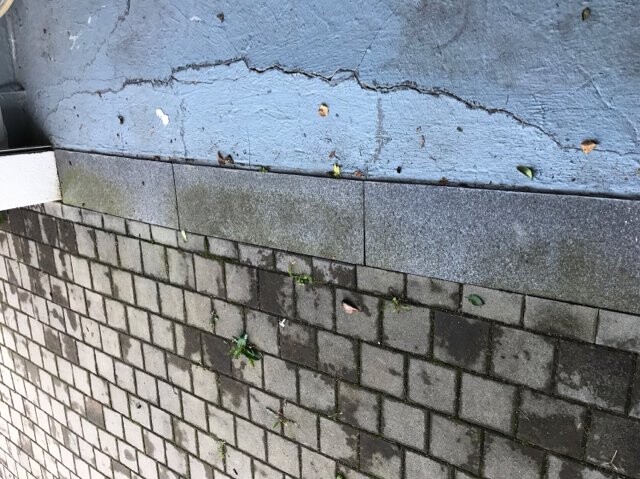
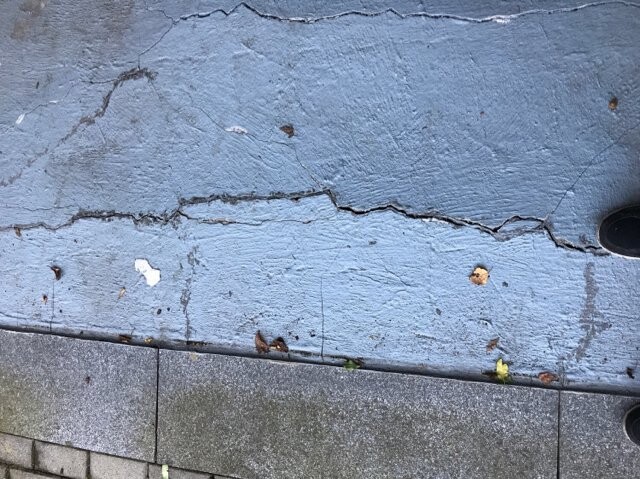
Thanks for your answers. Attached are some pictures.
The worst damage is near the garage door.
I have a question. When we built, we installed a cement screed in the garage, about 7 cm (3 inches) thick. Now, after 14 years, it has cracked, water has penetrated, and the screed is bulging upwards.
I want to install a new floor now. What would you recommend?
Thanks for your answers. Attached are some pictures.
The worst damage is near the garage door.

Hello questioner.
Are you sure it is a self-leveling screed?
Since it can only be a cement-based screed and self-leveling screeds on a cement basis have always been prone to cracking due to their almost uncontrollable internal stresses, I suspect it is a bonded screed installed with a damp mix and compacted.
In any case, the bond zone between the concrete surface and the screed has for some reason failed to transfer the forces.
The first question before any repair work is: WHY did this happen? This is a crucial question before continuing to build on an unresolved systematic defect.
Procedure:
To determine which area is affected, you need a medium-sized hammer and a piece of chalk.
Drag the hammerhead across the screed surface. Detachment of the bonded screed can be detected by the sound.
Then use the chalk to mark the boundary between loose and firm areas on the screed surface. It’s best to use oil chalk, which will last several weeks.
After about 3 to 4 weeks (the garage should be used in the meantime), check again to see if the boundary line still matches the marking.
If YES: remove the loose screed plus 10 to 30cm (4 to 12 inches) into the “healthy area.”
First, cut the screed with an angle grinder through its full thickness at the point where the “healthy area” begins.
You may then identify the reason for the detachment on the back sides of the screed sections.
Thoroughly grind the substrate (60 grit), vacuum, pre-wet with water, and apply a bonding slurry.
Apply the new screed wet-on-wet. Then, at least for this repaired section, there should be “peace” in the future.
-----------------------
Regards, KlaRa
KlaRa schrieb:
Hello questioner.
Are you sure it is a self-leveling screed?
Since it can only be a cement-bound screed and self-leveling screeds based on cement have always been prone to cracking due to their almost uncontrollable internal stresses, I suspect it is actually a damp concrete bonded screed that was compacted in place.
Anyway: the bonding zone between the concrete surface and the screed, for whatever reason, was unable to withstand the forces.
The first question before any repair work is: WHY did this happen? A crucial question before continuing to build on an unresolved systematic fault.
Procedure:
For the initial assessment to determine which area is affected, you need a medium-sized hammer and a piece of chalk.
Run the hammerhead over the screed surface; you can detect (hear) detached bonded screed areas by the sound.
Use chalk to mark the boundary between loose and firm areas on the screed surface. It’s best to use oil-based chalk, which lasts several weeks.
After about 3 to 4 weeks (the garage can be used in the meantime), check again to see if the marked boundary still matches the actual condition.
If YES: remove the loose screed plus an additional 10 to 30cm (4 to 12 inches) into the "healthy area."
First, cut through the screed thickness with an angle grinder where the "healthy area" begins.
You may then be able to identify on the back sides of the screed sections the reason why it detached there.
Thoroughly grind the substrate (60 grit), vacuum, pre-wet with water, and apply a bonding slurry.
Install the new screed wet on wet, then at least this renewed section will remain stable in the future.
-----------------------
Regards, KlaRaHello, thank you for your reply.
It is definitely a self-leveling screed; it was poured in liquid form and is floating on the concrete slab with a membrane in between.
Should I only remove the damaged part and re-pour, or remove everything and pour a full concrete overlay?
Hello questioner,
I am writing these lines (as well as the previous ones) not just for the sake of writing, but you can assume that I understand the subject area (this as a primary indication, since you have not claimed otherwise either).
Using a self-leveling screed as well as a screed on a separating layer for a garage is very unusual and should be considered an exceptional solution.
This is partly because cement-based self-leveling screeds are still classified as highly prone to cracking, and screeds used as garage floors are usually applied as approximately 35 mm (1.4 inches) thick bonded constructions, not as screeds on a separating layer.
Based on the screed thickness you provided (70 mm (2.8 inches)), the structure should at least theoretically withstand the expected breaking forces.
Judging from the damage patterns, I would almost exclude causes other than workmanship defects.
If you decide to remove the screed, we will probably find backing membrane folds extending into the cross-section of the screed right at the fracture edges visible in the photos, which significantly weakens the structure.
In my opinion, this cause of damage is the most likely.
Whether other causes have contributed to the damage can only be assessed on site.
If you still have warranty claims on the screed work, do not attempt any repairs yourself. Instead, file a written defect notice to the builder or your contractual partner with a deadline for remedying the defect.
------------------------
Regards (and please keep us informed about further developments): KlaRa
B
Benutzer 100326 Mar 2018 09:48Hello Forum,
In this case, moisture first penetrated the screed and over time froze during frost periods. The moisture in the screed was only able to freeze near the gate area, so damages are present only there.
If the entire screed were defective, then damage would appear across the whole surface.
Nowadays, a drainage channel is usually installed in front of the gate to effectively drain away any moisture.
Renovation without at least replacing the damaged section of the screed is not possible. Therefore, I would renew the entire screed.
I would carry out the demolition myself. Since the floor rests on a separating layer, the removal should be relatively straightforward.
Whether you install the new screed bonded to the substrate or on a separating layer doesn’t matter with a thickness of 7.00 cm (2.75 inches). However, the risk of damage is always lowest with bonded installation.
It is much more important to take additional measures to prevent moisture ingress in the future. This could be achieved by the aforementioned drainage channel.
Alternatively, the gate frame can be sealed on the outside and the entire screed protected from moisture penetration with a suitable coating. However, this is a special construction and requires separate planning.
Best regards
Kristof
Similar topics