Preliminary information:
City villa (built in 2019)
36.5 cm Poroton blocks without insulation, finished with silicone resin plaster
Garage (added later as self-build)
6.50 m * 9 m (21 ft 4 in * 29 ft 6 in)
24.5 cm Poroton blocks
1 interior wall with 11.5 cm Poroton blocks (4.5 inches)
Wood flat roof
Access to the house
The concrete slab will be poured for both structures together by the general contractor.
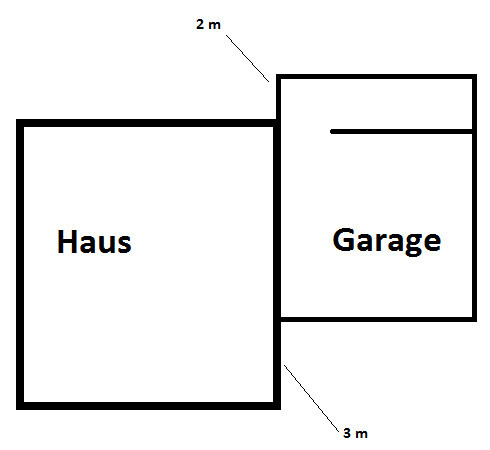
A sketch showing the garage’s position relative to the house is attached.
When planning to add the garage later, we initially considered building it with four separate walls.
However, we were recently advised to attach the garage directly to the house without a separating wall.
I actually prefer this option because it would give us about 25 cm (10 inches) more interior space.
Now to my question:
Where and how is the roof attached or supported on the house side?
Will the ridge beam (purlin) be omitted and the rafters fixed to the masonry using joist hangers?
Is that sufficient to carry the load?
Or is it possible to create recesses in the house’s masonry to install internal joist hangers so the rafters rest inside the house wall? (But there would have to be quite a few of them, which probably wouldn’t look good before building the garage, I assume.)
What other options are there?
I can’t just screw a ridge beam to the house wall with bolts the thickness of reinforced concrete, can I?
Yes, we will also discuss this with an architect and general contractor, but I prefer to go into such conversations with some prior knowledge so I don’t get sold a pig in a poke.
Thanks for your input.
City villa (built in 2019)
36.5 cm Poroton blocks without insulation, finished with silicone resin plaster
Garage (added later as self-build)
6.50 m * 9 m (21 ft 4 in * 29 ft 6 in)
24.5 cm Poroton blocks
1 interior wall with 11.5 cm Poroton blocks (4.5 inches)
Wood flat roof
Access to the house
The concrete slab will be poured for both structures together by the general contractor.
A sketch showing the garage’s position relative to the house is attached.
When planning to add the garage later, we initially considered building it with four separate walls.
However, we were recently advised to attach the garage directly to the house without a separating wall.
I actually prefer this option because it would give us about 25 cm (10 inches) more interior space.
Now to my question:
Where and how is the roof attached or supported on the house side?
Will the ridge beam (purlin) be omitted and the rafters fixed to the masonry using joist hangers?
Is that sufficient to carry the load?
Or is it possible to create recesses in the house’s masonry to install internal joist hangers so the rafters rest inside the house wall? (But there would have to be quite a few of them, which probably wouldn’t look good before building the garage, I assume.)
What other options are there?
I can’t just screw a ridge beam to the house wall with bolts the thickness of reinforced concrete, can I?
Yes, we will also discuss this with an architect and general contractor, but I prefer to go into such conversations with some prior knowledge so I don’t get sold a pig in a poke.
Thanks for your input.

Yes, exactly like that. The structural design only specified 17.5 cm (7 inches) bricks and just those three walls. This means I step directly from the house wall into the garage.
To still ensure the necessary stability, the two reinforced concrete columns were required, and the open partition wall was constructed as a "doorway." That’s also why the masonry pillar for the partition wall is there. The positions are marked in my last post.
Are you planning to park two cars side by side in there? That will be really tight with the 5.60 m (18 feet 4 inches) width. You would ideally need to park them staggered to open the doors properly, especially if you have something like a cabinet or similar in the garage.
Or are you building with a partition wall as well? Depending on the vehicles, staggered parking may then be more difficult.
No, the floor slabs were poured in one piece. Unfortunately, I can’t provide a photo from the front showing how it was attached anymore, as everything has already been plastered and there is no visible joint now.
I can only give you a tip: if you make a reinforced concrete column at the house masonry, separate it from the wall in some way. I didn’t do this on the advice of my masons and hastily built the formwork late at night so I could use the concrete delivery intended for the house ceiling the next morning.
In hindsight, I was repeatedly told this should have been separated to prevent cracks in the plaster and for acoustic isolation purposes.
I’ll briefly list the remaining steps I carried out.
(Yes, I deviated somewhat from the original structural design but always consulted extensively with professionals in advance to find alternatives that were equivalent or even better.)
The reinforced concrete ring beam was cast onto the masonry using formwork boards, giving it a full wall thickness of 17.5 cm (7 inches) all around. It was properly reinforced all around, and each corner was professionally executed. This is really important, so please research it. I don’t remember exactly, but I think there were about six angles per corner, such as: inside-inside, outside-outside, inside-outside, and the same on top and bottom. Please double-check this.
I poured the ring beam with a slope and saved myself the extra lintel for the gate. My ring beam is approx. 34 cm (13.5 inches) high at the front and 20 cm (8 inches) at the back. For the 5-meter (16 feet 5 inches) gate opening, it was poured down further so that it reaches about 55 cm (22 inches) high above the gate. For this, I had a structural engineer / reinforced concrete specialist design a steel cage with the required rebar diameters, which I then built myself.
The cage was about 6.20 m (20 feet 4 inches) long and about 52 cm (20 inches) high, with stirrups approximately every 10 cm (4 inches), and six steel bars ranging in thickness from 16 to 12 mm. I left gaps in the bricks at the upper part of the supports around the gate so the cage could rest securely and relieve the entire lintel (as every lintel needs a certain bearing length).
To increase the slope further, I attached rafter supports to the ring beam: about 14 cm (6 inches) thick at the front, 10 cm (4 inches) on the partition wall, and 8 cm (3 inches) on the rear wall.
I laid the rafters in one piece without the rafter joint on the middle wall that was originally planned in the structural design. However, I discussed this with the structural engineer, who advised me not to fully nail the rafters at the far end. Instead, I used longer nails left about 2 cm (0.8 inches) sticking out. This is to prevent the middle partition wall from creating a lever effect on the rafters under heavy load that could lift the ring beam at the rear wall.
All in all, I achieved exactly a 2% slope.
Additionally, I built a roof overhang all around because I simply found it nicer and more practical. I won’t go into further detail here, as I guess it’s not of interest to everyone, and you could also just buy longer rafters (which wasn’t an option for me because, by chance, I already had the rafters on site—but in the “wrong” length, without an overhang).
The roof was then sheathed with 22 mm (7/8 inch) OSB boards, covered with roofing sheets, sealed by welding, and finished.
It sounds so easy when writing it down, but there was a lot of research, time, effort, and sweat involved. I only finished the last work two weeks ago in subzero temperatures. But that’s just a side note =D
Okay, that got a bit longer here now. If you want more details, feel free to ask. I’m happy to provide information as soon as I have time.
And finally, a note: my text only briefly describes what I DID and is not meant as a recommendation for DIYers to do the same. It was very important to me to build everything as professionally correct as possible since this is a lifetime project, not something for a few years. During the process, I spent an incredible amount of time on Google, YouTube, but mostly in conversations with real professionals to get expert opinions—especially for unusual or special ideas—so that nothing eventually collapses or looks like a makeshift job.
E
Eberhardt17 Dec 2020 13:32Patkia schrieb:
Yes, that's exactly how it is. The structural design only specified 17.5 cm (7 inches) thick bricks and only those three walls. So, I basically step right from the house wall into the garage.
To still ensure the necessary stability, two reinforced concrete columns were required, and the open partition wall was built as a "doorway." Hence, the masonry pillar for the partition wall. The positions are marked in my previous post.
Are you planning to fit two cars side by side? That would be really tight with the 5.60 m (18 feet 4 inches) width. You would pretty much need to park them staggered to open the doors properly, especially if you also have something like a cabinet in the garage.
Or are you building with a partition wall as well? Depending on the vehicle, that might make staggered parking difficult.
No, the floor slabs were poured in one piece. Unfortunately, I can’t provide a photo from the front showing how it connects, since everything is already plastered, and the transition is no longer visible.
As a tip: if you make a reinforced concrete column connected to the house masonry, separate them in some way. I didn’t do this on the advice of my masons and then quickly made a formwork late into the night so I could use the concrete delivery intended for the house ceiling the next morning.
Afterwards, I was repeatedly told this should have been separated to prevent plaster cracks and for acoustic separation.
I’ll briefly list the remaining steps I completed.
(Yes, I deviated somewhat from the original structural plans, but before each change, I consulted experts intensively to ensure the alternatives were equivalent or even better.)
The ring beam was cast using formwork boards set on the masonry so that it has the full wall thickness of 17.5 cm (7 inches) all around. Of course, it’s fully reinforced and every corner professionally executed. This is really important, so check this yourself. I can’t recall exactly, but I think each corner had six bends like: inner inner, outer outer, inner outer. The same applies for top and bottom. But please double-check that.
I poured the ring beam with a slope and saved myself an extra lintel for the gate. The ring beam is about 34 cm (13 inches) high at the front and 20 cm (8 inches) at the back. At my 5 m (16 feet 5 inches) gate opening, it was poured further down accordingly, so the beam above the gate is about 55 cm (22 inches) high. For this, I had a structural engineer/reinforced concrete specialist draw a cage with the required rebar diameters, which I then built myself.
It was about 6.20 m (20 feet 4 inches) long and around 52 cm (20 inches) high, with stirrups approximately every 10 cm (4 inches), and six steel bars between 16 and 12 mm thick. For this, I left gaps in the upper part of the wall supports around the gate so the cage would have extra bearing surface to relieve the entire lintel (since every lintel needs a certain bearing length).
To increase the slope further, I anchored rafter supports onto the ring beam: about 14 cm (6 inches) thick at the front, 10 cm (4 inches) on the partition wall, and 8 cm (3 inches) at the rear wall.
I laid the rafters in one piece, without the rafter joint on the partition wall as originally planned in the structural design. However, I discussed this with the structural engineer, who recommended not fully nailing the rafters at the very back but using somewhat longer nails that protrude about 2 cm (¾ inch). The idea is that with heavy loads in the middle of the roof, the partition wall could act as a lever on a rafter and in the worst case lift the ring beam on the rear wall.
All in all, I achieved exactly a 2% slope.
Additionally, I built a roof overhang all around because I simply found it more attractive and practical. I won’t go into details here as it might not interest everyone, or one could just buy longer rafters (which I couldn’t because I already had the rafters on site, but by chance in the “wrong” length without overhang).
The roof was then covered with 22 mm (¾ inch) OSB boards, finished with metal flashing, sealed, and done.
It’s easy to write about, but it took a lot of research, time, effort, and even some injuries. I completed these last steps just two weeks ago in subzero temperatures. But that’s another story =D
Okay, it turned into quite a bit more here. If you want more details, feel free to ask. I’m happy to provide information when I have time.
Finally, a note: my text only briefly describes what I DID and is not an instruction for any DIYer to do exactly the same. It was absolutely important for me to build everything as professionally correct as possible because this is a lifetime project, not just for a few years.
I spent an incredible amount of time with Google, YouTube, and especially conversations with real experts to get informed opinions—especially for special or unconventional ideas—so nothing collapses later or just looks hastily thrown together. Thanks for taking the time to give such a detailed description!
The garage is meant to be a large single-car garage; it’s too narrow for two cars. Still, I want to somehow gain the approximately 20 cm (8 inches) of space by omitting the garage wall against the house wall.
My problem is that the floor slab was not poured together with the house slab. I need to research whether such a design is possible without a garage wall at the house wall when the slabs are separate.
I’ll take your tips and consult an architect to see what solutions they suggest... Sometimes you just don’t know where to start.
Next time, best to have the garage built along with the house... another lesson learned.
Thanks!
Well, I’m also unsure whether that might cause issues because of different settling behavior or something similar. That’s why the only thing I had done exactly the same way was the foundation slab. Otherwise, I completely understand that you want to save the space of the fourth wall. I was glad that it was possible.
My only advice is, if you can squeeze out a little more space, go for it. It’s really important to leave some space between the garage and the house so you can walk all around the building. I still find that useful, and the space in the garage is sufficient. However, looking back, I sometimes wonder if I should have made the garage just 80cm (32 inches) wider. Fortunately, I didn’t have the problem of the 15-meter (50-foot) maximum length limit at the property lines. I don’t know how it is in your case.
In the end, I can still say that I’m glad I built the garage myself. Despite the stress I experienced, it was really enjoyable, I learned a lot, and it definitely cost much, much less—even compared to better equipped options.
Similar topics