ᐅ Floor-to-ceiling windows: Persistent drafts at the base area despite repairs
Created on: 11 Nov 2025 21:48
M
MelCRoeHello everyone,
Since the installation of my floor-to-ceiling windows five years ago, I have been struggling with significant drafts in the lower connection area, especially near the floor and corners. At first, the airflow was so strong that it could even be heard whistling. I constantly feel cold air around my feet, and in summer, insects/ants even get inside.
Measures taken by the company so far:
I would appreciate any feedback.
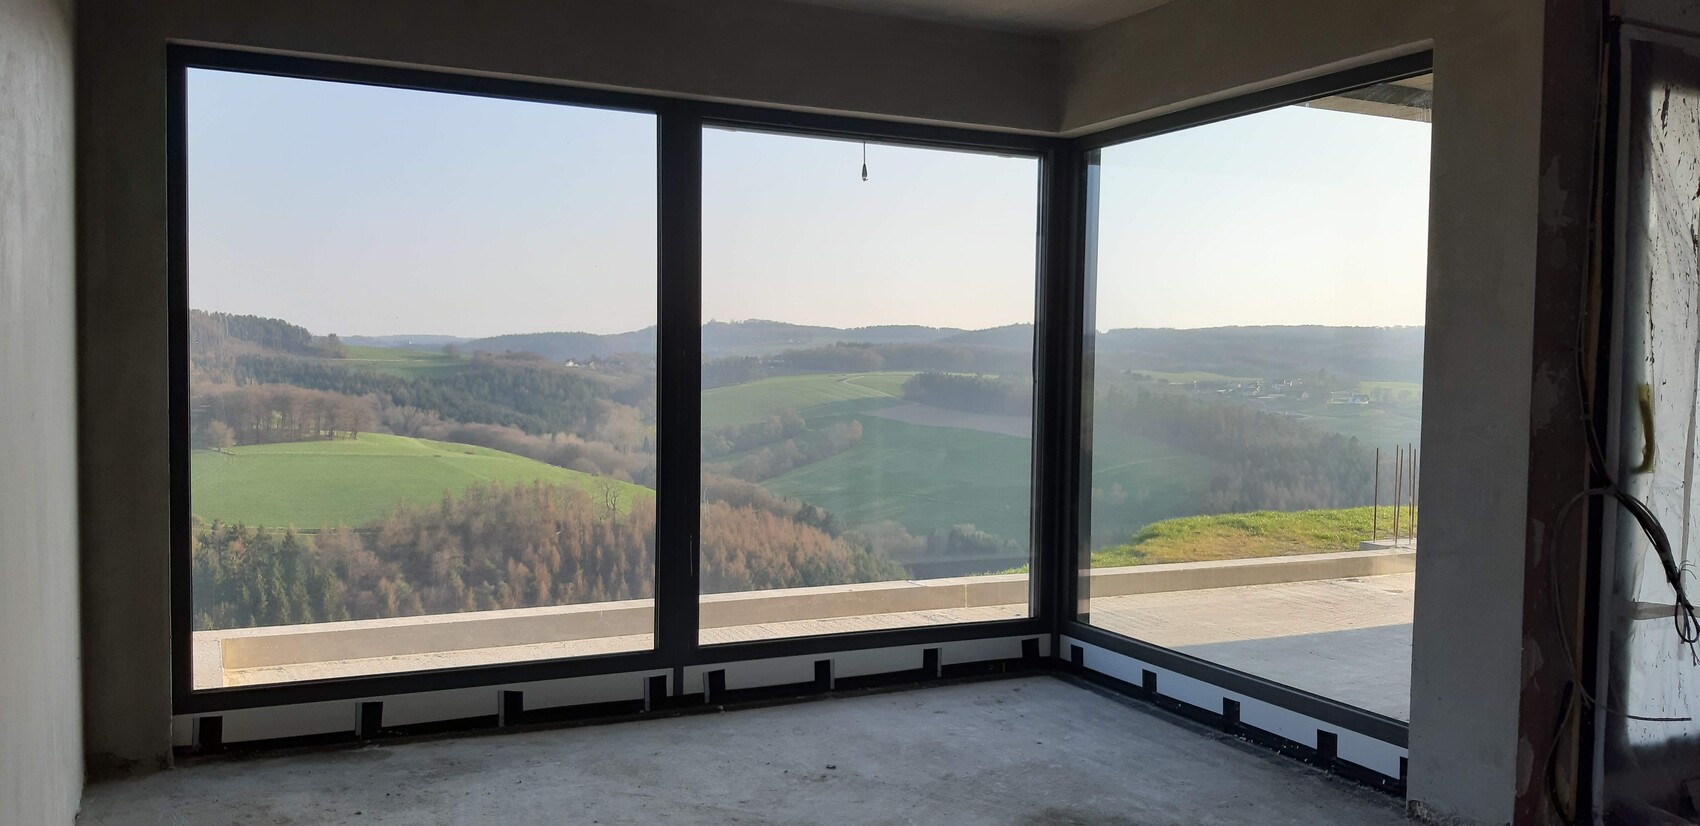
Since the installation of my floor-to-ceiling windows five years ago, I have been struggling with significant drafts in the lower connection area, especially near the floor and corners. At first, the airflow was so strong that it could even be heard whistling. I constantly feel cold air around my feet, and in summer, insects/ants even get inside.
Measures taken by the company so far:
- Annual repairs (reglazing, additional seals)
- Drilling into the frame from mid-height and injecting sealing compound
- Applying a blue sealing compound in the corners
- The base sealing was applied over the anchoring brackets, not underneath or behind them
- Despite all measures, the sealing is still not permanently airtight
- How should the sealing in the base area be professionally executed?
- What measures are permanently effective if the sealing is applied over the brackets?
- Could the drilling in the frame or injected sealing compound have caused damage?
- Are there standardized methods or materials to permanently eliminate the drafts?
I would appreciate any feedback.
Hi,
First of all: What you describe is definitely not an isolated case, and honestly, one would have expected that after several years and multiple repairs, a permanent solution should have been achieved by now. However, the problem usually lies in the details: The window sealing must also be installed underneath (!) the mounting brackets, and from your description, this does not seem to be the case. In building practice, there are no compromises – either the sealing is properly continuous (airtight on the inside, vapor-permeable on the outside, insulated in between) or it’s simply poor workmanship.
The injection of sealant afterwards is essentially a temporary fix that often does not hold in practice if the basic structural conditions were not done correctly (which you have probably noticed yourself). Additionally, drilling into the frames can cause long-term issues, including structural integrity or even warranty problems. And ants and drafts are already alarming warning signs – significant leaks apparently reach into the living space. Your photos show that the transition to the floor remained open like concrete, and no amount of carefully applied corner sealing will fix that. Has a blower door test ever been conducted?
There are standardized procedures, of course: First, there must be a continuous, glued foil layer (“RAL installation”) at the threshold area – on the warm side, meaning in front of the insulation and covering all connections without interruption. Anything else is simply shoddy workmanship that is often just concealed rather than fixed. In your case, everything would need to be opened, cleaned, and properly and permanently sealed with suitable foil or liquid sealing compound (such as illbruck or Soudal) along with a new connection. Getting an expert or a truly experienced window installer involved is essential – no more patchwork, as that only makes things worse.
Now honestly: Did you have detailed photo documentation during installation, or are there any execution plans? Also, did the window supplier provide a clear installation detail or was it just “somehow sealed”? I would be interested to know if the screed installer damaged or bypassed the connections – that is often a source of problems. It is high time that one of the responsible parties finally takes accountability instead of continuing to fumble around.
Good luck
Hello Nauer,
First of all, many thanks for taking the time to write these lines. I really appreciate that there are still people willing to share their expertise for free.
The sealing compound applied afterwards is Illbruck SP925; the expert we have now involved (unfortunately much too late :-() contacted the manufacturer, Tremco, who said that this method is absolutely unsuitable for fixing a leak in the interior airtightness layer.
I am really disappointed in our window installer. He showed up here with an alleged inspector who recommended this measure.
It was quite a major operation: removing the glazing from the windows, drilling the profiles, and injecting that material. You can’t see anything on the fixed glazing elements; however, we also have some doors where the same procedure was done. There, of course, you can see the drill holes plugged when opening the door, but blue compound is still oozing out around the edges. I really thought we'd have to accept this – very naive of me.
If at least it had been airtight afterward.
Yes, we had blower door tests done; the result was 0.79 1/h (air changes per hour) ... which apparently is quite good.
But elsewhere I was told that the result doesn’t necessarily mean the windows are properly sealed.
Overall, it was a strange experience with the blower door tester, who tried to tell me that windows can never be installed completely airtight. I think it goes without saying that this person was hired by our window installer.
It’s really disturbing how this whole system seems to work.
Yes, I took pictures regularly. After the windows were installed, the metal brackets were attached to the profiles at the bottom, and ONLY AFTER THAT the sealing was applied over the brackets.
The photo I uploaded shows the situation before the underfloor heating was installed. At that stage, only this green insulating tape was applied along the edge, and then the screed was poured.
What exactly the screed installer might have done wrong – I have no idea.
As far as I recall, he just poured the screed on and spread it.
I’m not sure what you mean by “assembly detail,” but our window installer described clearly in his offer which materials he uses for the sealing. It’s also not a “small outfit,” but rather, I would say, a relatively large manufacturer from the area near Siegburg.
Today, we received the expert’s statement, which I forwarded to the window installer, along with a two-week deadline for a competent solution proposal.
I fear this issue will drag on for quite some time. In my opinion, a major reconstruction (quite literally) will be necessary to make our house airtight.
I can imagine that unfortunately, we may have to take this to court.
Hello,
my guess is that it might be the case that:
Notes:
my guess is that it might be the case that:
- no blower door test was conducted during the construction phase.
- the blower door test was carried out on the finished, occupied house (as I understand your text) only after the "draft = leak" was reported.
- the blower door test specialist may have explained the truth in a way that was "unfortunate" and difficult for laypeople to understand, using technical German specialty terms. In brief, houses/windows are never 100% airtight for various reasons(!). Standards define how "airtight" a building must/should/can be and which "leaks" are allowed.
- no unacceptable leaks were found at the joint between the building components during the blower door test.
- no airtight sealing between profiles/thresholds/base profiles/... is present, which could explain why the "unsuccessful" remediation involved injecting something...
- it could be that actual "measurable" leaks found in the blower door test are an indication that the "watertight" exterior building waterproofing (done by another trade/planner/site manager/...) is also leaking and/or not installed properly.
- thermal bridges and/or floor-to-ceiling windows and/or corner windows like these can cause cold spots/room corners perceived by occupants as drafts.
Notes:
- with a standard residential blower door test, functional joints within windows/doors/sliding doors between sash and frame/threshold are not supposed to be included in the test measurement/evaluation according to blower door test standards… but this is still often done anyway, partly because it allows one to identify and evaluate suspicious areas, which can indicate missing exterior seals or missing seals between profiles.
Yes, a blower door test measures the overall airtightness of a building but cannot adequately assess local joints and transitions – especially around windows. The sealing method you described using the angle is technically incorrect, as there must be a continuous airtight layer there. Injecting sealing foam into drilled holes is at best a makeshift solution that will not last long and is more likely to cause problems.
The fact that the screed installer simply poured the screed over the connection could indeed lead to thermal and moisture-related issues because it quickly creates a cold spot. The green insulating tape is good but does not replace proper professional sealing.
Was the sealing at the window installer’s side carried out in detail with appropriate materials (e.g., illbruck or Soudal systems) following RAL installation guidelines – meaning airtight on the inside, vapor-permeable on the outside? Or was it done more roughly? AND was it checked whether the drilling and injected material might have affected the warranty or even the frame stability? That can become costly quickly.
Overall, this looks like a case of systematic planning failure, which your expert hopefully will clarify. Your setting of deadlines is important, because the longer you wait, the more expensive the consequential damage will become.
Are there any signs of moisture damage in the connection area? Because that would be a whole different issue…
Nauer schrieb:
The described waterproofing over the angle is technically incorrect because an airtight layer must run continuously there.Why? The generally accepted rules of technology require an airtight seal on the interior side… no more than that. How to achieve this in detail can be debated.Similar topics