ᐅ Floor plan design shortly before submitting the building permit application
Created on: 2 Oct 2017 23:25
R
R.Hotzenplotz
Hello everyone!
As some users have requested before, I’m now starting a new thread with the current planning of our detached house, which is about to be finalized.
These are the preliminary drawings for the building permit / planning permission application, and I have one last chance to review them and point out any issues.
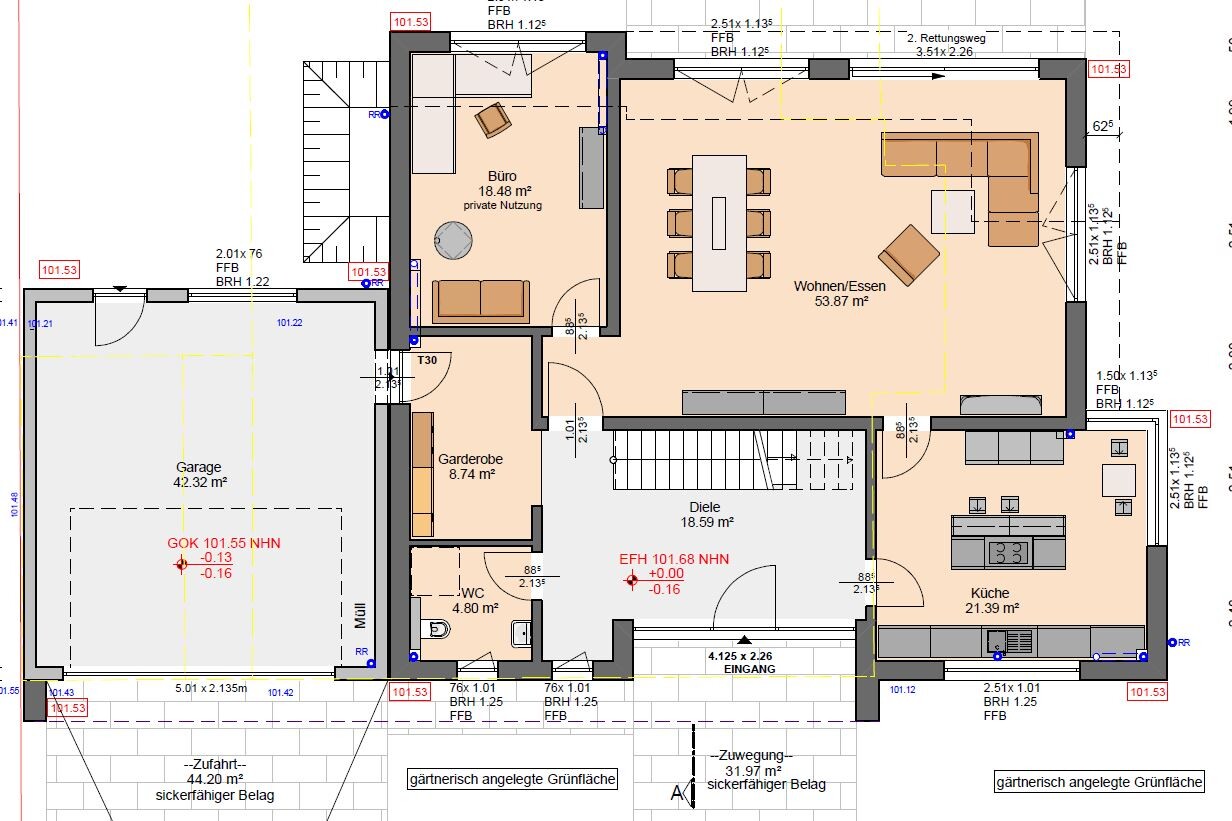
It still seems to me that there is less than 1.20m (4 feet) of space between the two wardrobes in the dressing room. Or am I seeing this wrong? Apparently, the rooms on the left and right were overlooked and not adjusted accordingly.
Two Velux ceiling spotlights are still planned to illuminate the upper floor hallway.
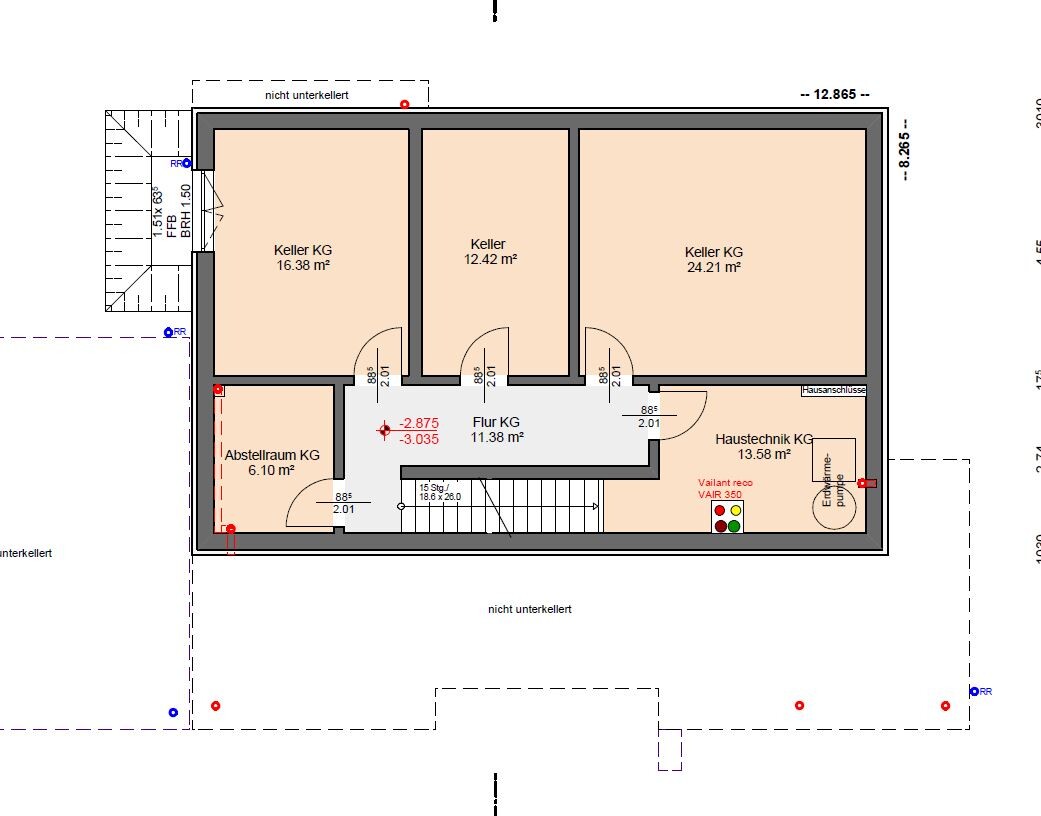
In the basement, on the right side in the upper room, a window similar to the one on the left basement side is an option.
We still haven’t decided on the T30 fire-rated door to the garage, even though it is shown in the plans. Most likely, for safety reasons and the limited use of the kitchen at the other end of the house, we will eventually forgo it.
User 11ant pointed out that the right window in child’s room 2 is suboptimally positioned. However, this could still be changed after submitting the building permit / planning permission application. Our architect thinks moving the window to the left would negatively affect the house’s exterior appearance. We’ll have to see about that.


As some users have requested before, I’m now starting a new thread with the current planning of our detached house, which is about to be finalized.
These are the preliminary drawings for the building permit / planning permission application, and I have one last chance to review them and point out any issues.
It still seems to me that there is less than 1.20m (4 feet) of space between the two wardrobes in the dressing room. Or am I seeing this wrong? Apparently, the rooms on the left and right were overlooked and not adjusted accordingly.
Two Velux ceiling spotlights are still planned to illuminate the upper floor hallway.
In the basement, on the right side in the upper room, a window similar to the one on the left basement side is an option.
We still haven’t decided on the T30 fire-rated door to the garage, even though it is shown in the plans. Most likely, for safety reasons and the limited use of the kitchen at the other end of the house, we will eventually forgo it.
User 11ant pointed out that the right window in child’s room 2 is suboptimally positioned. However, this could still be changed after submitting the building permit / planning permission application. Our architect thinks moving the window to the left would negatively affect the house’s exterior appearance. We’ll have to see about that.
Well, the philosophy isn’t entirely wrong. It’s also about shifting dew points, preventing pipes from freezing, and so on.
However, as we can now see, the pipes were installed quite freely during the construction. The wall cabinet probably won’t end up being 90cm (35 inches) wide anymore.
However, as we can now see, the pipes were installed quite freely during the construction. The wall cabinet probably won’t end up being 90cm (35 inches) wide anymore.

R.Hotzenplotz schrieb:
(I see a floor opening there, not necessarily a pipe in the corner), However, there is also a ceiling opening, probably for the drainage of the children’s bathroom, so the pipe is unavoidable and makes sense in this context. Regarding the usefulness of ignoring the connection to the kitchen planning here, I agree with you, but it doesn’t help in this case. The pipe will have to be enclosed, and the cabinet will need to be built narrower.
By the way, I would double-check the sockets (I see a desired height without reference to either the rough or finished floor level).
The window is correctly designed as a fixed element at this width, but in the kitchen plan, it is shown as operable. In the photo, it also appears to have pivot fittings (?)
https://www.instagram.com/11antgmxde/
https://www.linkedin.com/company/bauen-jetzt/
R
R.Hotzenplotz8 Jul 2018 18:23Interesting how much space the soffit will need. All the electrical cables still have to fit inside there. I’m not very optimistic. Maybe the whole thing has to be routed down along the left side of the window and then hidden under the kitchen island through the floor.
Do you mean in the kitchen or in general? What height are you referring to? No one asked me how they should be installed—apparently, it’s all standard measurements, including the light switches. Should I ask the electrician which floor construction he assumed?
The window is a fixed element.
11ant schrieb:
By the way, I would double-check the outlet heights (I see a desired height without reference to the rough or finished floor).
Do you mean in the kitchen or in general? What height are you referring to? No one asked me how they should be installed—apparently, it’s all standard measurements, including the light switches. Should I ask the electrician which floor construction he assumed?
11ant schrieb:
The window is the correct fixed element at that width, but shown as operable in the kitchen plan. In the photo, it also looks like it has opening fittings (?)
The window is a fixed element.
R
R.Hotzenplotz8 Jul 2018 22:0711ant schrieb:
By the way, I would double-check the sockets (I notice a preferred height but no reference to the rough or finished floor).After your post, I specifically went back and measured and took photos.
As I mentioned, nothing was coordinated with me; I was simply told it would be done according to standard.
First, the heights of the standard sockets. I measured from the rough floor between 45 and 47cm (18-19 inches) to the center of the red box. You might think they accounted for the 16cm (6 inch) screed and nothing else. At my home, the center of the finished socket is 30cm (12 inches) above the finished floor.
Then, in both the study, where the desk will go, and on the TV wall, there are two rows of sockets. The center of the lower row of switches is 31cm (12 inches) above the rough floor.
The sockets for the kitchen appliances are mounted 26cm (10 inches) above the rough floor.
Next, I looked at the light switches and room controllers. They are centered at 122cm (48 inches) above the rough floor. That seems low to me. At home, they are 110cm (43 inches) above the finished floor, which I find reasonable. I will need to check what the standard is to see if the current installation is okay.
I don’t think I’ve shared recent photos where the cables in the kitchen are neatly bundled. Now you really realize what a huge bulkhead will be needed there! Incredible! That’s going to ruin the whole kitchen’s look!
No idea how this will even roughly fit with the kitchen layout.
I’m also struggling to decide between a Durgo valve and a ventilation pipe as suggested by Child 1. Overall, I find it difficult, with or without the pipe, to find a reasonable bed placement in relation to the sockets and the light switch. I think these are poorly positioned.
I even climbed the scaffolding and took pictures of the solar panels.
Similar topics