P
Poolerbauer12 May 2021 13:01What Does Building a Styrofoam Pool Yourself Really Cost (in Austria)?
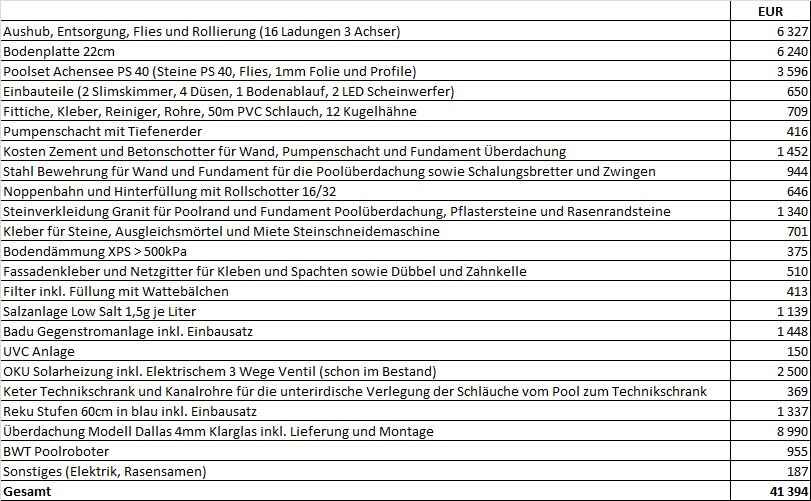
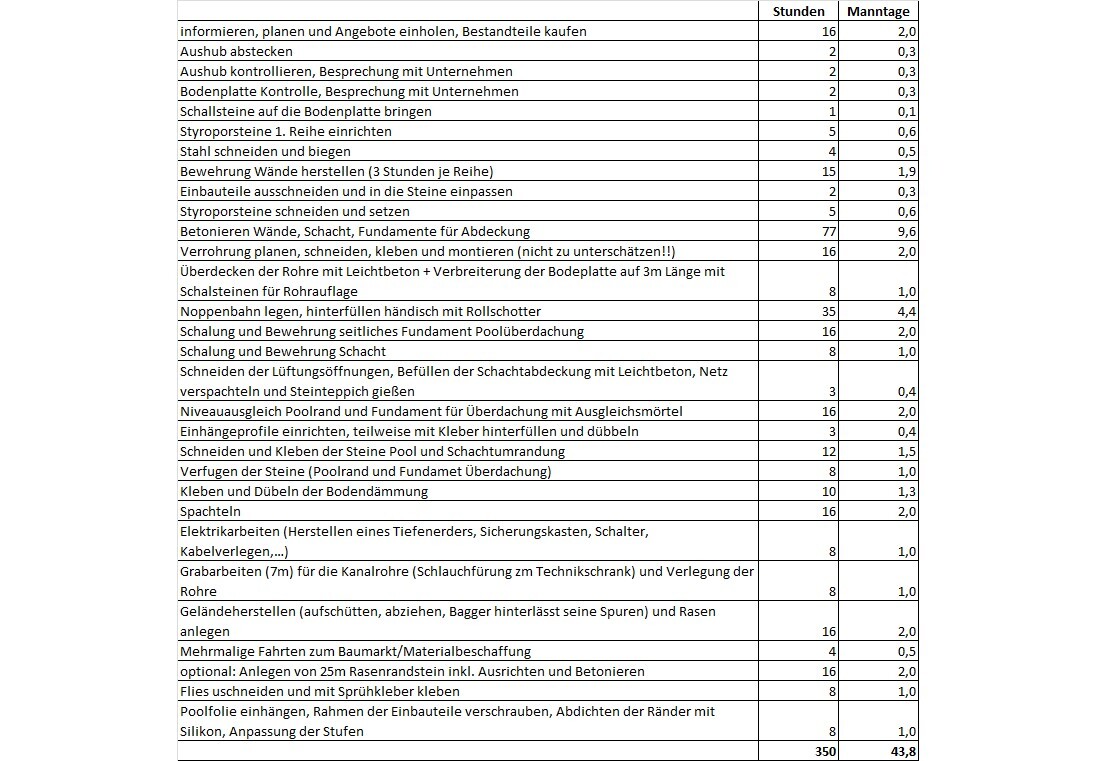
In this post, I want to provide information about the tasks and costs involved for a DIY builder of a Styrofoam pool. The pool kit itself makes up only a small part of the total expenses. To begin with: our project cost EUR 41,100 and involved almost 44 person-days of work. Below, I have broken down the individual tasks so everyone can get an idea of the costs and work involved depending on the equipment. Details follow! I would also like to note that these are our personal experiences based on the specific pool design. If anyone else has different experiences, they are welcome to share, but I won’t be discussing those here.
Why Did We Choose a Styrofoam Pool?
It was important to us that the pool is insulated on all sides, as we wanted to heat it and swim until early October or longer if possible. Since most heat escapes upwards, we also planned to build a pool enclosure. More on that later.
The following alternatives were also considered: polyethylene pool, masonry (block) or concrete pool, fiberglass (GRP) pool.
At first, the polyethylene pool appealed to us because of the relatively simple installation: excavation, construction of a slab without side reinforcement, delivery by crane (already preassembled), and backfilling the side trenches with lean concrete. To be clear: this is probably the least labor-intensive option overall. But the problem is the lifespan of such pools is stated to be about 20 years. Those years pass quickly, and then what? If the basin needs to be replaced later, the lean concrete would have to be broken up, leading to a major construction project—and additional costs. Styrofoam is, as long as it is not exposed to UV light, expected to last well beyond 40 years. Since it is used under passive house floors, it should theoretically last over 100 years—though experience is limited. A neighboring house’s 5cm (2 inch) façade Styrofoam is now 40 years old and still in great condition.
An acquaintance owns an older fiberglass pool, which is now unsightly and requires annual repairs in several places. Insulation is also difficult. However, this is definitely the cheapest option.
A fully concrete pool was not an option for us as DIY builders. A block pool (concrete blocks) was also unsuitable due to the heavy weight. Setting the blocks also requires masonry skills to ensure straight and square walls.
Therefore, we chose a Styrofoam pool because of its low weight and insulation properties. Our planning specifications were as follows:
.) Size 8 x 4 m (enough for swimming; cooling off can be done cheaply under the garden shower)
.) Flush with the ground if possible, no raised edges
.) Insulation also on the floor
.) As high a water level as possible, so a slim skimmer
.) Excavation and slab done by contractors; the rest done DIY
.) No technical shaft, as we didn’t want to crawl anywhere on hands and knees. Filter pump and counter-current system in a small shallow pump pit 80 cm (31 inches) below water level; the rest housed in a separate technical cabinet by the house a few meters away
.) Steps, no ladder
.) Pool enclosure
.) UVC clarifier and saltwater system
.) Counter-current system (mainly for fun; in our opinion not really necessary at this pool size)
Excavation
An area of about 9.3 x 5.3 meters (on the pipe-laying side slightly wider) was excavated. Planned depth was 200cm (20cm (8 inch) of lean concrete base, 22cm (9 inch) slab, 155cm (61 inch) pool height (150cm (59 inch) height + 5cm (2 inch) insulation, excluding edge slabs). The goal: granite edge slabs were to protrude about 4cm (1.5 inch) beyond the surroundings using adhesive. Since a truck could not access the site directly, a dumper was also used. In total, 16 loads of earth from a 3-axle truck were removed. Costs for excavation including laying the lean concrete base (9m3 (12 yd3) crushed gravel): EUR 6,247. Of this, excavator and dumper work cost only EUR 1,700, lean concrete EUR 670. The bulk of the cost came from removal and disposal of the soil. If you can reuse the soil on your property (e.g., landscaping), it is much cheaper. Geotextile fabric was laid between gravel and soil. Online, 150g fabric costs about EUR 80.
The Concrete Slab
The slab is 22cm (9 inch) thick, measuring 8.7 x 4.7 meters (additional overhang beyond pool size to support plumbing). Reinforcement followed my specifications. Plenty of construction plans are available online. We didn’t save on reinforcement: a maximum variant was used. Reinforcing mesh AQ 65, two vertical bars every 25cm (10 inches) for the walls, perimeter reinforcement of 2x 12mm (0.5 inch) bars as required for slabs. The vertical side reinforcement had to line up exactly with the center of the openings in the Styrofoam blocks. Cost of the slab: EUR 6,240. Concrete quality C25/30 B3 GK 16, finely smoothed. It pays off to get multiple quotes and specify concrete quality & detailed reinforcement plan. The highest quote for the same specs was almost EUR 12,000. Also, make sure the reinforcement is placed as planned.
I installed the floor drain myself after the reinforcement was completed. It was fixed with concrete and the pipe routed through the edge shuttering. Since we added 5cm (2 inch) floor insulation, the drain is raised about 4cm (1.5 inch). It’s not easy to run the pipe through the two layers of reinforcement mesh. Appropriate adhesive sleeves should be used to adjust pipe runs as needed.
Up to this point, not much has been done DIY except for the drain installation.
The Pool Set
We chose an Achensee basic set with PS40 stones. The advantage is the liner is 1mm (0.04 inch) thick, not the usual 0.8mm. The set contains the blocks, geotextile fabric, 1mm liner, and profiles for hanging the liner. Cost including delivery: EUR 3,596. Purchased online, 8 weeks delivery time. A full set including ladder and plumbing was not suitable for us since plumbing and equipment are customized and we wanted slim skimmers not included in standard sets. We didn’t need ladders either. Whether PS40 stones are essential—no experience to judge, but ours worked well.
Plumbing and Components
2 Astral slim skimmers total EUR 300, 4 Astral inlet nozzles including fittings EUR 118, 1 Astral floor drain EUR 27. Full plumbing parts, glue, cleaner, 50m (164 ft) hose, countless fittings (elbows, tees, connectors) and numerous ball valves total EUR 709. Because we separated the technical cabinet from the pump, costs are slightly higher. Skimmer and floor drain can be individually shut off or throttled with ball valves. A pool set with plumbing would have missed some of these components, leading to an additional EUR 300. Overall plumbing and nozzles cost EUR 1,127. It’s worth comparing prices. In Germany, there is an online water technology supplier offering ball valves and PVC fittings significantly cheaper than pool shops.
Additionally, we purchased 2 Astral mini underwater lights. The 50W halogen bulbs were replaced with 5W LEDs, much cheaper than buying LED floodlights as a complete package. Both lights with exchanged LED bulbs cost EUR 205. I already had a 12V power supply from an old device. The two lights provide sufficient pool illumination.
The Pump Pit
For filter pump and counter-current pump. Size 80 x 90cm, depth 80cm, floor 20cm concrete, walls 15cm concrete, self-formed shuttering and concrete, with a drain. Pumps sit slightly elevated in the pit in case of water leakage. Directly adjacent to the pool. Covered with an 80 x 80 cm hatch. The cover is filled with lightweight concrete (cement-styrofoam mix) to reduce weight. Top layer is a stone carpet finish. Under the pumps is a rubber mat for noise reduction (washer mat). Total cost including 2 ventilation openings EUR 296. Costs for concrete, shuttering, and reinforcement are not included. Several hours of work went into shuttering, reinforcement, and concrete pouring. Also, a 3m (10 ft) stainless steel grounding rod costing EUR 120 (required separately for the counter-current pump) was concreted into the pit floor. Available cheaply on eBay.
The Equipment
Filter is a single-chamber filter with a 75L tank, filled not with sand but with filter balls due to weight. Both cost EUR 413. We chose a low-salt chlorination system (1.5 grams per liter). Cost EUR 1,139. The UVC system was already owned; cost about EUR 150. The Badu counter-current system including installation kit cost EUR 1,448. A solar heating system with 12 modules was already available from the previous pool. Cost including electric 3-way valve approximately EUR 2,500. We have had good experience with this system: with 30,000L (8,000 gal), it raised the water temperature by up to 7°C (13°F) per day. It’s a primary system operated by the filter pump. When the roof temperature is higher than the pool, the filter stream is sent over the roof panels, returning warmed water. A Keter cabinet to house the equipment cost EUR 269. Hoses and cables between pump pit and equipment cabinet are installed in conduit pipes (EUR 100). Total equipment cost EUR 6,019. Of course, savings can be made on heating, salt system, and counter-current system. But since the children often spend an hour in the pool, having a chlorine-free, well-heated pool makes a big difference.
The Steps
We decided to purchase fiberglass (GRP) steps separately. This makes changing the pool liner cheaper and faster (standard liner 8 x 4 x 1.5 m). The step mounting brackets were cast into the wall. Reku steps (60cm / 24 inch wide) are simply screwed onto the wall. Cost including mounting hardware EUR 1,337. 80cm (31 inch) wide steps are also available but reduce swimming space. A Roman step (curved recess) would have been nice but we lacked space. With pool surround and extended enclosure rails, the pool now measures 11.4 m (37.4 ft) long. Building a Roman stair would also have been much more complex.
Pool Construction
The blocks in the Achensee pool set fit precisely and assembling them is generally quite fast. Generally. The slab usually isn’t perfectly level. Therefore, the first row of blocks must be carefully leveled. I used facade adhesive to shim some blocks so the first row was truly level. The main effort, however, is not assembling the blocks but creating the reinforcement. The vertical reinforcement protruding from the slab was extended up to the pool height of 150cm (59 inch). Additionally, for each of the 5 Styrofoam block rows, a double horizontal reinforcement (2x 10mm (0.4 inch) rebar) was added all around. Costs for the wall reinforcement totaled EUR 539 (630m (2,067 ft) of steel). Vertical bars were wire-tied to the horizontal reinforcement. Each row took about 3 hours of work. The delivered 7m (23 ft) rods (630m total) also needed cutting and bending, which took about 4 hours.
Originally, we planned to fill the blocks with concrete mechanically. The company that completed our slab advised against that, so filling was done by hand. First, the bottom 3 rows, then the remaining 2 with a 5cm (2 inch) concrete collar. A total of 6m3 (8 yd3) concrete in two stages. Duration: more than 2 days with up to three people. With machine filling all 5 rows at once, I find it hard to imagine the concrete flowing everywhere evenly because blocks are staggered by half and have webs in between. The horizontal reinforcement also obstructs concrete flow. Even with 3 rows, we had to help the flow with rods—without compacting! Concrete and aggregate cost EUR 1,452 (very good mix 1:3.5). This also includes concrete for the pump pit and the 40cm (15.7 inch) wide, 11.5m (38 ft) long, 22cm (9 inch) thick foundation strip for the pool enclosure. A neighbor kindly provided a mixing machine for free. Manually filling the bottom block rows is certainly one of the most strenuous tasks in pool building. The concrete must be transferred into buckets and lifted down. Upper rows can be filled directly from the wheelbarrow, which is faster and easier. Three people are needed for the bottom rows: one mixing and supplying, two filling. Additional costs of EUR 166 cover the wood formwork for the collar and the needed clamps. The total cost for concreting the walls with reinforcement was EUR 2,160. For the foundation strips on both sides (40cm (15.7 inch) wide for the enclosure), extra costs of EUR 239 arose for steel and shutter boards. Preparing this side foundation took 2 days (setting up formwork, bending and cutting rebar, tying reinforcement). Actual concrete pouring took about 8 hours with two people.
After laying the first row, plumbing for the inlet nozzles on the opposite side was glued and installed along one long side. In some places, two pipes ran side-by-side requiring the slab to be widened with block stones as support so pipes would rest properly. The pipes were fixed to the slab with brackets and covered with lightweight concrete (Styrofoam-cement mix) to provide some insulation and protect them from uneven pressure by the blocks (cost EUR 81). I would not recommend backfilling gravel directly onto the pipes.
Backfilling
A studded membrane was laid around the pool (cost EUR 106). Backfilling with gravel (13.5m3 (18 yd3)) was done manually. Cost EUR 540. Two people worked 2 days.
Edge Stones
A granite edge was ordered via eBay (cost EUR 800). For the pool enclosure foundations, matching granite slabs (40 x 60 cm (16 x 24 inch)) were purchased from a hardware store (EUR 460). EUR 75 for lawn edging stones that mark the boundary toward the neighboring property, which is slightly elevated. Also, paving stones for the pump pit surround as a border to the lawn (EUR 4.79). I installed five LED paving stones between those (EUR 77). Natural stone adhesive or special flexible adhesive and flexible grout cost EUR 234. Rental for a stone cutting machine EUR 64. You can also use an angle grinder, but cuts are less precise and there is stone chipping and large dust clouds.
One rarely mentioned detail is the leveling between the concrete collar and the liner anchor profiles before gluing the stones. The profiles are mounted to the concrete curb with nail anchors. I sometimes shimmed these with facade adhesive because the raw concrete was not perfectly even. Level differences can be corrected this way. Mounting the profiles with nail anchors goes quickly. But here’s the tricky part: there was a level difference of about 1cm (0.4 inch) between the mounted profile and concrete collar. This had to be leveled with leveling mortar, including the 40cm (16 inch) wide strip beneath the enclosure stones so they sit on the same level. A large amount of material is needed. Cost for Cimsec leveling mortar: EUR 403. One person needed 2 days’ work. This step could partly be avoided if the extra side foundations were concreted 1cm higher, but that requires forethought!
Cutting and gluing the stones requires at least one full day (first laying out, then cutting, checking, and finally gluing). Don’t underestimate the time needed for grouting, which must be done very cleanly and quickly (another 8 hours). If grout dries on rough stones, stains are hard to remove. If only the pool edge is grouted (without additional side stones), the time needed is less because fewer grout lines.
Total cost for the stone edging including foundation for the pool enclosure: EUR 2,150.
Floor Insulation and Filler
For floor insulation, we didn’t use the expensive sheets offered in pool shops. Instead, we chose XPS (extruded polystyrene) tongue-and-groove panels with compressive strength above 500 kPa (72 psi). These are stronger and cheaper. Cost EUR 375. Important: the smooth panels must be roughened with a wire brush before gluing, otherwise the facade adhesive won't stick and panels will lift after drying. Both floor and edges were skim coated (floor also glued). Adhesive cost another EUR 402. I strongly recommend skim coating the walls to get a really smooth surface. Even with PS40 stones (very stable and precise, barely yielding to concrete), the joints show through. Additional costs: a 50cm (20 inch) stainless steel notched trowel EUR 14, mesh fabric EUR 44. Work for gluing and doweling floor insulation took at least one day. This is the more intensive work since uneven slab surfaces must be compensated with adhesive. I also added dowels (facade anchors EUR 50), which took about 2 hours. Seeing that extra safety against insulation panels lifting due to possible undermining by leaks. Skim coating took 2 days for one person. Insulation and skim coating total EUR 885.
The Enclosure
We chose the Dallas model with 4mm (0.15 inch) clear glass including track extension. Cost EUR 8,990 including delivery and installation. This would nearly buy a small car. It’s also available as a kit, completely disassembled, for EUR 7,099, but then you have to install the panes and cut weatherstripping yourself. Please note that elements weigh over 150 kg (330 lbs) each, total enclosure over 600 kg (1,322 lbs). Although I am handy, after watching the assembly video it was clear to me that the enclosure should be delivered fully assembled. A middle ground is to have the pre-assembled elements delivered to the curb, but the price difference then isn’t that big anymore. For DIY assembly, at least 4 people are needed due to the weight. The track extension was very important to us so the enclosure can be retracted fully and not hang over the pool. Therefore, side foundations extend 2.5 meters (8.2 ft) beyond the pool edges. The company installation took only 3 hours.
What Other Costs Are There?
Other electrical work (main switch, fuses for counter-current and salt system, grounding cables and conduits) and grass seed cost EUR 187. Filling the pool with water cost about EUR 70.
In this post, I want to provide information about the tasks and costs involved for a DIY builder of a Styrofoam pool. The pool kit itself makes up only a small part of the total expenses. To begin with: our project cost EUR 41,100 and involved almost 44 person-days of work. Below, I have broken down the individual tasks so everyone can get an idea of the costs and work involved depending on the equipment. Details follow! I would also like to note that these are our personal experiences based on the specific pool design. If anyone else has different experiences, they are welcome to share, but I won’t be discussing those here.
Why Did We Choose a Styrofoam Pool?
It was important to us that the pool is insulated on all sides, as we wanted to heat it and swim until early October or longer if possible. Since most heat escapes upwards, we also planned to build a pool enclosure. More on that later.
The following alternatives were also considered: polyethylene pool, masonry (block) or concrete pool, fiberglass (GRP) pool.
At first, the polyethylene pool appealed to us because of the relatively simple installation: excavation, construction of a slab without side reinforcement, delivery by crane (already preassembled), and backfilling the side trenches with lean concrete. To be clear: this is probably the least labor-intensive option overall. But the problem is the lifespan of such pools is stated to be about 20 years. Those years pass quickly, and then what? If the basin needs to be replaced later, the lean concrete would have to be broken up, leading to a major construction project—and additional costs. Styrofoam is, as long as it is not exposed to UV light, expected to last well beyond 40 years. Since it is used under passive house floors, it should theoretically last over 100 years—though experience is limited. A neighboring house’s 5cm (2 inch) façade Styrofoam is now 40 years old and still in great condition.
An acquaintance owns an older fiberglass pool, which is now unsightly and requires annual repairs in several places. Insulation is also difficult. However, this is definitely the cheapest option.
A fully concrete pool was not an option for us as DIY builders. A block pool (concrete blocks) was also unsuitable due to the heavy weight. Setting the blocks also requires masonry skills to ensure straight and square walls.
Therefore, we chose a Styrofoam pool because of its low weight and insulation properties. Our planning specifications were as follows:
.) Size 8 x 4 m (enough for swimming; cooling off can be done cheaply under the garden shower)
.) Flush with the ground if possible, no raised edges
.) Insulation also on the floor
.) As high a water level as possible, so a slim skimmer
.) Excavation and slab done by contractors; the rest done DIY
.) No technical shaft, as we didn’t want to crawl anywhere on hands and knees. Filter pump and counter-current system in a small shallow pump pit 80 cm (31 inches) below water level; the rest housed in a separate technical cabinet by the house a few meters away
.) Steps, no ladder
.) Pool enclosure
.) UVC clarifier and saltwater system
.) Counter-current system (mainly for fun; in our opinion not really necessary at this pool size)
Excavation
An area of about 9.3 x 5.3 meters (on the pipe-laying side slightly wider) was excavated. Planned depth was 200cm (20cm (8 inch) of lean concrete base, 22cm (9 inch) slab, 155cm (61 inch) pool height (150cm (59 inch) height + 5cm (2 inch) insulation, excluding edge slabs). The goal: granite edge slabs were to protrude about 4cm (1.5 inch) beyond the surroundings using adhesive. Since a truck could not access the site directly, a dumper was also used. In total, 16 loads of earth from a 3-axle truck were removed. Costs for excavation including laying the lean concrete base (9m3 (12 yd3) crushed gravel): EUR 6,247. Of this, excavator and dumper work cost only EUR 1,700, lean concrete EUR 670. The bulk of the cost came from removal and disposal of the soil. If you can reuse the soil on your property (e.g., landscaping), it is much cheaper. Geotextile fabric was laid between gravel and soil. Online, 150g fabric costs about EUR 80.
The Concrete Slab
The slab is 22cm (9 inch) thick, measuring 8.7 x 4.7 meters (additional overhang beyond pool size to support plumbing). Reinforcement followed my specifications. Plenty of construction plans are available online. We didn’t save on reinforcement: a maximum variant was used. Reinforcing mesh AQ 65, two vertical bars every 25cm (10 inches) for the walls, perimeter reinforcement of 2x 12mm (0.5 inch) bars as required for slabs. The vertical side reinforcement had to line up exactly with the center of the openings in the Styrofoam blocks. Cost of the slab: EUR 6,240. Concrete quality C25/30 B3 GK 16, finely smoothed. It pays off to get multiple quotes and specify concrete quality & detailed reinforcement plan. The highest quote for the same specs was almost EUR 12,000. Also, make sure the reinforcement is placed as planned.
I installed the floor drain myself after the reinforcement was completed. It was fixed with concrete and the pipe routed through the edge shuttering. Since we added 5cm (2 inch) floor insulation, the drain is raised about 4cm (1.5 inch). It’s not easy to run the pipe through the two layers of reinforcement mesh. Appropriate adhesive sleeves should be used to adjust pipe runs as needed.
Up to this point, not much has been done DIY except for the drain installation.
The Pool Set
We chose an Achensee basic set with PS40 stones. The advantage is the liner is 1mm (0.04 inch) thick, not the usual 0.8mm. The set contains the blocks, geotextile fabric, 1mm liner, and profiles for hanging the liner. Cost including delivery: EUR 3,596. Purchased online, 8 weeks delivery time. A full set including ladder and plumbing was not suitable for us since plumbing and equipment are customized and we wanted slim skimmers not included in standard sets. We didn’t need ladders either. Whether PS40 stones are essential—no experience to judge, but ours worked well.
Plumbing and Components
2 Astral slim skimmers total EUR 300, 4 Astral inlet nozzles including fittings EUR 118, 1 Astral floor drain EUR 27. Full plumbing parts, glue, cleaner, 50m (164 ft) hose, countless fittings (elbows, tees, connectors) and numerous ball valves total EUR 709. Because we separated the technical cabinet from the pump, costs are slightly higher. Skimmer and floor drain can be individually shut off or throttled with ball valves. A pool set with plumbing would have missed some of these components, leading to an additional EUR 300. Overall plumbing and nozzles cost EUR 1,127. It’s worth comparing prices. In Germany, there is an online water technology supplier offering ball valves and PVC fittings significantly cheaper than pool shops.
Additionally, we purchased 2 Astral mini underwater lights. The 50W halogen bulbs were replaced with 5W LEDs, much cheaper than buying LED floodlights as a complete package. Both lights with exchanged LED bulbs cost EUR 205. I already had a 12V power supply from an old device. The two lights provide sufficient pool illumination.
The Pump Pit
For filter pump and counter-current pump. Size 80 x 90cm, depth 80cm, floor 20cm concrete, walls 15cm concrete, self-formed shuttering and concrete, with a drain. Pumps sit slightly elevated in the pit in case of water leakage. Directly adjacent to the pool. Covered with an 80 x 80 cm hatch. The cover is filled with lightweight concrete (cement-styrofoam mix) to reduce weight. Top layer is a stone carpet finish. Under the pumps is a rubber mat for noise reduction (washer mat). Total cost including 2 ventilation openings EUR 296. Costs for concrete, shuttering, and reinforcement are not included. Several hours of work went into shuttering, reinforcement, and concrete pouring. Also, a 3m (10 ft) stainless steel grounding rod costing EUR 120 (required separately for the counter-current pump) was concreted into the pit floor. Available cheaply on eBay.
The Equipment
Filter is a single-chamber filter with a 75L tank, filled not with sand but with filter balls due to weight. Both cost EUR 413. We chose a low-salt chlorination system (1.5 grams per liter). Cost EUR 1,139. The UVC system was already owned; cost about EUR 150. The Badu counter-current system including installation kit cost EUR 1,448. A solar heating system with 12 modules was already available from the previous pool. Cost including electric 3-way valve approximately EUR 2,500. We have had good experience with this system: with 30,000L (8,000 gal), it raised the water temperature by up to 7°C (13°F) per day. It’s a primary system operated by the filter pump. When the roof temperature is higher than the pool, the filter stream is sent over the roof panels, returning warmed water. A Keter cabinet to house the equipment cost EUR 269. Hoses and cables between pump pit and equipment cabinet are installed in conduit pipes (EUR 100). Total equipment cost EUR 6,019. Of course, savings can be made on heating, salt system, and counter-current system. But since the children often spend an hour in the pool, having a chlorine-free, well-heated pool makes a big difference.
The Steps
We decided to purchase fiberglass (GRP) steps separately. This makes changing the pool liner cheaper and faster (standard liner 8 x 4 x 1.5 m). The step mounting brackets were cast into the wall. Reku steps (60cm / 24 inch wide) are simply screwed onto the wall. Cost including mounting hardware EUR 1,337. 80cm (31 inch) wide steps are also available but reduce swimming space. A Roman step (curved recess) would have been nice but we lacked space. With pool surround and extended enclosure rails, the pool now measures 11.4 m (37.4 ft) long. Building a Roman stair would also have been much more complex.
Pool Construction
The blocks in the Achensee pool set fit precisely and assembling them is generally quite fast. Generally. The slab usually isn’t perfectly level. Therefore, the first row of blocks must be carefully leveled. I used facade adhesive to shim some blocks so the first row was truly level. The main effort, however, is not assembling the blocks but creating the reinforcement. The vertical reinforcement protruding from the slab was extended up to the pool height of 150cm (59 inch). Additionally, for each of the 5 Styrofoam block rows, a double horizontal reinforcement (2x 10mm (0.4 inch) rebar) was added all around. Costs for the wall reinforcement totaled EUR 539 (630m (2,067 ft) of steel). Vertical bars were wire-tied to the horizontal reinforcement. Each row took about 3 hours of work. The delivered 7m (23 ft) rods (630m total) also needed cutting and bending, which took about 4 hours.
Originally, we planned to fill the blocks with concrete mechanically. The company that completed our slab advised against that, so filling was done by hand. First, the bottom 3 rows, then the remaining 2 with a 5cm (2 inch) concrete collar. A total of 6m3 (8 yd3) concrete in two stages. Duration: more than 2 days with up to three people. With machine filling all 5 rows at once, I find it hard to imagine the concrete flowing everywhere evenly because blocks are staggered by half and have webs in between. The horizontal reinforcement also obstructs concrete flow. Even with 3 rows, we had to help the flow with rods—without compacting! Concrete and aggregate cost EUR 1,452 (very good mix 1:3.5). This also includes concrete for the pump pit and the 40cm (15.7 inch) wide, 11.5m (38 ft) long, 22cm (9 inch) thick foundation strip for the pool enclosure. A neighbor kindly provided a mixing machine for free. Manually filling the bottom block rows is certainly one of the most strenuous tasks in pool building. The concrete must be transferred into buckets and lifted down. Upper rows can be filled directly from the wheelbarrow, which is faster and easier. Three people are needed for the bottom rows: one mixing and supplying, two filling. Additional costs of EUR 166 cover the wood formwork for the collar and the needed clamps. The total cost for concreting the walls with reinforcement was EUR 2,160. For the foundation strips on both sides (40cm (15.7 inch) wide for the enclosure), extra costs of EUR 239 arose for steel and shutter boards. Preparing this side foundation took 2 days (setting up formwork, bending and cutting rebar, tying reinforcement). Actual concrete pouring took about 8 hours with two people.
After laying the first row, plumbing for the inlet nozzles on the opposite side was glued and installed along one long side. In some places, two pipes ran side-by-side requiring the slab to be widened with block stones as support so pipes would rest properly. The pipes were fixed to the slab with brackets and covered with lightweight concrete (Styrofoam-cement mix) to provide some insulation and protect them from uneven pressure by the blocks (cost EUR 81). I would not recommend backfilling gravel directly onto the pipes.
Backfilling
A studded membrane was laid around the pool (cost EUR 106). Backfilling with gravel (13.5m3 (18 yd3)) was done manually. Cost EUR 540. Two people worked 2 days.
Edge Stones
A granite edge was ordered via eBay (cost EUR 800). For the pool enclosure foundations, matching granite slabs (40 x 60 cm (16 x 24 inch)) were purchased from a hardware store (EUR 460). EUR 75 for lawn edging stones that mark the boundary toward the neighboring property, which is slightly elevated. Also, paving stones for the pump pit surround as a border to the lawn (EUR 4.79). I installed five LED paving stones between those (EUR 77). Natural stone adhesive or special flexible adhesive and flexible grout cost EUR 234. Rental for a stone cutting machine EUR 64. You can also use an angle grinder, but cuts are less precise and there is stone chipping and large dust clouds.
One rarely mentioned detail is the leveling between the concrete collar and the liner anchor profiles before gluing the stones. The profiles are mounted to the concrete curb with nail anchors. I sometimes shimmed these with facade adhesive because the raw concrete was not perfectly even. Level differences can be corrected this way. Mounting the profiles with nail anchors goes quickly. But here’s the tricky part: there was a level difference of about 1cm (0.4 inch) between the mounted profile and concrete collar. This had to be leveled with leveling mortar, including the 40cm (16 inch) wide strip beneath the enclosure stones so they sit on the same level. A large amount of material is needed. Cost for Cimsec leveling mortar: EUR 403. One person needed 2 days’ work. This step could partly be avoided if the extra side foundations were concreted 1cm higher, but that requires forethought!
Cutting and gluing the stones requires at least one full day (first laying out, then cutting, checking, and finally gluing). Don’t underestimate the time needed for grouting, which must be done very cleanly and quickly (another 8 hours). If grout dries on rough stones, stains are hard to remove. If only the pool edge is grouted (without additional side stones), the time needed is less because fewer grout lines.
Total cost for the stone edging including foundation for the pool enclosure: EUR 2,150.
Floor Insulation and Filler
For floor insulation, we didn’t use the expensive sheets offered in pool shops. Instead, we chose XPS (extruded polystyrene) tongue-and-groove panels with compressive strength above 500 kPa (72 psi). These are stronger and cheaper. Cost EUR 375. Important: the smooth panels must be roughened with a wire brush before gluing, otherwise the facade adhesive won't stick and panels will lift after drying. Both floor and edges were skim coated (floor also glued). Adhesive cost another EUR 402. I strongly recommend skim coating the walls to get a really smooth surface. Even with PS40 stones (very stable and precise, barely yielding to concrete), the joints show through. Additional costs: a 50cm (20 inch) stainless steel notched trowel EUR 14, mesh fabric EUR 44. Work for gluing and doweling floor insulation took at least one day. This is the more intensive work since uneven slab surfaces must be compensated with adhesive. I also added dowels (facade anchors EUR 50), which took about 2 hours. Seeing that extra safety against insulation panels lifting due to possible undermining by leaks. Skim coating took 2 days for one person. Insulation and skim coating total EUR 885.
The Enclosure
We chose the Dallas model with 4mm (0.15 inch) clear glass including track extension. Cost EUR 8,990 including delivery and installation. This would nearly buy a small car. It’s also available as a kit, completely disassembled, for EUR 7,099, but then you have to install the panes and cut weatherstripping yourself. Please note that elements weigh over 150 kg (330 lbs) each, total enclosure over 600 kg (1,322 lbs). Although I am handy, after watching the assembly video it was clear to me that the enclosure should be delivered fully assembled. A middle ground is to have the pre-assembled elements delivered to the curb, but the price difference then isn’t that big anymore. For DIY assembly, at least 4 people are needed due to the weight. The track extension was very important to us so the enclosure can be retracted fully and not hang over the pool. Therefore, side foundations extend 2.5 meters (8.2 ft) beyond the pool edges. The company installation took only 3 hours.
What Other Costs Are There?
| |
| |
Other electrical work (main switch, fuses for counter-current and salt system, grounding cables and conduits) and grass seed cost EUR 187. Filling the pool with water cost about EUR 70.
H
hanghaus200012 May 2021 13:23Are there any pictures of the construction or plans? I find it hard to follow with so much text.
J
JuliaMünchen12 May 2021 21:49We are having our pool professionally built because we simply don’t have enough DIY skills and unfortunately don’t know anyone in our circle who feels confident enough to guide us. I would have expected you to save even more money compared to a fully built pool, but considering the size, with a cover and counter-current system, it’s still a great price. Hats off to you for managing so much on your own!
If you’d like to share photos of the results or the construction process, that would be great!
For anyone looking for more experiences related to pool construction and pool purchase: The Poolpowershop forum gathers everything on the topic, and you can also admire great results from other DIY builders there.

Phew, a lot of text and unfortunately (still) no pictures.
I’m not a big fan of filter technology. I’d rather use sand or glass and backwash properly.
UVC doesn’t help with pools at all because the retention time is too short… but it’s often sold anyway.
The Oku system is great for the transitional seasons if you have the space.
Our pool is fully insulated as well. I wouldn’t do it any other way nowadays. We use it almost every day.
P
Poolerbauer17 May 2021 11:39Sorry, since I want to remain anonymous online, I won’t be sharing any photos. After 9 years of pool experience, I have a high opinion of UVC. The sizing has to be right, and the lamp needs to be replaced every 2 years. However, everyone should act according to their own experience.
This post is meant to show that building a pool is quite a complex process and cannot be completed in just 5 days. It also aims to present all the costs involved for the builder, which are often downplayed or not mentioned online. Those who are truly interested will read it. There are plenty of nice photos available online anyway.
This post is meant to show that building a pool is quite a complex process and cannot be completed in just 5 days. It also aims to present all the costs involved for the builder, which are often downplayed or not mentioned online. Those who are truly interested will read it. There are plenty of nice photos available online anyway.
Similar topics