ᐅ Cracks in the plaster facade of the external thermal insulation composite system (ETICS) – possible expansion joints?
Created on: 12 Dec 2012 19:42
Z
zeus2007Hello!
We have now been living in our house for 4 years. The house was built using timber frame construction (prefabricated house) and was plastered on the outside.
After the house was completed, a wooden cladding was immediately installed around the house (eaves) without the external thermal insulation composite system (ETICS) being applied at that time; that was done later. Perimeter insulation boards were installed under the wooden cladding (these were nailed with hammer and nails).
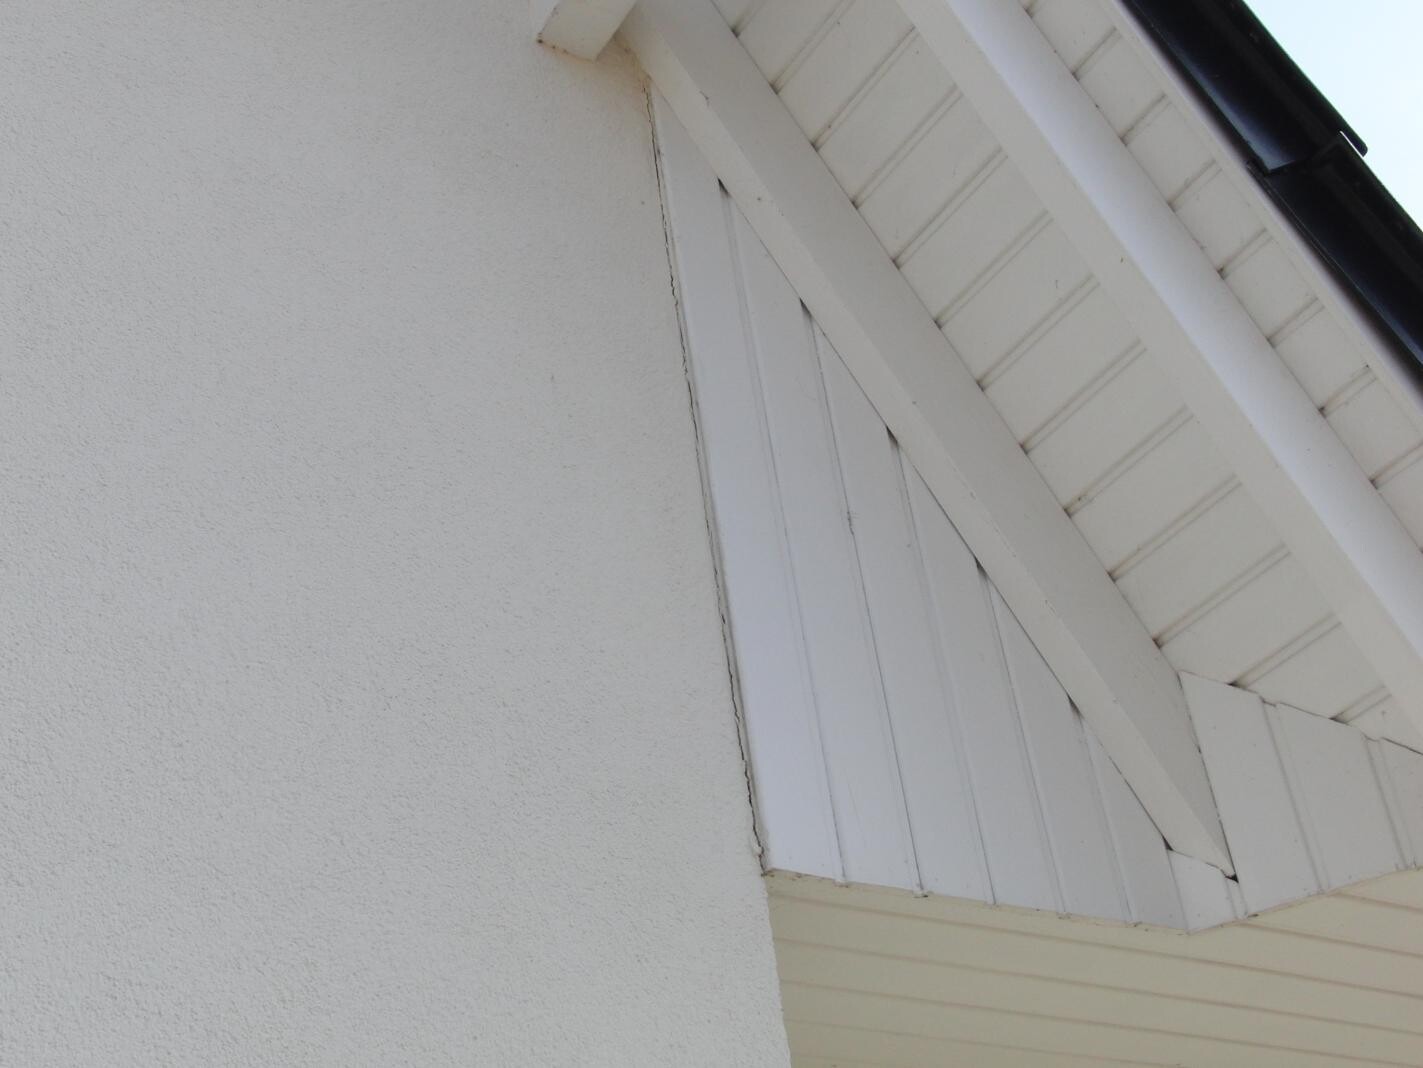
Then the ETICS was applied and extended up to the cladding and plastered. The remaining gaps were sealed with acrylic (?). The joints at the extension (Dutch gable) were also sealed with acrylic and painted over.
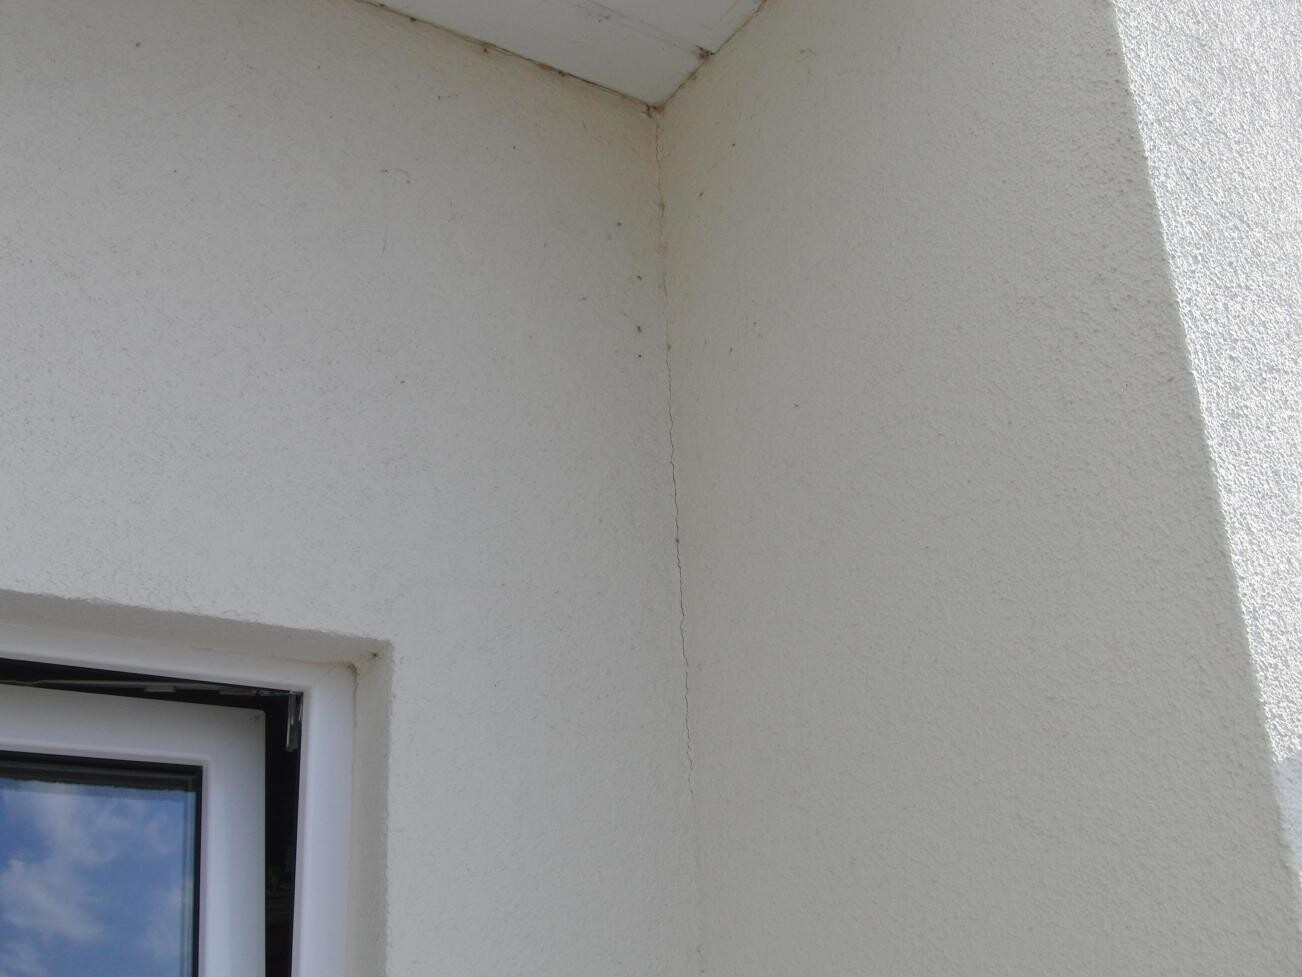
Now cracks have developed in these joints, and there is a risk of moisture ingress.
Also, the insulation boards near the lower part of the windows seem to have shifted slightly and detached by about 3mm (1/8 inch), allowing moisture to get in there.
My question is:
Was this installation sequence correct? I would have expected the ETICS to be installed and plastered first, and then the wooden cladding added afterwards.
What does a professional installation look like?
The builder says these are movement joints!?
What can I do in this case? Should I remove and repair the joints myself? Is it common to seal these with acrylic? Or should I keep insisting with the builder since I still have warranty coverage?
The painting company has already visited twice (2011/12) and only re-covered the cracks with acrylic.
So far, I have not been able to find any information about a similar case online, and the building waterproofing standards (DIN) do not explicitly address this issue.
Here are some photos:
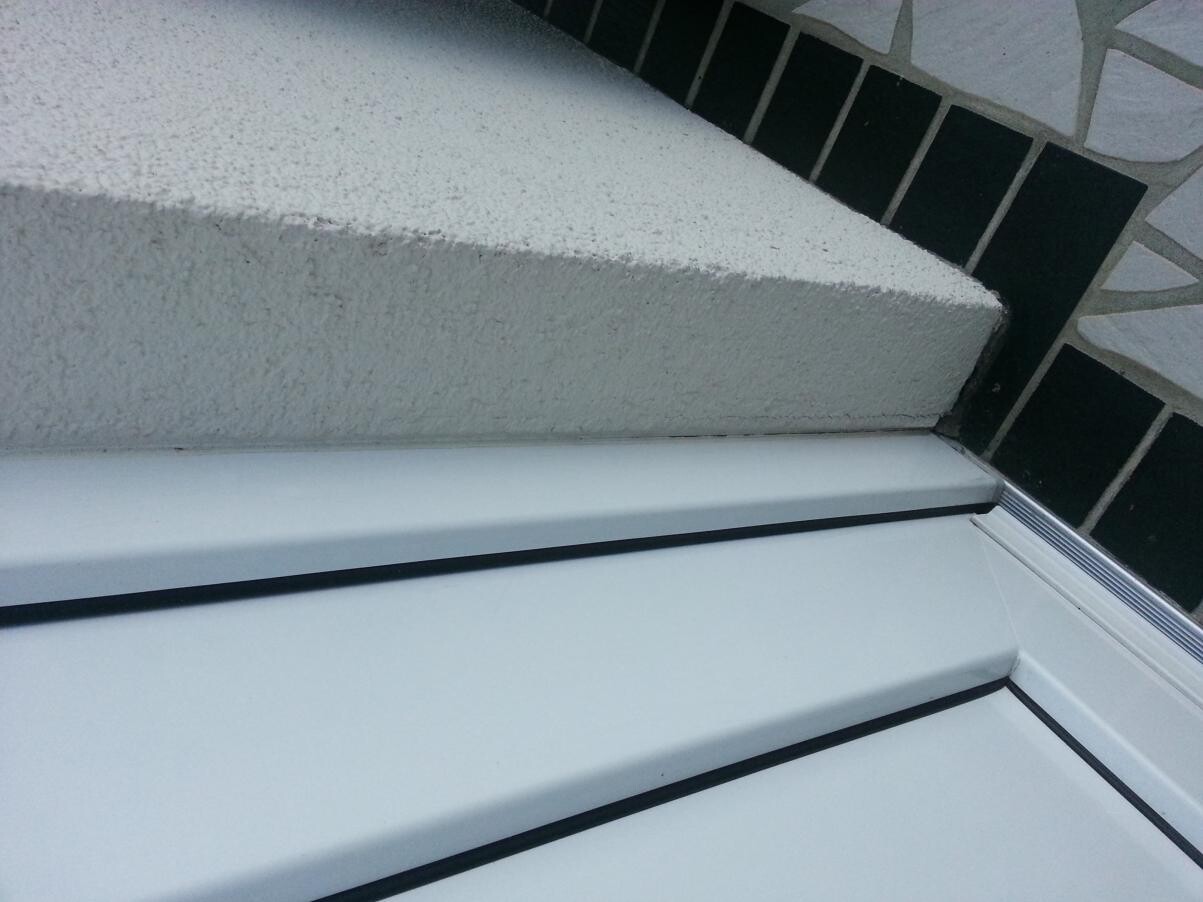
The last photo shows the detachment of the ETICS in the lower areas (at the front door). I have already tried sealing this gap with acrylic myself, but the gap has enlarged again.
Floor-to-ceiling windows show almost the same detachment.


Thank you for your responses!

We have now been living in our house for 4 years. The house was built using timber frame construction (prefabricated house) and was plastered on the outside.
After the house was completed, a wooden cladding was immediately installed around the house (eaves) without the external thermal insulation composite system (ETICS) being applied at that time; that was done later. Perimeter insulation boards were installed under the wooden cladding (these were nailed with hammer and nails).
Then the ETICS was applied and extended up to the cladding and plastered. The remaining gaps were sealed with acrylic (?). The joints at the extension (Dutch gable) were also sealed with acrylic and painted over.
Now cracks have developed in these joints, and there is a risk of moisture ingress.
Also, the insulation boards near the lower part of the windows seem to have shifted slightly and detached by about 3mm (1/8 inch), allowing moisture to get in there.
My question is:
Was this installation sequence correct? I would have expected the ETICS to be installed and plastered first, and then the wooden cladding added afterwards.
What does a professional installation look like?
The builder says these are movement joints!?
What can I do in this case? Should I remove and repair the joints myself? Is it common to seal these with acrylic? Or should I keep insisting with the builder since I still have warranty coverage?
The painting company has already visited twice (2011/12) and only re-covered the cracks with acrylic.
So far, I have not been able to find any information about a similar case online, and the building waterproofing standards (DIN) do not explicitly address this issue.
Here are some photos:
The last photo shows the detachment of the ETICS in the lower areas (at the front door). I have already tried sealing this gap with acrylic myself, but the gap has enlarged again.
Floor-to-ceiling windows show almost the same detachment.
Thank you for your responses!
Hello Zeus,
Are you sure the external thermal insulation composite system (ETICS) was installed by a professional company? Joint connections must be executed properly. Were approved pre-compressed sealing or swelling tapes installed in the connection areas? Simply "smearing" acrylic into the joints is not professional and does not comply with the manufacturer's guidelines.
Are you sure the external thermal insulation composite system (ETICS) was installed by a professional company? Joint connections must be executed properly. Were approved pre-compressed sealing or swelling tapes installed in the connection areas? Simply "smearing" acrylic into the joints is not professional and does not comply with the manufacturer's guidelines.
Hello Zeus,
Are you sure that the External Thermal Insulation Composite System (ETICS) was installed by a professional company? Joint connections must be executed properly. Were approved pre-compressed sealing or swelling tapes installed in the connecting joints? Simply applying acrylic sealant in the joints is not professional and does not comply with the manufacturer’s guidelines. Acrylic joints are permitted but must be correctly done. The acrylic should only contact the sides of the building components. Adhesion in the joint depth must be avoided. To achieve this, a PE backer rod is placed in the joint beforehand. Was this done? The acrylic sealant also needs to meet certain requirements and must be approved for the ETICS system. For instance, the permissible total deformation (PTD) of the sealant must be at least 20%. Additionally, the sealant should be paint-compatible, non-yellowing, and resistant to aging and weathering.
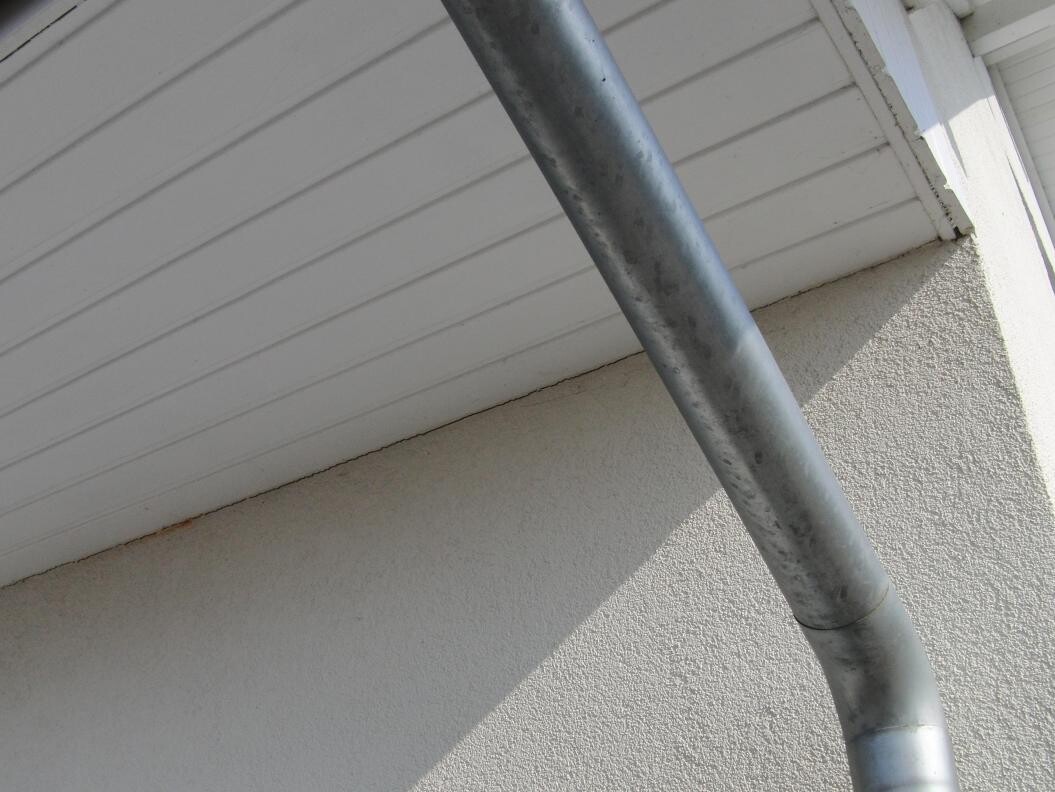
Sealing tapes are installed at all component connections (including the window sill) at the outer edge of the insulation boards. The pre-compressed sealing tapes slowly expand and reliably seal the joint. At vertical connections, the reinforcement mesh and plaster are cut with a trowel from the adjoining component down to the depth of the sealing tape. At horizontal component connections (e.g., eaves, under window sills), the reinforcement and plaster must also be chamfered at a 45-degree angle to allow moisture or water (e.g., from driving rain) to flow off freely and be drained as quickly as possible.
Connections to window and door frames can also be made using connection profiles. According to the photos, these have been installed. However, I am concerned about the detachment at the bottom of the connection profile at the front door. You mentioned this has also occurred on the floor-to-ceiling window elements. Could you please upload some additional photos of this?
In one photo, it is visible that the entrance area is tiled up to below the ETICS. Was something sealed behind that? Or is the bare perimeter board exposed there? This creates the risk that moisture can be absorbed and come into direct contact with the wood-based panels. If these panels are exposed to moisture for extended periods, they will swell and increase in volume in the affected areas. This would push the insulation outward and could have caused the detachment of the lower connection profile. Prolonged moisture exposure will damage the wood-based panel.
Are you sure that the External Thermal Insulation Composite System (ETICS) was installed by a professional company? Joint connections must be executed properly. Were approved pre-compressed sealing or swelling tapes installed in the connecting joints? Simply applying acrylic sealant in the joints is not professional and does not comply with the manufacturer’s guidelines. Acrylic joints are permitted but must be correctly done. The acrylic should only contact the sides of the building components. Adhesion in the joint depth must be avoided. To achieve this, a PE backer rod is placed in the joint beforehand. Was this done? The acrylic sealant also needs to meet certain requirements and must be approved for the ETICS system. For instance, the permissible total deformation (PTD) of the sealant must be at least 20%. Additionally, the sealant should be paint-compatible, non-yellowing, and resistant to aging and weathering.
Sealing tapes are installed at all component connections (including the window sill) at the outer edge of the insulation boards. The pre-compressed sealing tapes slowly expand and reliably seal the joint. At vertical connections, the reinforcement mesh and plaster are cut with a trowel from the adjoining component down to the depth of the sealing tape. At horizontal component connections (e.g., eaves, under window sills), the reinforcement and plaster must also be chamfered at a 45-degree angle to allow moisture or water (e.g., from driving rain) to flow off freely and be drained as quickly as possible.
Connections to window and door frames can also be made using connection profiles. According to the photos, these have been installed. However, I am concerned about the detachment at the bottom of the connection profile at the front door. You mentioned this has also occurred on the floor-to-ceiling window elements. Could you please upload some additional photos of this?
In one photo, it is visible that the entrance area is tiled up to below the ETICS. Was something sealed behind that? Or is the bare perimeter board exposed there? This creates the risk that moisture can be absorbed and come into direct contact with the wood-based panels. If these panels are exposed to moisture for extended periods, they will swell and increase in volume in the affected areas. This would push the insulation outward and could have caused the detachment of the lower connection profile. Prolonged moisture exposure will damage the wood-based panel.
Hopegro schrieb:
Hello Zeus,
are you sure that the external thermal insulation composite system (ETICS) was installed by a professional company? Connection joints must be executed properly. Were approved pre-compressed sealing or swelling tapes installed in the connection areas? Simply applying acrylic sealant into the joints is not professional and does not comply with the manufacturer’s guidelines. Acrylic joints are allowed but must be applied correctly. The acrylic must only contact the edges of the building components. Adhesion deep into the joint must be avoided. To achieve this, a polyethylene (PE) backer rod is placed in the joint beforehand. Was this done? The acrylic sealant must also meet certain requirements and must be approved for the ETICS system. For example, the maximum allowable total deformation (movement capability) of the sealant must be at least 20%. Additionally, the sealant should be paint-compatible, non-yellowing, and resistant to aging and weathering.
Sealing tapes are placed at all building component junctions (also at the window sill) at the outer edge of the insulation boards. The pre-compressed sealing tapes gradually expand and reliably seal the connection joint. At vertical connections, the reinforcing mesh and plaster are cut with a trowel knife from the connecting component to the depth of the sealing tape. At horizontal component junctions (eaves, under window sills, etc.), the reinforcing mesh and plaster must also be chamfered at a 45-degree angle to allow moisture or water (e.g., from driving rain) to drain freely and as quickly as possible.
Connections to window and door frames can also be made with connection profiles. According to the pictures, these have been installed. However, I am concerned about the lower detachment of the connection profile from the front door. You mentioned this has also occurred at the floor-to-ceiling window elements. Could you please provide more pictures of those areas?
One picture shows that the entrance area has been tiled up to under the ETICS. Has that area been sealed behind? Or is the bare perimeter board exposed? This poses a risk that moisture could penetrate and come into direct contact with the wood-based panels. If these panels remain exposed to moisture for a long time, they will swell and expand in volume where exposed. This pressure pushes the insulation outward. This may have caused the lower detachment of the connection profile. Prolonged moisture exposure will destroy the wood-based panel.Yes, the work was carried out by a professional company. I have already spoken with an expert who confirmed from the photos that connection profiles should have been used there. Whether compression tapes were installed—I would also like to know that... I can’t say! Can I check this? These tapes would have to be installed everywhere. The joints on the formwork definitely do not have these tapes! Now I hope at least that they were used in the base area and in the joints to the annex.
The tiled area is our entrance, and behind it is sealed with bitumen, perimeter insulation, and plaster. However, only up to that height, where the tile edge is. There is definitely a slope there! The expert believes that a joint there caused the damage. However, he said it can be repaired. For more details, he would need to come and inspect the site...
zeus2007 schrieb:
Yes, the work was carried out by a professional company. I have already spoken with an expert who confirmed from the photos that connection trims should have been used there. I would also like to know if compressible sealing tapes were installed… I can’t say! Can I check this? These tapes would have to be installed everywhere. The joints in the formwork definitely don’t have these tapes! Now I just hope that at least in the base area and in the joint connections to the extension they were used.If the plaster was applied right up to the connection… it is difficult to check without causing damage. But in the areas with wider cracks at the soffit, you can try shining a flashlight inside. The tapes are either black, gray, or light gray. You can also feel them… gently insert a blunt (not sharp) knife blade into the crack; after 2-3 cm (1 inch), you should feel slight resistance that yields a bit if you stop pressing… similar to pressing into a firm sponge…
The tiled area is our main entrance, and behind it is also sealed with bitumen, perimeter insulation, and plaster. However, only up to this height, exactly where the tiles start. There is definitely a slope there! The expert thinks that a joint caused this damage. But he said it can be corrected.Where was the sealing applied? On the perimeter board? Or was the sealing applied first, and then the perimeter board attached?
The sealing layer is always at the shell construction stage. That means the sealing must be done before the perimeter insulation… Then it needs to be extended upwards at least 15-20 cm (6-8 inches) as a upstand, so that the beam base/wood-based panel area is also protected against lateral moisture penetration.
The bottom detachment could indeed have been caused by a strong impact, but then the door frame would also have to be pushed inward… by exactly the 5 millimeters (0.2 inches) that are visible now. And you said you had already sealed this joint before. So it has gotten bigger? That can’t happen from a single impact. Especially since you apparently have the same problem with the other floor-to-ceiling windows?
Can you upload more photos of the other windows?
Hopegro
Similar topics