First, an overview of my planning:
I have designed an L-shaped kitchen with an additional island along the wall.
The long side features tall cabinets on both sides of the corner.
The short side under the window must not be as tall as IKEA units, otherwise it would block the window.
It also must not be as deep as IKEA units, otherwise it would obstruct the door.
Here is a top-down overview:

Please don’t mind the missing fronts; I couldn’t add suitable ones in the planner.
Also, the cabinet carcasses available do not have the desired fronts or internal layouts as I want them.
Regarding the long side:
From right to left...
- Vertical filler panel
- Tall cabinet consisting of a 20cm (8 inches) drawer, a 122cm (48 inches) high refrigerator with a 140cm (55 inches) front, and a 60cm (24 inches) compartment above
- Stove niche 200cm (79 inches) wide with wall cabinets, built-in hood, the light wall area is a niche
- Dishwasher placed high, 40cm (16 inches) drawer, dishwasher, 40cm (16 inches) compartment, 60cm (24 inches) compartment (the compartment above the dishwasher may still be adjusted)
- Tall cabinet with oven and combination microwave
- In the corner, the kitchen and coffee machine cabinet (more on this below)
- Vertical filler panel, 5cm (2 inches) wide
Around the corner, it continues with cabinet carcasses 70cm (28 inches) high.
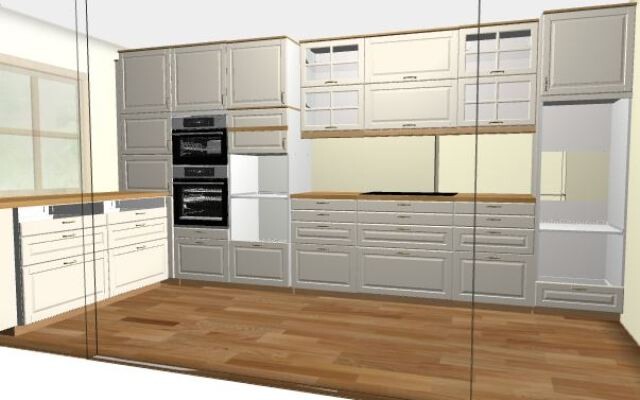
In the corner, there will be a 60x60cm (24x24 inches) cabinet carcass, 220cm (87 inches) high. Next to it, I’ve included the oven tall cabinet for better visualization.

After the continuous plinth, there is an empty corner area. To finish it off, there will be a baseboard preventing anything from falling into the corner.
At countertop height under the window, there is a filler panel to close off the countertop and to gain some distance between the door and the countertop, as the door swings over the countertop.
The door, 40cm (16 inches) high, opens towards the wall, using the UTRUSTA hinge with a 153° opening angle.
Inside is a heavy-duty pull-out – not IKEA, as they do not have a suitable one – with a fixed bottom plate.
This can accommodate the kitchen machine, which I can pull out almost flush with the countertop using additional sliders on the bottom plate.
The next door, also 40cm (16 inches) high and also opening towards the wall with the UTRUSTA hinge 153°, inside another heavy-duty pull-out with fixed bottom plate fits the coffee machine, allowing it to be pulled out at eye level.
Above this, there will be a filler panel, possibly also between the two 40cm (16 inches) doors.
Above that, a 60cm (24 inches) compartment for infrequently used items.
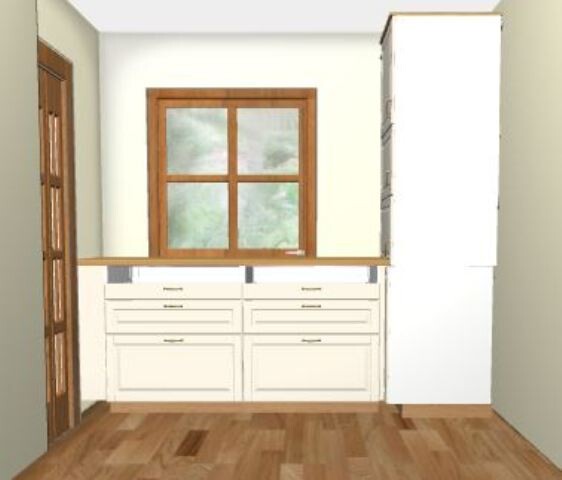
Under the window, the height to the bottom edge of the windowsill is about 83cm (33 inches).
Because there is a door on the left, I only have 57cm (22 inches) rough structural depth. The old door frame will be removed.
We will install a sliding door. The passage inside will be plastered generously, allowing me to gain a few centimeters (inches) of depth on the window side.
There, starting from the right, I want to install a filler panel to maintain clearance on the left side for opening the sliding doors. Then, two 80x60cm (31x24 inches) base cabinet carcasses will follow.
About 17cm (7 inches) of clearance will remain in the left corner for a filler panel.
We want to reduce the height of the carcasses by 10cm (4 inches) and, if possible, also reduce the depth.
The countertop depth will also be reduced (hence the 10cm (4 inches) gap shown in the image).
At the corner door, the sliding door finish will be integrated into the countertop, minimizing any overhang into the door opening.
I want to install drawers in the carcasses.
IKEA offers Maximera drawers in depths of 37cm (15 inches), 45cm (18 inches), and 60cm (24 inches). I would prefer the 60cm (24 inches) deep ones.
My question is:
Are these drawers really 60cm (24 inches) deep in actual drawer length (rail length), meaning that cabinet depth reduction is not possible? Is there maybe 1-2cm (about 1 inch) of play at the back?
After all, the internal accessories like the knife tray are only about 50cm (20 inches) deep.
I don’t want to give up over 20cm (8 inches) of storage depth along the entire width under the window because of 1-2cm (1 inch).
I want to avoid any stepped surface, as I have that currently and no longer want it.
Alternatively, would the Förvara drawers be an easier solution? These are listed with a depth of 52cm (20 inches).
Because of the 70cm (28 inches) height, I plan to install drawers of 40cm (16 inches), 20cm (8 inches), and 10cm (4 inches) height.
For Förvara, I would alternatively use three 20cm (8 inches) and one 10cm (4 inches) drawer.
A brief look at the sink island:
The partition wall hides the sliding doors. There is space in the middle to reach the plumbing as desired.
The island will be 80cm (31 inches) deep. Beside the regular cabinets, narrow cabinets will be installed on each side – 20x60cm (8x24 inches) on the left and 20x40cm (8x16 inches) on the right, shortened to fit.

Maybe someone has an idea for me.
Cheers, Sabine
I have designed an L-shaped kitchen with an additional island along the wall.
The long side features tall cabinets on both sides of the corner.
The short side under the window must not be as tall as IKEA units, otherwise it would block the window.
It also must not be as deep as IKEA units, otherwise it would obstruct the door.
Here is a top-down overview:
Please don’t mind the missing fronts; I couldn’t add suitable ones in the planner.
Also, the cabinet carcasses available do not have the desired fronts or internal layouts as I want them.
Regarding the long side:
From right to left...
- Vertical filler panel
- Tall cabinet consisting of a 20cm (8 inches) drawer, a 122cm (48 inches) high refrigerator with a 140cm (55 inches) front, and a 60cm (24 inches) compartment above
- Stove niche 200cm (79 inches) wide with wall cabinets, built-in hood, the light wall area is a niche
- Dishwasher placed high, 40cm (16 inches) drawer, dishwasher, 40cm (16 inches) compartment, 60cm (24 inches) compartment (the compartment above the dishwasher may still be adjusted)
- Tall cabinet with oven and combination microwave
- In the corner, the kitchen and coffee machine cabinet (more on this below)
- Vertical filler panel, 5cm (2 inches) wide
Around the corner, it continues with cabinet carcasses 70cm (28 inches) high.
In the corner, there will be a 60x60cm (24x24 inches) cabinet carcass, 220cm (87 inches) high. Next to it, I’ve included the oven tall cabinet for better visualization.
After the continuous plinth, there is an empty corner area. To finish it off, there will be a baseboard preventing anything from falling into the corner.
At countertop height under the window, there is a filler panel to close off the countertop and to gain some distance between the door and the countertop, as the door swings over the countertop.
The door, 40cm (16 inches) high, opens towards the wall, using the UTRUSTA hinge with a 153° opening angle.
Inside is a heavy-duty pull-out – not IKEA, as they do not have a suitable one – with a fixed bottom plate.
This can accommodate the kitchen machine, which I can pull out almost flush with the countertop using additional sliders on the bottom plate.
The next door, also 40cm (16 inches) high and also opening towards the wall with the UTRUSTA hinge 153°, inside another heavy-duty pull-out with fixed bottom plate fits the coffee machine, allowing it to be pulled out at eye level.
Above this, there will be a filler panel, possibly also between the two 40cm (16 inches) doors.
Above that, a 60cm (24 inches) compartment for infrequently used items.
Under the window, the height to the bottom edge of the windowsill is about 83cm (33 inches).
Because there is a door on the left, I only have 57cm (22 inches) rough structural depth. The old door frame will be removed.
We will install a sliding door. The passage inside will be plastered generously, allowing me to gain a few centimeters (inches) of depth on the window side.
There, starting from the right, I want to install a filler panel to maintain clearance on the left side for opening the sliding doors. Then, two 80x60cm (31x24 inches) base cabinet carcasses will follow.
About 17cm (7 inches) of clearance will remain in the left corner for a filler panel.
We want to reduce the height of the carcasses by 10cm (4 inches) and, if possible, also reduce the depth.
The countertop depth will also be reduced (hence the 10cm (4 inches) gap shown in the image).
At the corner door, the sliding door finish will be integrated into the countertop, minimizing any overhang into the door opening.
I want to install drawers in the carcasses.
IKEA offers Maximera drawers in depths of 37cm (15 inches), 45cm (18 inches), and 60cm (24 inches). I would prefer the 60cm (24 inches) deep ones.
My question is:
Are these drawers really 60cm (24 inches) deep in actual drawer length (rail length), meaning that cabinet depth reduction is not possible? Is there maybe 1-2cm (about 1 inch) of play at the back?
After all, the internal accessories like the knife tray are only about 50cm (20 inches) deep.
I don’t want to give up over 20cm (8 inches) of storage depth along the entire width under the window because of 1-2cm (1 inch).
I want to avoid any stepped surface, as I have that currently and no longer want it.
Alternatively, would the Förvara drawers be an easier solution? These are listed with a depth of 52cm (20 inches).
Because of the 70cm (28 inches) height, I plan to install drawers of 40cm (16 inches), 20cm (8 inches), and 10cm (4 inches) height.
For Förvara, I would alternatively use three 20cm (8 inches) and one 10cm (4 inches) drawer.
A brief look at the sink island:
The partition wall hides the sliding doors. There is space in the middle to reach the plumbing as desired.
The island will be 80cm (31 inches) deep. Beside the regular cabinets, narrow cabinets will be installed on each side – 20x60cm (8x24 inches) on the left and 20x40cm (8x16 inches) on the right, shortened to fit.
Maybe someone has an idea for me.
Cheers, Sabine
N
nachtvogel29 May 2016 03:58A lot has happened since then.
I’ve gotten two quotes from kitchen studios... honestly, it’s unbelievable.
Of course, it costs more, that was clear to me. Still, I wanted to see it in black and white.
But looking at the totals, I just don’t see the value anymore — it’s not worth it to me.
The installation costs aren’t actually that high; having Ikea assemble everything would cost a lot more.
Just for the cabinets, which don’t even look or feel better in quality...
and the same goes for the fronts... paying three times as much to a mid-range manufacturer
without comparable Ikea warranty...
So the final decision is to go with Ikea.
I’m in the process of revising my plans again. Not all the details are quite right yet.
Also, I’m not ordering based on the Ikea planner’s list but have made my own note sheets.
For example, I created a separate sheet for the kitchen machine cabinet,
so I can keep track during assembly which box or part belongs to that cabinet. It should make the assembly a bit clearer and easier.
I understand you... We were turned away by the studio when we gave a budget of 3000–4000 euros (including appliances). I thought that was quite shocking!
Regarding the Blanco sink, what goes inside the cabinet below? I was put off by the long siphon so far, because I wouldn’t be able to fit a waste bin in a 40cm (16 inches) high pull-out drawer.
Regarding the Blanco sink, what goes inside the cabinet below? I was put off by the long siphon so far, because I wouldn’t be able to fit a waste bin in a 40cm (16 inches) high pull-out drawer.
N
nachtvogel3 Jun 2016 23:34I understand how you feel... When we mentioned a budget of 3000-4000 euros (including appliances) to the studio, they basically dismissed us. I thought that was quite surprising!
Regarding the Blanco sink, what goes underneath in the cabinet? I was put off by the long trap so far because I wouldn’t have room for a waste bin in a 40cm (16-inch) high pull-out drawer.Well, I find that quite polite of them… they probably don’t need the business.
I ordered my kitchen yesterday, without the sink BUT with two deep drawers in the cabinet.
So, 80cm (31.5 inches) wide, 40cm (16 inches) high, and 60cm (24 inches) deep.
My husband thinks the plumbing connection will fit easily since I have extra depth there.
I still have 20cm (8 inches) of space behind the sink cabinet where my husband can install the trap.
(He’s trained for this)
N
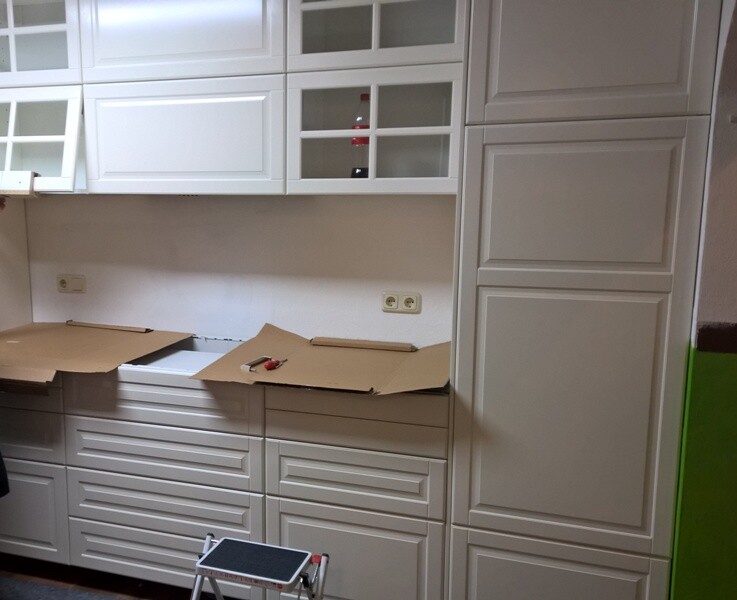
nachtvogel18 Aug 2016 04:01The Ikea delivery has arrived in the meantime.
The room is mostly ready.
Old kitchen removed... Floor and wall tiles removed... Doors and frames taken out... Leveling done.
Sliding doors and partition wall installed... Floor in place... Kitchen assembly has begun.
Yes, it takes time... Assembling a kitchen definitely has its quirks.
All cabinets adjusted to be perfectly level... Appliances installed... Somehow everything was a bit off.
The corrections cost us almost a whole day.
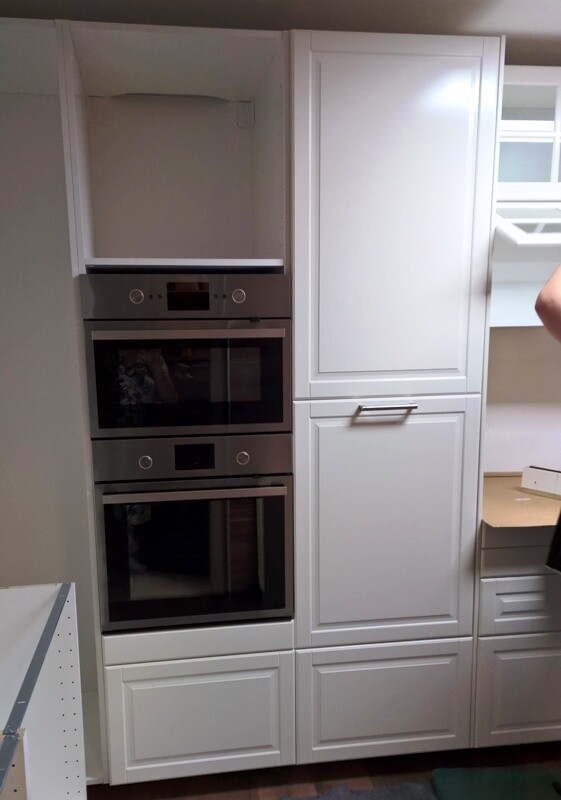
For example, the dishwasher built into a tall cabinet, the refrigerator with a 120cm (47 inches) front instead of Ikea’s specified 140cm (55 inches) front, and a drawer underneath.
So there were quite a few custom modifications, which naturally required some planning and implementation time.
But I can show you a few pictures:
Partition wall in front of the sliding doors and the new floor are also somewhat visible.
Behind the 120cm (47 inches) door, the 122cm (48 inches) high AVKYLD is hidden.

A bit more of the long cooktop side – still without the cooktop.
What the wall will look like in that cutout is still undecided.
Microwave, oven, and hidden next to them is the dishwasher.
There it is...

That went much easier than expected.
100cm (39 inches) door on top, 80cm (31 inches) dishwasher Skinhade with sliding hinge,
and below that a 40cm (16 inches) drawer. We didn’t have to adjust the fronts at all.
Tomorrow we’ll continue with the window side, handles, and well... everything else.
Bye for now, Sabine
The room is mostly ready.
Old kitchen removed... Floor and wall tiles removed... Doors and frames taken out... Leveling done.
Sliding doors and partition wall installed... Floor in place... Kitchen assembly has begun.
Yes, it takes time... Assembling a kitchen definitely has its quirks.
All cabinets adjusted to be perfectly level... Appliances installed... Somehow everything was a bit off.
The corrections cost us almost a whole day.
For example, the dishwasher built into a tall cabinet, the refrigerator with a 120cm (47 inches) front instead of Ikea’s specified 140cm (55 inches) front, and a drawer underneath.
So there were quite a few custom modifications, which naturally required some planning and implementation time.
But I can show you a few pictures:
Partition wall in front of the sliding doors and the new floor are also somewhat visible.
Behind the 120cm (47 inches) door, the 122cm (48 inches) high AVKYLD is hidden.
A bit more of the long cooktop side – still without the cooktop.
What the wall will look like in that cutout is still undecided.
Microwave, oven, and hidden next to them is the dishwasher.
There it is...
That went much easier than expected.
100cm (39 inches) door on top, 80cm (31 inches) dishwasher Skinhade with sliding hinge,
and below that a 40cm (16 inches) drawer. We didn’t have to adjust the fronts at all.
Tomorrow we’ll continue with the window side, handles, and well... everything else.
Bye for now, Sabine
I
IKEA-Experte19 Aug 2016 19:55It already looks good. What is the dishwasher standing on now?
Refrigerator with a 120cm (47 inches) front instead of the Ikea default 140cm (55 inches) front and drawer beneath.
So quite a few custom modifications, which of course took some planning and implementation time. I would be very interested in the details. I have a refrigerator that is 103cm (41 inches) tall myself, and I would really like to use a 100cm (39 inches) door instead of a 120cm (47 inches) one.
How did you do it? How tall is your refrigerator? Could you post a photo with the refrigerator door open?
Similar topics