ᐅ Extend the hardwood flooring from the hallway into the room.
Created on: 28 Oct 2021 07:06
P
Parvus6
Hello,
I would like to move my engineered parquet flooring from the hallway into the rooms, or vice versa—from the rooms into the hallway. The floor will be glued down, and I plan to cut the expansion gap afterward.
My main focus is to achieve a seamless look from the hallway into the rooms, and I want to avoid cross grain patterns.
My problem/question is: where is it best to start laying the floor? Should I begin in the hallway or in the rooms? Also, with click engineered parquet, is it possible to click the groove onto the tongue as well as the tongue onto the groove?
I would appreciate any tips or advice.
KlaRa schrieb:
Hello questioner.
It’s quite bold to want to start your flooring project right away with full-surface gluing of multilayer parquet without the necessary knowledge.
Let me put it simply:
If you understand subfloor preparation and how to handle an adhesive that must be applied and processed within a specific timeframe, then DIY parquet installation could work out for you.
You should also be familiar with the issue of wear on the notched trowel teeth.
Why do I mention this at the beginning?
Because in my professional experience, I have had to assess damage in residential properties to screeds and floors, including parquet, where the installer’s expertise was legitimately questioned.
As another contributor (BBaumeister) already pointed out, there are many factors to consider.
For example, walls are often not perfectly perpendicular to each other, and you cannot assume that the distances between opposite corners are exactly the same, so the room may be a few centimeters (inches) wider or narrower on one side compared to the other.
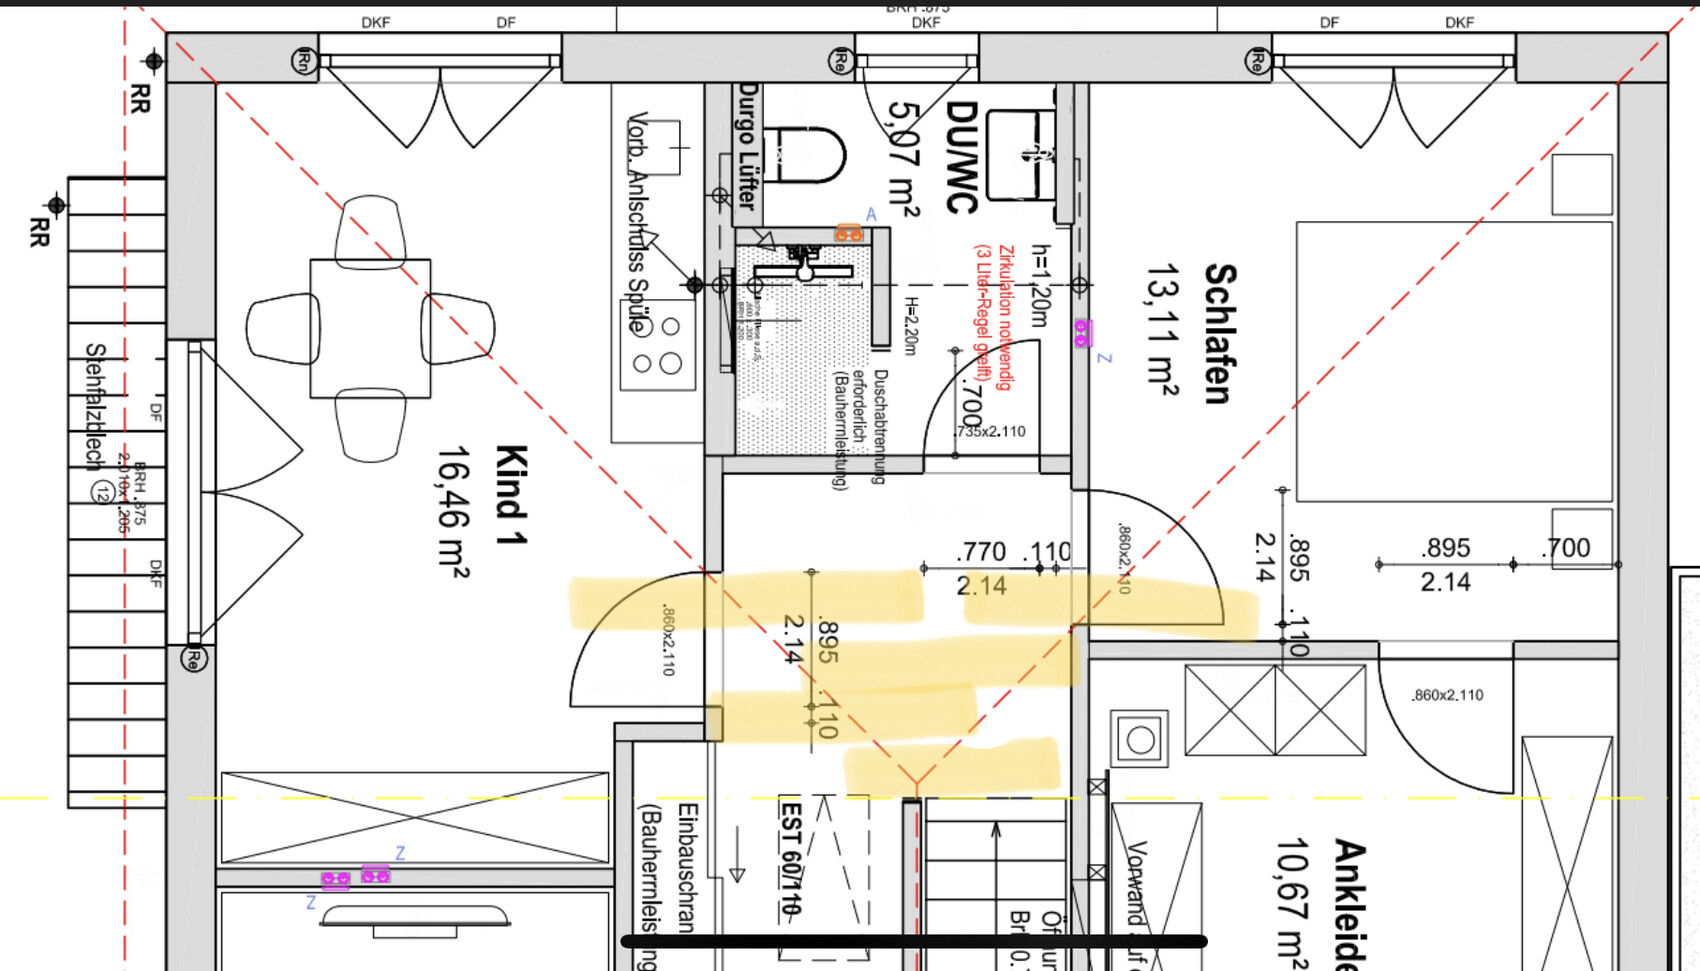
You should also keep in mind that even with full-surface gluing, you need to leave an expansion gap of at least 5mm (0.2 inches). And when laying boards lengthwise, as indicated in your plan, you should aim to end up at the side walls of the two kids’ rooms with about half the board width. Only amateurs start installing (and gluing, with no possibility of later correction) and realize afterwards that they are left with 1cm + 0.5cm (0.4 inch + 0.2 inch) expansion gaps at the edges.
The proper approach is first to measure the room width, then subtract 10mm (0.4 inches), divide by the board width, and multiply the decimal remainder by the board width.
This gives you the width of the last strip you would have if you installed the first row without further checks.
In continuous rooms—especially smaller living spaces like in your case—no movement joint between rooms is required. This joint is created during installation, not cut afterwards, which often results in poor workmanship.
Use a chalk line running through the kids’ rooms, hallway, and bedroom to transfer your width measurements and ensure a straight installation line.
----------------------
If, after these valid points, you still want to proceed with DIY installation, I wish you the best of luck!
Regards, KlaRa Funny that you assume I have never installed or glued parquet before. I never said that. Still, thanks for your interesting comments.
Best regards
Parvus6 schrieb:
My question/problem is: where is the best place to start laying the floor? In the hallway or in the room?
With click-lock engineered hardwood flooring, can I click the groove onto the tongue as well as the tongue onto the groove? Parvus6 schrieb:
It’s funny that you assume I’ve never installed or glued parquet flooring. I never said anything about that. I see it differently, for example… and since @KlaRa is a professional…
B
BBaumeister4 Nov 2021 13:10Parvus6 schrieb:
Funny that you assume I have never installed or glued parquet flooring before. I didn’t mention anything about that. Still, thanks for your interesting comments.
Best regards Well, honestly, the question of whether the groove always has to face down or if it can be installed the other way around didn’t really suggest someone with a master craftsman qualification. Of course, everyone can decide how much they want to take on themselves. However, it gets really frustrating when you end up having to throw good money after bad. I don’t know what price range your parquet flooring is in. Back then, we paid €60 per sqm (about $59 per sqft) plus adhesive, primer, tools (a miter sliding compound saw), baseboards, leveling compound, screed clips, and so on. Altogether, we bought materials worth well over €8,000 (about $8,000), which is a lot of money if you reach the point where you have to tear everything out again and either redo it yourself or pay someone else to do it.

"Well, honestly, the question of whether the groove always has to be facing down or if it can be installed the other way around didn’t exactly suggest expert knowledge."
From practical experience, it is quite "difficult" to install a parquet flooring system with side locking (simply put: click flooring) with the groove side against the wall, so that the tongue faces into the room.
This is because the locking mechanism works by angling the tongue into the groove and then clicking it down.
If – against all practical experience – it might also work the other way around, please let me know so the professional community can be revolutionized 🙂
And yes, a master craftsman should definitely be aware of this. So should a (installing) journeyman!
With humorous regards, KlaRa
S
Seppl's Häusle4 Nov 2021 15:52Putting technical details aside for a moment, wouldn’t it be better to lay the flooring according to the line of sight and the direction of the light, meaning exactly opposite to your planned installation direction?
From what I know, this makes the rooms appear larger.
I would reconsider and simply install each room with the same direction, using a clean door transition with an aluminum profile or something similar...
From what I know, this makes the rooms appear larger.
I would reconsider and simply install each room with the same direction, using a clean door transition with an aluminum profile or something similar...
Similar topics