ᐅ Extend the hardwood flooring from the hallway into the room.
Created on: 28 Oct 2021 07:06
P
Parvus6
Hello,
I would like to move my engineered parquet flooring from the hallway into the rooms, or vice versa—from the rooms into the hallway. The floor will be glued down, and I plan to cut the expansion gap afterward.
My main focus is to achieve a seamless look from the hallway into the rooms, and I want to avoid cross grain patterns.
My problem/question is: where is it best to start laying the floor? Should I begin in the hallway or in the rooms? Also, with click engineered parquet, is it possible to click the groove onto the tongue as well as the tongue onto the groove?
I would appreciate any tips or advice.
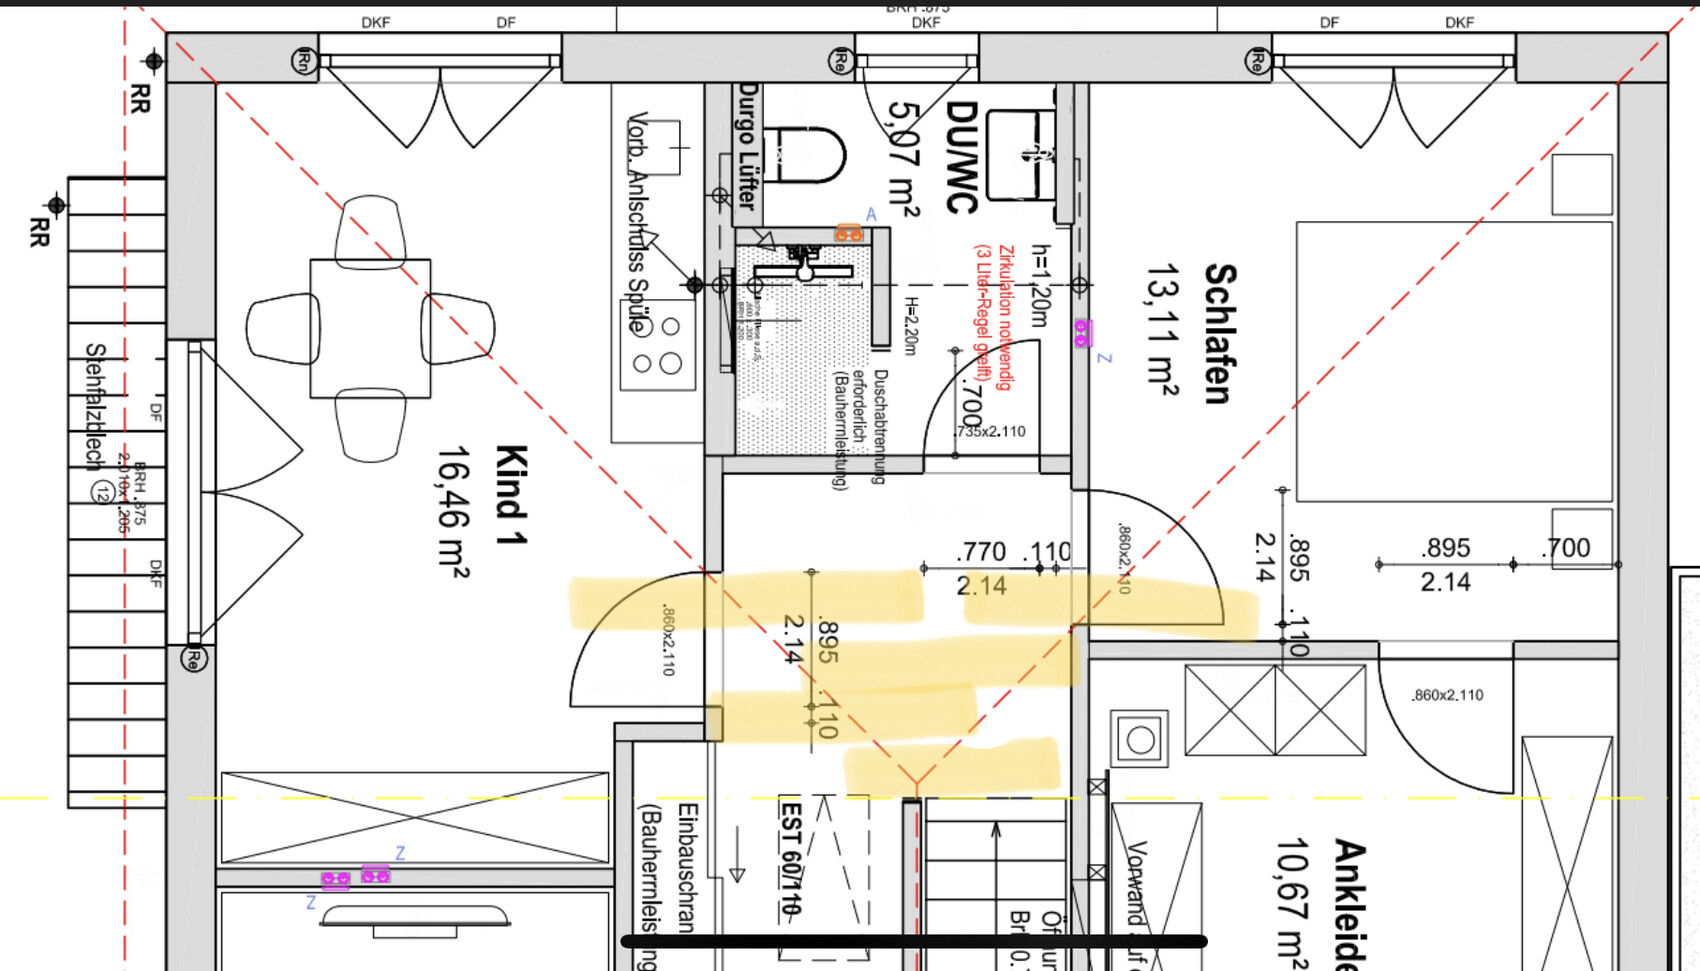
B
BBaumeister29 Oct 2021 13:47If you want to lay the parquet flooring at all costs, at least the screed should be reinforced: Use an angle grinder to cut about 4 cm (1.5 inches) deep across the joint in the screed. Do not go any deeper to avoid damaging the underfloor heating. It is best to use the angle grinder’s guard as a depth stop.
Next, insert screed staples and fill with resin. This is no guarantee it will hold, but it at least improves the chances.
Apart from that, I still see the challenge of practically implementing this if there is little experience so far. I would still start by the closet. From there, you can quickly reach the door and will have only laid a few layers. Starting from the top will be much more difficult, especially if you are not a professional. I estimate the total house width to be about 10 meters (33 feet). A few millimeters (fractions of an inch) that are not precisely level at the beginning can add up to noticeable centimeters (inches) over the 10 meters (33 feet) length.
B
Benutzer20029 Oct 2021 13:59Parvus6 schrieb:
My problem/question is, where is the best place to start installing? In the hallway or the room? Oh, do you want to lay it as drawn? So, across the room.
Then forget it. You will never get it right.
Click laminate flooring is usually installed from left to right or from top to bottom. So, according to your drawing, you would start in the child’s room at the top left and at the same time in the bedroom at the top left. Hoping that when you reach the door in the child’s room and also finish the hallway, the flooring in the bedroom matches exactly to the millimeter.
For a beginner, it is easier to start in the bottom left of the child’s room and lay it parallel to the left wall. That is how I would do it, if I really wanted to have a continuous floor.
A
Alessandro29 Oct 2021 14:18BBaumeister schrieb:
If you want to install the parquet flooring at all costs, the screed should at least be stapled: Use an angle grinder to cut about 4cm (1.5 inches) deep across the joint into the screed. Do not go deeper to avoid damaging the underfloor heating. It’s best to use the grinder’s guard as a depth stop.
Then insert screed staples and fill with resin. This does not guarantee that it will hold, but at least improves the chances.This is generally how the problem is managed. That’s exactly how it was done for me.
B
BBaumeister29 Oct 2021 14:26Superuser schrieb:
Oh, do you want to install it exactly as drawn? So, across the room.
Then forget it. You’ll never manage that.
Click flooring is usually installed from left to right or from top to bottom. According to your drawing, you would start in the top left corner of the kids' room and at the same time also in the top left corner of the bedroom. Hoping that when you reach the door in the kids' room and also finish the hallway, the flooring in the bedroom will line up perfectly down to the millimeter.
For a DIYer, it would be easier to start in the bottom left of the kids' room and then lay the flooring parallel to the left wall. That’s how I would do it if I really wanted a continuous run.I completely agree. To avoid the problem, I would also have started at the bottom by the wardrobe in the kids' room. Of course, it would be simpler to lay it parallel to the left wall. The problem is that this makes the room appear long. Since it is already longer than it is wide, I would generally prefer to lay it across the room, but definitely not continuously through three rooms.
In addition, there’s the difficulty that when gluing the flooring, it is much harder to make corrections, and you only have a limited amount of time for each section treated with adhesive. This is not suitable for the amateur handyman if you want it done this way.

Hello questioner.
That’s quite bold to want to start installing multi-layer parquet flooring with full-surface gluing without the necessary knowledge.
Let me put it simply:
If you understand the topics of subfloor preparation and handling an adhesive that must be applied and processed within a specific time window, then a DIY parquet installation might work out.
You should also be familiar with the issue of "wear on the notched trowel teeth" caused by abrasion.
Why do I mention this at the beginning?
Because, in my professional experience assessing damage to screeds and floors, including parquet, in residential buildings, the installer’s or fitter’s expertise was often legitimately questioned.
As another respondent (BBaumeister) has already explained in detail, there’s a lot to consider.
For example, walls are rarely perfectly square to each other, and it cannot be ruled out that wall surfaces at opposite corners have equal distances. This means the room might be several centimeters larger or smaller on one side compared to the opposite side.
You should also keep in mind that, even with full-surface gluing, you must leave an expansion gap of at least 5mm (0.2 inches) around the edges. Also, when laying the plank lengthwise, as indicated in your plan, you should ideally finish with half a plank width along the side walls of the two children’s rooms. Only amateurs start laying (and here even GLUING without the chance for later adjustment) and then find out that they end up with 1cm (0.4 inches) + 0.5cm (0.2 inches) expansion gap at the sides.
The correct approach is to first measure the room width, then subtract 10mm (0.4 inches) and divide that by the plank width. Multiply the decimal remainder by the plank width. This will give you the width of the last strip you would get if you simply installed the first row without further checks.
For continuous rooms—if these are smaller residential rooms, as in this case—no movement joint between the rooms needs to be created. That joint is made during installation—not cut in afterwards. Doing it afterwards leads to “botched work times ten.”
Use a chalk line stretching over the children’s rooms, hallway, and bedroom to transfer the width measurement results (for the planks) to the other rooms and to create a straight installation line.
----------------------
If, after these justified remarks, you still want to go ahead with a DIY installation, I wish you every success!
Regards, KlaRa
Similar topics