ᐅ Location of a city villa or detached single-family house on a 500 m² rectangular plot
Created on: 17 Jan 2020 18:03
T
Tolentino
Dear all,
after sharing the floor plans of my possible hamster cage with you in the other thread , here comes the next thread (thanks again for all the constructive suggestions there).
Just so you know, the semi-detached house is not off the table yet, as this plot of land is highly sought after and it’s not clear whether it will work out. But this one would be my favorite.
Now to this plot. For now, I’m mainly concerned with where and roughly how the house should be positioned on this plot.
Development plan / restrictions
Plot size: 500 m² (5400 sq ft)
Slope: none
Site coverage ratio: 0.2
Floor area ratio: 0.4
Building envelope, building line and boundary: 5 m (16 ft) from the street, 3 m (10 ft) from neighbors
Edge development: allowed for garages and sheds, none existing on the plot
Number of parking spaces: 1-2
Number of floors: 1.5–2.5
Roof shape: no preference
Architectural style: no preference
Orientation: aligned parallel to the street
Maximum heights / limits: ridge height max. 9 m (30 ft)
Below are the site plans I created myself based on the details from the listing.
This is a rough overview of the plot with building boundaries and dimensions.
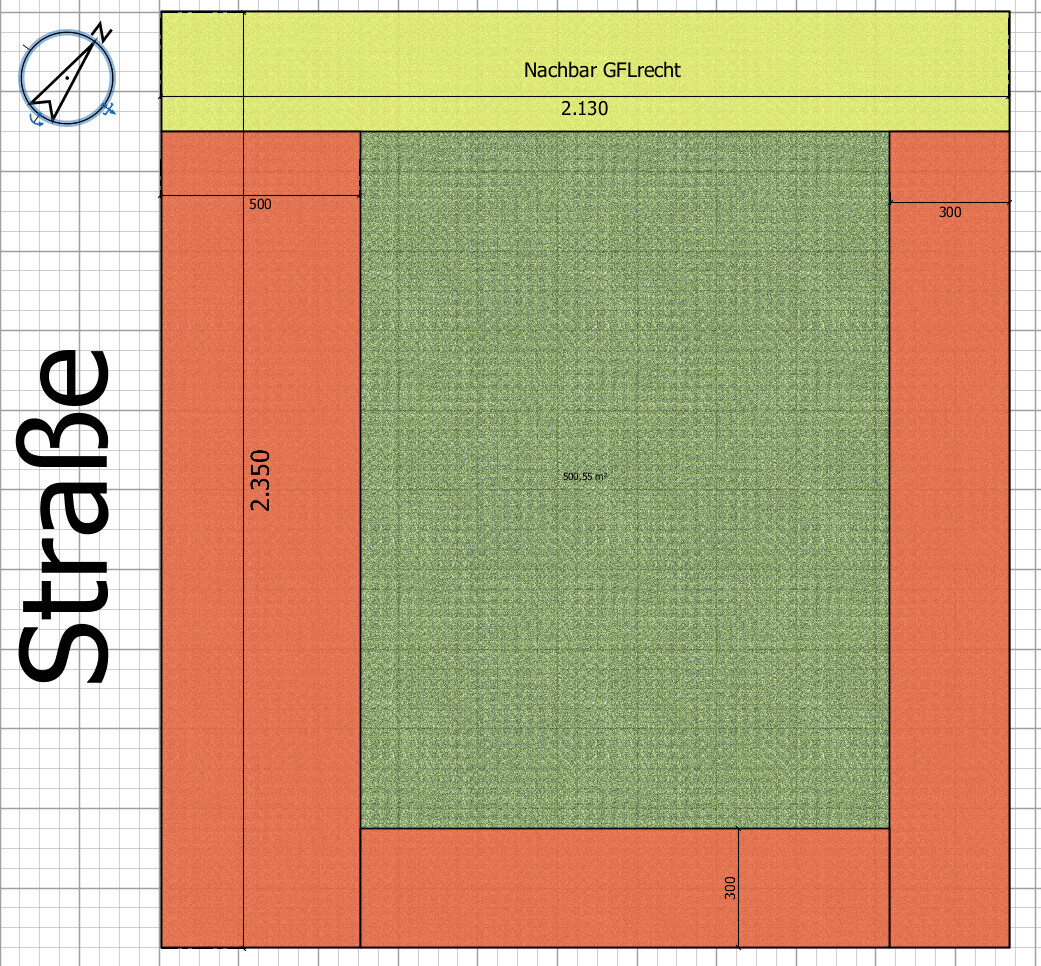
My question is: where to put the house?
The broker suggests placing it towards the back, since you already have the 5 m (16 ft) setback at the front and would “gain” about 3 m (10 ft) of garden. My partner doesn’t like this because of the visibility from the street. I say: privacy screen! But I also think, a fence too high might create a prison-yard feel.
But even if you follow this suggestion, I wonder if a more square floor plan (-> town villa style) would be better?
Like this, for example:

Then parking space might be tricky, right?
Or upright like this?
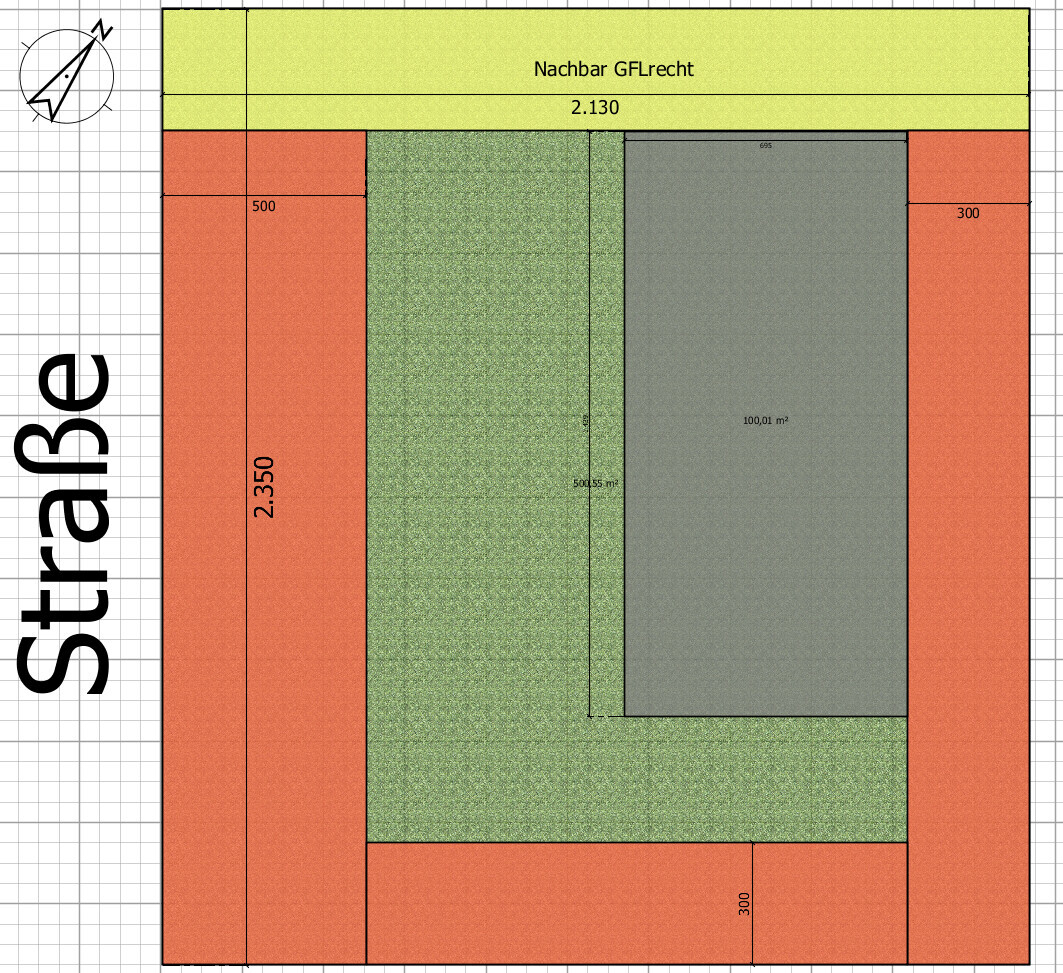
I really want as much of a west-facing view and garden as possible. I tend to be an evening person and that side is less built up, due to the road. So I think more light comes through.
But the narrow floor plan caused lots of problems with the semi-detached house already. Well, here you could build longer instead.
What do you think?
Best regards
Tolentino
after sharing the floor plans of my possible hamster cage with you in the other thread , here comes the next thread (thanks again for all the constructive suggestions there).
Just so you know, the semi-detached house is not off the table yet, as this plot of land is highly sought after and it’s not clear whether it will work out. But this one would be my favorite.
Now to this plot. For now, I’m mainly concerned with where and roughly how the house should be positioned on this plot.
Development plan / restrictions
Plot size: 500 m² (5400 sq ft)
Slope: none
Site coverage ratio: 0.2
Floor area ratio: 0.4
Building envelope, building line and boundary: 5 m (16 ft) from the street, 3 m (10 ft) from neighbors
Edge development: allowed for garages and sheds, none existing on the plot
Number of parking spaces: 1-2
Number of floors: 1.5–2.5
Roof shape: no preference
Architectural style: no preference
Orientation: aligned parallel to the street
Maximum heights / limits: ridge height max. 9 m (30 ft)
Below are the site plans I created myself based on the details from the listing.
This is a rough overview of the plot with building boundaries and dimensions.
My question is: where to put the house?
The broker suggests placing it towards the back, since you already have the 5 m (16 ft) setback at the front and would “gain” about 3 m (10 ft) of garden. My partner doesn’t like this because of the visibility from the street. I say: privacy screen! But I also think, a fence too high might create a prison-yard feel.
But even if you follow this suggestion, I wonder if a more square floor plan (-> town villa style) would be better?
Like this, for example:
Then parking space might be tricky, right?
Or upright like this?
I really want as much of a west-facing view and garden as possible. I tend to be an evening person and that side is less built up, due to the road. So I think more light comes through.
But the narrow floor plan caused lots of problems with the semi-detached house already. Well, here you could build longer instead.
What do you think?
Best regards
Tolentino

Tolentino schrieb:
Actually, the heating technician received the plans in advance and nothing specific was said about the exterior location of the sensor. Update: The heating technician said it doesn’t matter!
So, another month and a half has passed. I can hardly believe it.
What happened in the meantime:
The interior plaster was applied and dried, although weather conditions caused it to dry poorly.
My plumber was finally allowed in to install the rough-in plumbing. The following photos give an impression of both:
Ventilation in the children's room
Heating manifold on the upper floor in the same children’s room
Ventilation pipes on the upper floor run into various rooms
Upper floor bathroom, which is directly above the utility and storage room, so it has to serve as the source for pipes. The drinking water line to the bathtub had not yet been installed here…
Guest bathroom on the ground floor. Clearly illustrates why it’s a bad idea to let the plumber in only after the interior plasterer...
Guest WC pre-wall installation set
View from the utility room to the hallway and office (no, the pipe does not go to the en-suite shower in my office, but to the second outdoor faucet on the street side so the front yard can be watered sometimes).
The main unit of my mechanical ventilation system with heat recovery
Funny pipe layout in the utility room
Heating manifold on the ground floor

Tolentino schrieb:
Update: Heizi said it doesn’t matter! That’s what I would say too if I didn’t have to live in the house and just wanted to finish quickly. 😉
By the way, my neighbor, who is building with the same construction company but was able to keep the BU’s standard HSLer option, did not get insulated potable water pipes. I’m curious if he will hear the water noises... Especially since their main bathroom on the upper floor is located above the kitchen.
On the other hand, the BU’s site manager immediately raised a concern about my second outdoor faucet and a washbasin line in the exterior walls. Apparently, this violates the energy concept. The HSL supervisor said that, strictly speaking, that’s correct—the area will always insulate a little less than the rest of the wall. But on one hand, the surface area is very small, and on the other, the pipe is insulated. Moisture damage is unlikely, especially since we have a ventilation system. I wish someone had pointed this out earlier. The utility room would have been a reasonable place to install the pipes on the surface. Oh well, just a shrug and moving on...
Next phase:
Almost simultaneously, the exterior plaster was applied, and I installed the insulation underneath.
I nearly went crazy. The sheer number of pipes at various heights turned into a real nightmare. On top of that, I had the crazy idea to use better insulation than what was planned (not only to compensate for my cut-open exterior walls). I almost abandoned that plan due to rising raw material prices. Then @pagoni2020 came along with insulation he didn’t need anymore.
So I went over with a flatbed and loaded it up. Very nice guy, very pleasant interaction, even though I had pictured him differently from the forum. Thanks again @pagoni2020, happy to do it again!
So if I’m complaining now, it’s not against him but rather against myself and my high ideals.
The following floor structure was originally planned by the BU’s designer:
Interior
20mm (0.8 inch) finished flooring
70mm (2.8 inches) screed
30mm (1.2 inches) tacker board EPS 040
100mm (4 inches) EPS 035
5mm (0.2 inch) bitumen membrane
200mm (7.9 inches) concrete
Exterior
U-value (according to Ubakus) 0.258 W/m²K
My planned floor build-up on the ground floor (different on the upper floor with less thermal but more sound insulation, which is less relevant here) was:
Interior
20mm (0.8 inch) finished flooring
70mm (2.8 inches) screed
30mm (1.2 inches) tacker board EPS 045
40mm (1.6 inch) PIR 028 from Pagoni
40mm (1.6 inch) PIR 028 from Pagoni (staggered over the first layer)
20mm (0.8 inch) EPS 040 as height adjustment layer
0.2mm (0.008 inch) PE foil to protect the EPS from bitumen (read that somewhere)
5mm (0.2 inch) bitumen
200mm (7.9 inches) concrete
Exterior
U-value (Ubakus) an impressive 0.233 W/m²K
I wanted to fill the pipe channels with perlite to avoid gaps under the insulation. Unlike bound fill, which my HSLer offered, perlite also provides thermal insulation and thus reduces thermal bridges even further. I discussed this build-up with the HSLer and an expert, and both approved. The HSLer was even quite happy not to have to source the insulation himself.
What I didn’t know, and nobody told me (until it was too late), is that perlite cannot be used only for pipe channels, because it only forms a bound mass when applied over the entire surface (due to interlocking and dust). Loose perlite can slip under adjacent insulation boards if not applied fully across the surface. This makes the boards unstable and leaves unfilled voids over time.
So I looked for alternatives. There is perlite with bitumen, but then I remembered warnings about combining bitumen with EPS and thought, "No thanks."
Eventually, I found wax-coated perlite. Under pressure, the grains stick together and form a bound mass.
Extremely expensive stuff. Also hard to source on short notice. I actually found suppliers, one even in Berlin.
It’s quite dusty, so wearing a mask during installation is recommended to avoid coughing fits!
As expected, for the large ventilation ducts, the voids were so big that the perlite consumption was very high. The amount planned for the entire building was used up halfway through the upper floor.
So I had to reorder, which cost more time.
In the main bathroom, there were so many pipes that I dreaded cutting everything out. However, I had already ordered regular perlite because I was unaware of the bound form issue. So I simply filled the entire bathroom floor with perlite, balancing out the electrical and potable water pipes. Then I laid the thick 50mm (2 inch) impact sound insulation EPS boards on top and finished.
On the ground floor, I continued with the Pagoni insulation. The catch: this was originally designed as roof insulation and laminated with mineral fiber fleece. This makes it harder to cut and it pokes all over your skin.
Because I had two layers of PIR and another layer of EPS, I increased my work effort by about 50%. Also, since the electricians routed some pipes crossing each other unnecessarily (a proper plan would have helped), the 20mm (0.8 inch) EPS height adjustment was not sufficient everywhere and I had to cut the PIR too.
Another problem: even the wax-coated perlite migrated under the insulation boards if broken into too small pieces.
I then bought assembly adhesive and glued the boards to the PE foil on the pipes.
After three days off work and three weekend days, barely finished the office, and only one weekend left before the HSLer planned to install the tacker boards and underfloor heating, I knew I couldn’t manage alone.
Called my father-in-law, he could help on Sunday. Halfway through the living, dining, and kitchen area, he arrived and got to work.
“Filling the pipe channels everywhere? That’s a bit over the top! With all your insulation boards, it’s stable enough, and there’s air left to insulate.” So, after the heated room (or at least that’s the plan), we just laid boards in the hallway. It might backfire later, but I was near collapse. When he left, we still had the utility room and guest bathroom to finish.
The HSLer was then able to start laying the tacker boards upstairs and in the areas finished below the next day.
I spent Monday afternoon until late at night filling the rest. Again, only perlite as an adjustment layer (60mm (2.4 inches)) and only one layer of PIR (U-value 0.28).
But overall, I’m still ahead of the plan. In those two rooms, cozy warmth isn’t really that important anyway.
Now my wife is urging me, I have to go. More later...
Tolentino schrieb:
even though I had imagined it differently based on the forum That’s probably meant in a positive way (for @pagoni2020), right? 😉
Tolentino schrieb:
Regular perlite can slip underneath adjacent insulation boards if it’s not installed over the entire surface. Are you sure this is actually a problem? The adjacent boards should basically be, well, resting firmly on the floor, shouldn’t they?
P
pagoni20201 Sep 2021 18:32Tolentino schrieb:
Very nice man, very pleasant contact, even though I had imagined him differently based on the forum. Thanks again @pagoni2020, gladly again! What??? EVEN better looking???
Wow, I haven’t read so many positive things about myself since my own memoirs. For the sake of completeness, though, I have to say this first impression is misleading.....
K1300S schrieb:
That’s probably meant positively (for @pagoni2020), right? That would be my dream! I’m definitely showing this to my wife... although she already knows all these great things about me.
Honestly, I like writing here depending on my mood (and usually quite a lot 😀 ), but in the end, I always find direct or personal contact especially pleasant. I’ve had the chance to experience some of those here already, and they were always extremely helpful! For me, this shows that communication is only possible to a limited extent through pure text.
L
LukasFerante1 Sep 2021 20:54Your project is already impressive! rentschler-lüftung de
Similar topics