Hello everyone,
Our tiles are 1000 x 1000 mm (39 x 39 inches) with 2 mm (0.08 inches) grout lines. We plan to install them in a straight joint pattern. Normally, as I understand it, you start from the center of the room and work outwards, with cut pieces at the edges (Option 1). However, a friend advised us to start from one wall instead, so that the cuts only appear along the opposite wall (preferably the wall where shelves, sofas, or tables will be placed), which would be Option 2. His reasoning was that this would make the cuts less noticeable.
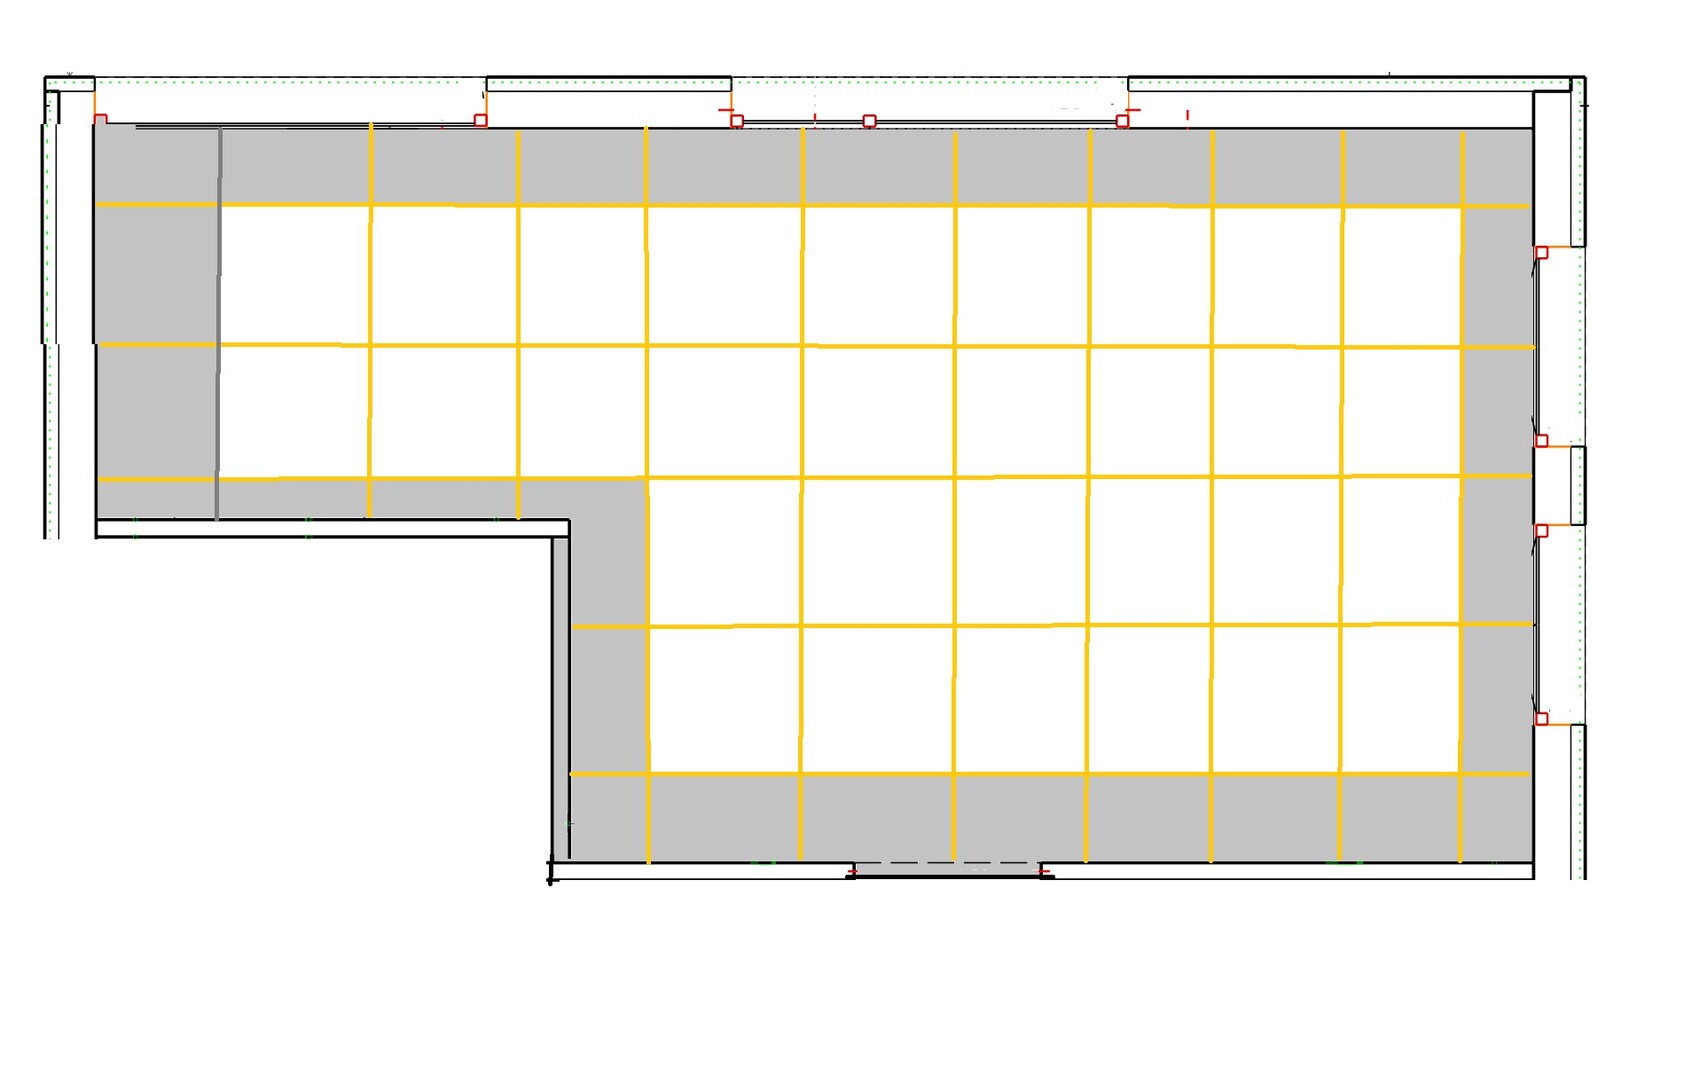
I roughly sketched both options, not to scale, with the gray areas representing the cut pieces. The room measures 11 m x 5.6 m (36 x 18 feet).
What are your thoughts? How would you install such large tiles?

Our tiles are 1000 x 1000 mm (39 x 39 inches) with 2 mm (0.08 inches) grout lines. We plan to install them in a straight joint pattern. Normally, as I understand it, you start from the center of the room and work outwards, with cut pieces at the edges (Option 1). However, a friend advised us to start from one wall instead, so that the cuts only appear along the opposite wall (preferably the wall where shelves, sofas, or tables will be placed), which would be Option 2. His reasoning was that this would make the cuts less noticeable.
I roughly sketched both options, not to scale, with the gray areas representing the cut pieces. The room measures 11 m x 5.6 m (36 x 18 feet).
What are your thoughts? How would you install such large tiles?
M
Mottenhausen28 Oct 2019 13:33Please also keep in mind that the actual size of the tile can deviate from the nominal size. Tile sizes are usually referred to in size classes such as 60x30, 60x60, 120x60, 100x100, etc. In reality, tiles are rarely exactly these dimensions. They are often a few millimeters smaller. This can disrupt layout calculations, especially when planning expansion joints. At least that was the case in our house.
We installed over 80 square meters (860 square feet) of a continuous tile pattern, starting at the expansion joint in the living area. This way, there are no visible seams in either the living room or the transition to the hallway. Our expansion joints are sealed with silicone in the same color as the tile grout, making them visually indistinguishable. We discussed everything in detail with the tilers beforehand, had different grout color samples on site to choose from, and also selected the silicone for the tile joints ourselves. If you let the tilers handle everything entirely on their own, you may not get the results you want.
Best regards,
Sabine
Best regards,
Sabine
L
Leopold8428 Oct 2019 23:54Baufie schrieb:
We have 120 by 120 cm (48 by 48 inches) tiles and faced this exact decision in the hallway as well. Either one tile in the center with 20 cm (8 inches) cuts on each side, or something else. We ended up starting with a full tile on the wall that you see from the front door straight through to the living room. Good that you mention that ^^ We are also using this tile in other rooms. And in the hallway (1.30–1.60 m (4.3–5.25 ft)) we face the same issue. Tile centered with cut edges on the outside, or not... right now we tend to have the cut edges on the outside, center the tile, and make it almost like a "path" from the hallway up to the front door.
ypg schrieb:
My alarm just went off. Are you planning to tile yourself, or why do you ask?
Basically, you use a full tile placed in a prominent position. This applies for both large and smaller tiles. We are having the tiles installed by professionals. As mentioned, we have 100 by 100 cm (40 by 40 inches) tiles, and the prefab home provider either wants a tile layout plan or leaves it up to the on-site tiler. However, we will only be notified a few weeks before when the tiler will be on site, so we want to think about it beforehand what we consider the best way to proceed.
With square rooms, it’s quite straightforward. Usually also with rectangular rooms. It gets tricky with other room shapes and especially when the same tile runs continuously into other rooms. With 60 by 60 cm (24 by 24 inches) tiles or smaller, it’s easier because you can shift the grout lines more flexibly. The bigger the tile, the fewer options you have for grout placement. For example, grout lines that are optimal in room 1 can quickly cause problems when transitioning to room 2 and room 3, because the cuts may end up in awkward places or grout lines might be right in the middle of a passageway, etc.
That’s why we thought it would be helpful to gather experiences from people who have been through this before or who know more about tiling than we do.
PS: The good news is that we won’t have any expansion joints. Our builder can also arrange contact with the tiler on short notice (a few days before installation) if needed. This, together with the many replies here on the forum, helps us feel a bit more relaxed. The only downside is that we don’t really know how it will all look in the room. It might work fine on a 2D floor plan, but how it looks in reality we still won’t know. On one hand, we tell ourselves that with furniture and such, it probably won’t matter much later on, but on the other hand, you want everything perfect during planning and keep refining every detail until the very end.
Really no expansion joints?
I would start by taking the floor plan and overlaying a 1x1m (3x3 ft) grid using an appropriate graphic tool, moving it around over the layout. This way, you can identify potential stress points. Then, you can explore how to avoid these critical areas. After all, you generally want room transitions to feel continuous.
Also, I would seriously consider this and want to have the details regarding the expansion joint documented in writing.
B
borderpuschl29 Oct 2019 08:15Have you already checked if baseboards matching this tile are available in this size?
For many tiles, not all sizes come with corresponding baseboards.
A 100 format tile with a 60mm (2.4 inches) baseboard looks quite poor.
For many tiles, not all sizes come with corresponding baseboards.
A 100 format tile with a 60mm (2.4 inches) baseboard looks quite poor.
Similar topics