ᐅ Floor plan design shortly before submitting the building permit application
Created on: 2 Oct 2017 23:25
R
R.Hotzenplotz
Hello everyone!
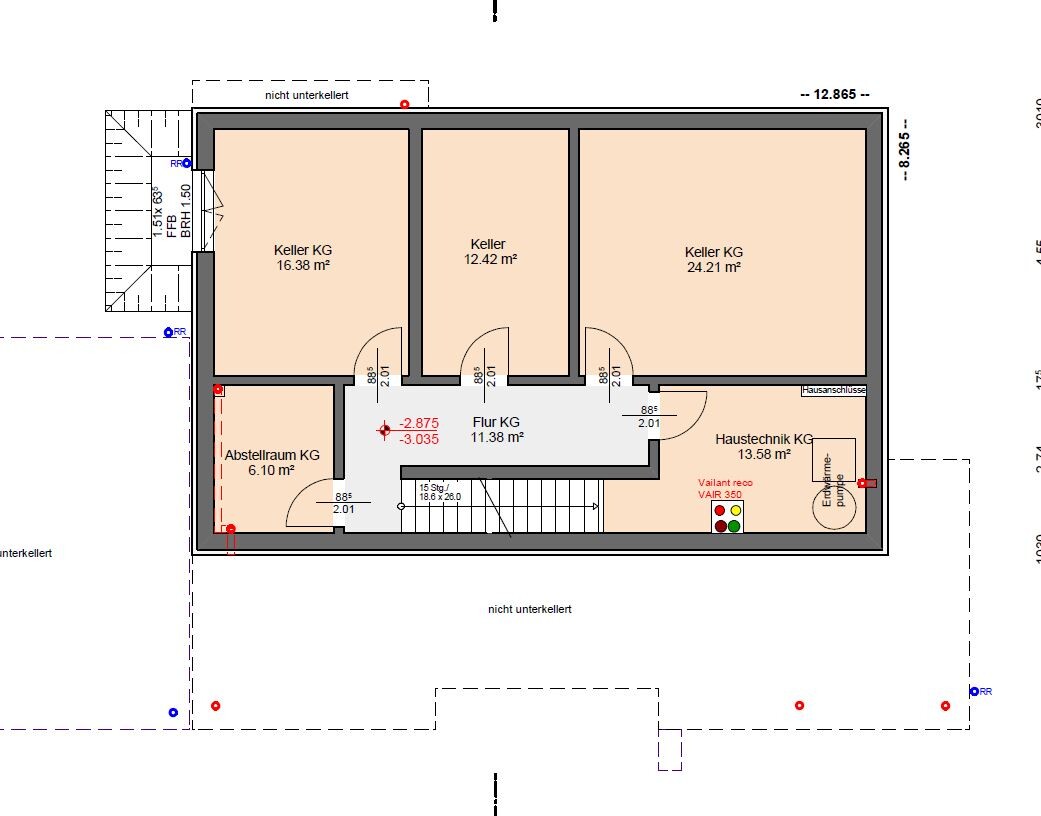
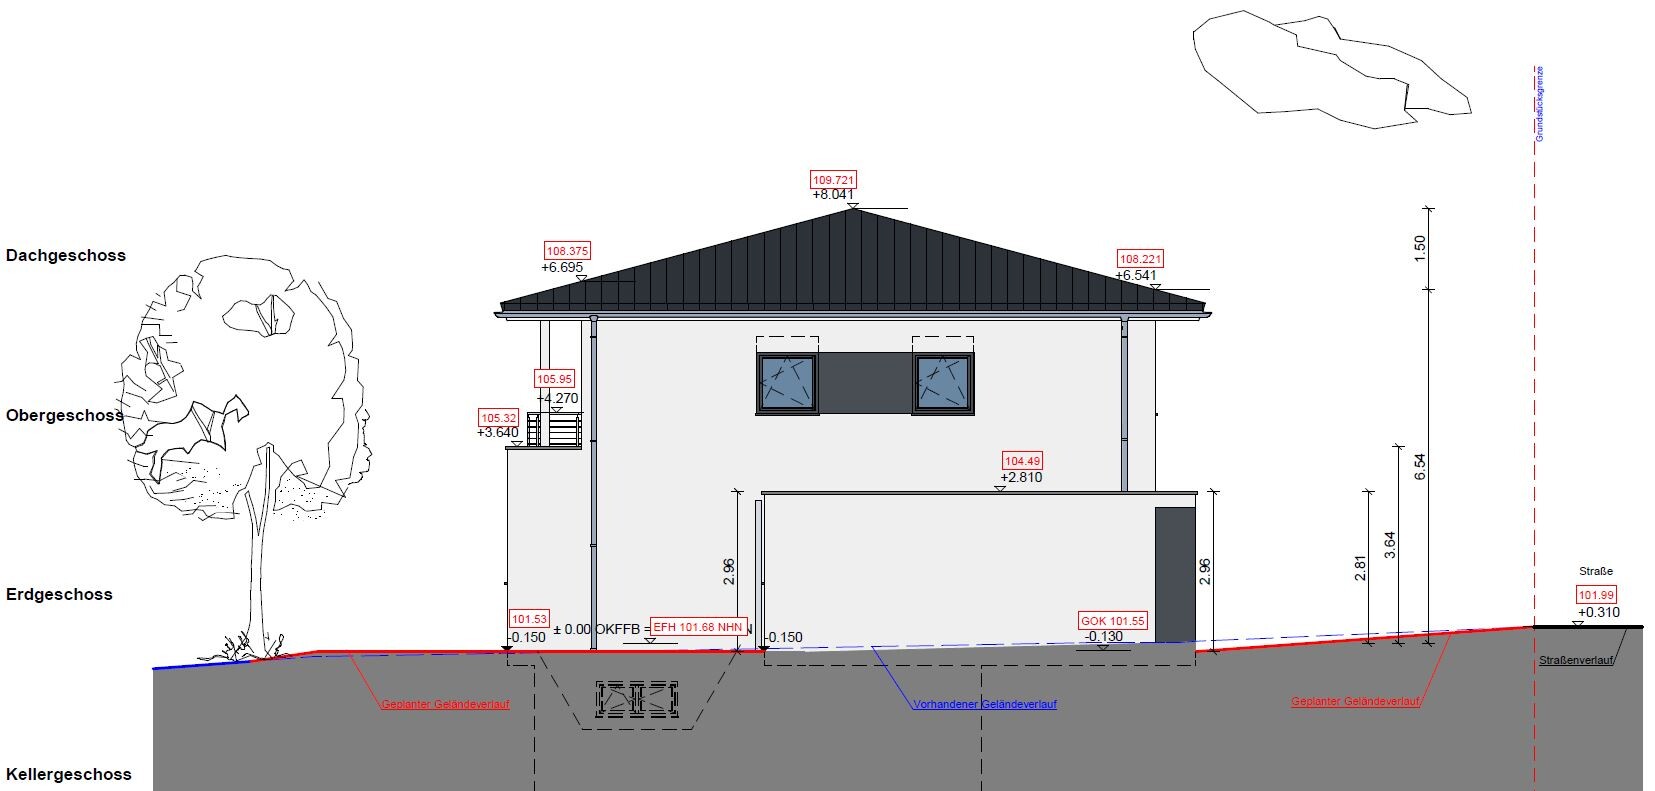
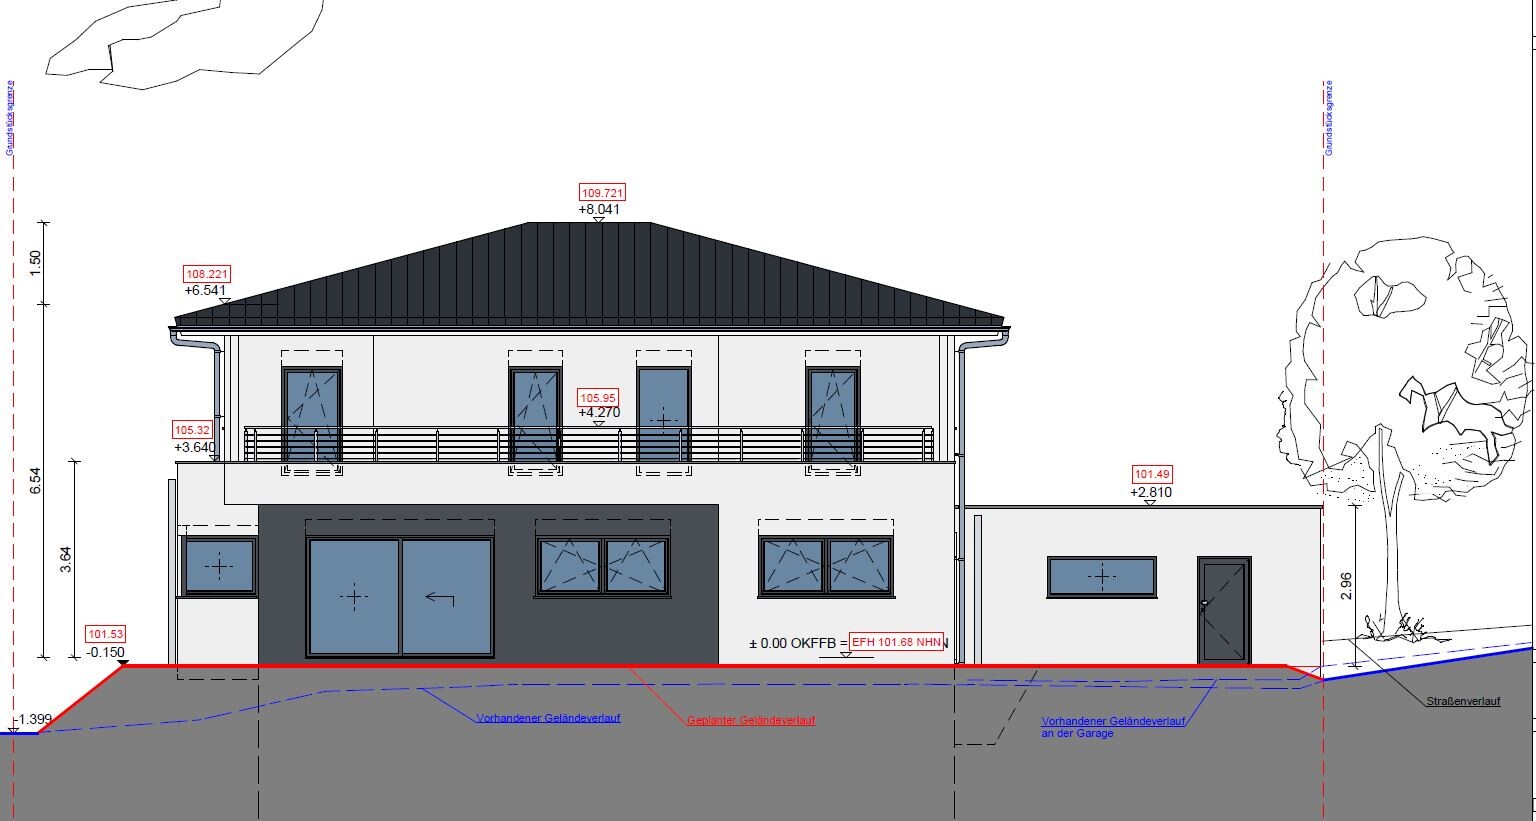
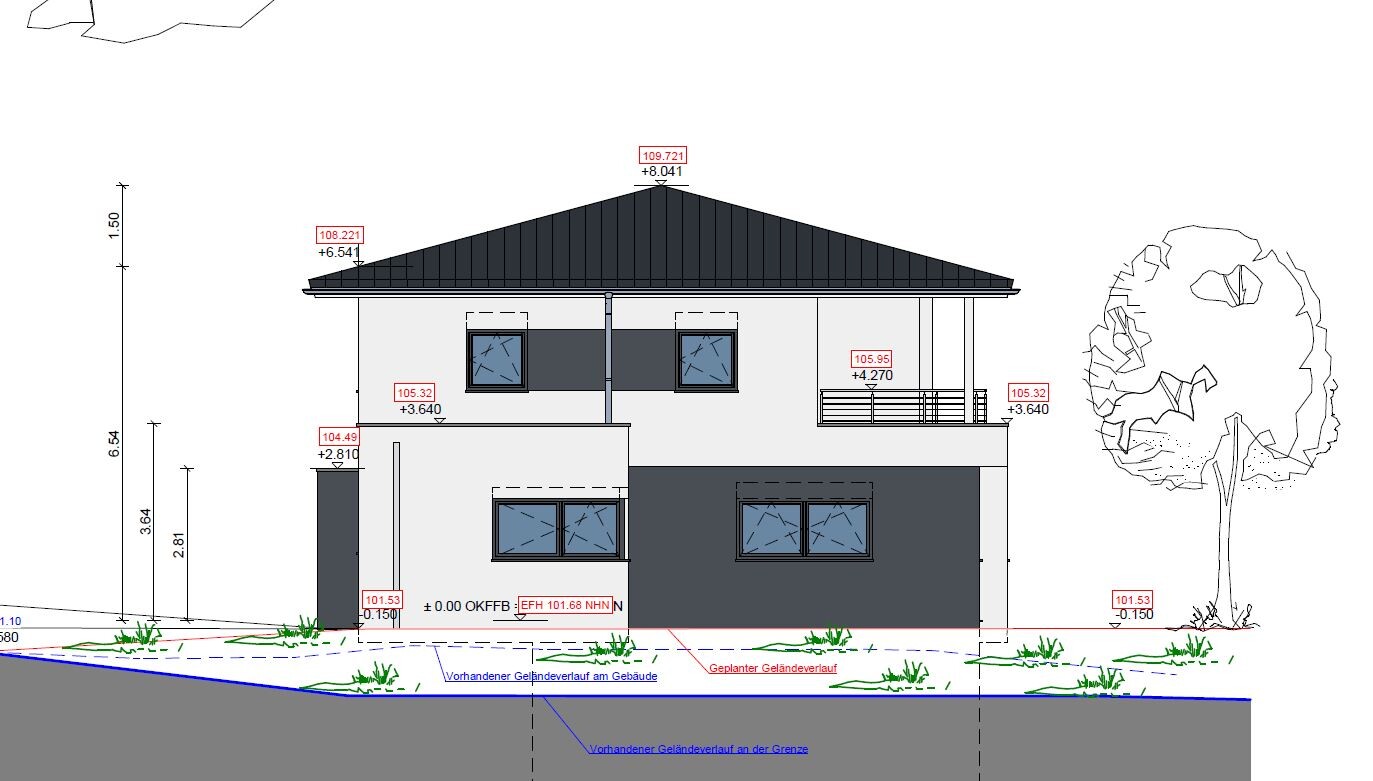
As some users have requested before, I’m now starting a new thread with the current planning of our detached house, which is about to be finalized.
These are the preliminary drawings for the building permit / planning permission application, and I have one last chance to review them and point out any issues.
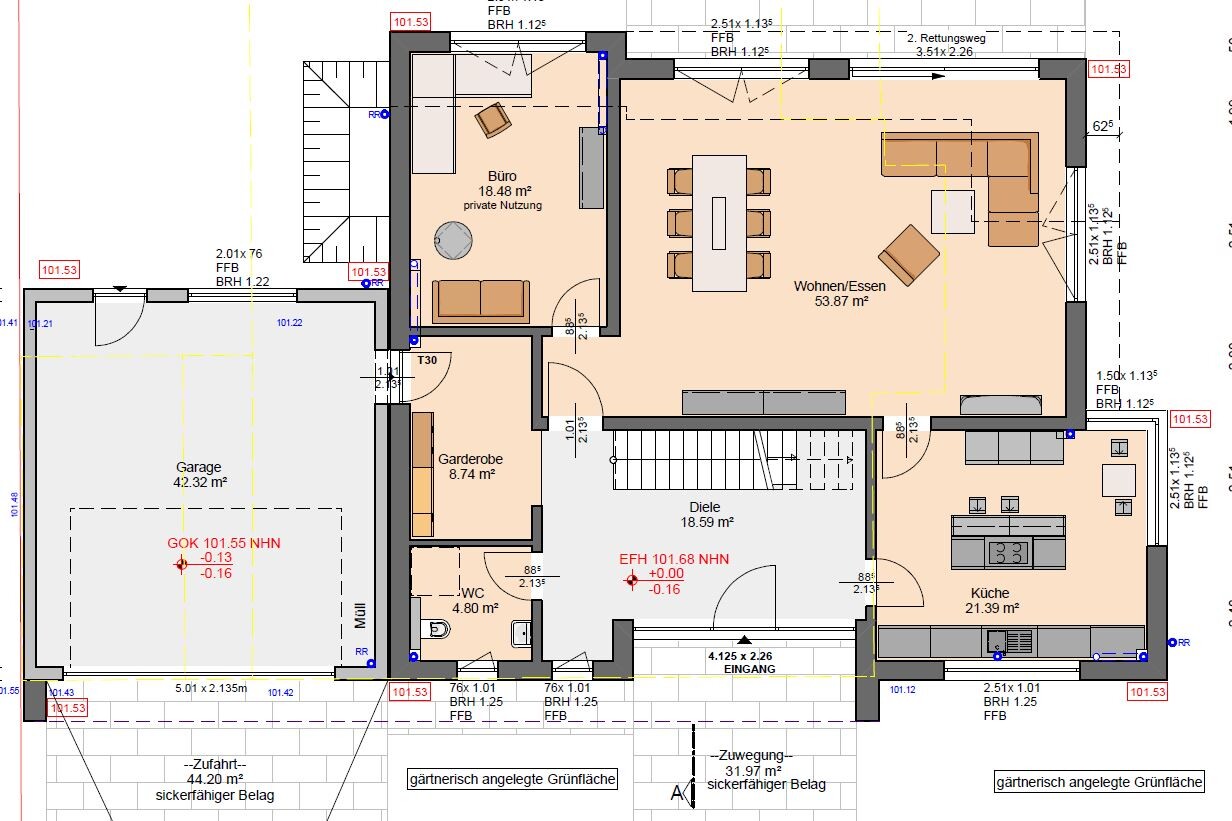
It still seems to me that there is less than 1.20m (4 feet) of space between the two wardrobes in the dressing room. Or am I seeing this wrong? Apparently, the rooms on the left and right were overlooked and not adjusted accordingly.
Two Velux ceiling spotlights are still planned to illuminate the upper floor hallway.
In the basement, on the right side in the upper room, a window similar to the one on the left basement side is an option.
We still haven’t decided on the T30 fire-rated door to the garage, even though it is shown in the plans. Most likely, for safety reasons and the limited use of the kitchen at the other end of the house, we will eventually forgo it.
User 11ant pointed out that the right window in child’s room 2 is suboptimally positioned. However, this could still be changed after submitting the building permit / planning permission application. Our architect thinks moving the window to the left would negatively affect the house’s exterior appearance. We’ll have to see about that.


As some users have requested before, I’m now starting a new thread with the current planning of our detached house, which is about to be finalized.
These are the preliminary drawings for the building permit / planning permission application, and I have one last chance to review them and point out any issues.
It still seems to me that there is less than 1.20m (4 feet) of space between the two wardrobes in the dressing room. Or am I seeing this wrong? Apparently, the rooms on the left and right were overlooked and not adjusted accordingly.
Two Velux ceiling spotlights are still planned to illuminate the upper floor hallway.
In the basement, on the right side in the upper room, a window similar to the one on the left basement side is an option.
We still haven’t decided on the T30 fire-rated door to the garage, even though it is shown in the plans. Most likely, for safety reasons and the limited use of the kitchen at the other end of the house, we will eventually forgo it.
User 11ant pointed out that the right window in child’s room 2 is suboptimally positioned. However, this could still be changed after submitting the building permit / planning permission application. Our architect thinks moving the window to the left would negatively affect the house’s exterior appearance. We’ll have to see about that.
R.Hotzenplotz schrieb:
Really? Someone mentioned that it causes problems with splashing. Open ones only make sense at 160cm (63 inches).That’s my opinion, from personal experience.
R
R.Hotzenplotz29 Jul 2018 19:05Alex85 schrieb:
That’s my own experience.Especially since we are not exactly using low-consumption or low-pressure components.
R.Hotzenplotz schrieb:
Especially since we are not using particularly economical or low-pressure components.More depth is definitely better.
However, you need to weigh your options. For 10cm (4 inches) and possibly a spacer as Bookstar mentioned, I wouldn’t give up the great mirrored cabinet.
R
R.Hotzenplotz29 Jul 2018 19:45Why 10cm (4 inches) anyway? It's 160cm (63 inches) versus 140cm (55 inches).
I might need to mark it out with chalk to see if 140cm (55 inches) is even sufficient.
Even if it fits, you still have the limitation of 140cm (55 inches) plus roughly €3,000 in costs for the wall modification, including plumbing work.
I was just thinking about taking the same mirror cabinet as a surface-mounted version instead. That way, the wall can stay as it is, and the 160cm (63 inches) shower as well. The appearance would just suffer a bit.
It would be the Emco Prestige surface-mounted light mirror cabinet, wide door on the right, with item number 989706021. I think that’s how we’ll do it. I’m also worried it might get even tighter near the toilet otherwise.

I believe the drywall installer is only thinking in terms of drywall construction. My suggestion was to leave the calcium silicate block wall up to the bottom edge of the mirror cabinet and to rebuild the mirror cabinet with drywall only on the sides and top.
https://www.instagram.com/11antgmxde/
https://www.linkedin.com/company/bauen-jetzt/
https://www.instagram.com/11antgmxde/
https://www.linkedin.com/company/bauen-jetzt/
R
R.Hotzenplotz29 Jul 2018 23:13The problem with this solution is that the mirror is so wide it also covers the L-shaped section. This is apparently an issue because the other side of the wall is affected as well. Several people involved, who partly don’t know about each other, told me this independently.
One person mentioned that if you do this, you need to regularly apply acrylic sealant throughout the year since it will keep popping off at the corner.
Unfortunately, it also doesn’t help me in terms of the depth...
Apparently, the drywall partition needs to be almost 8cm (3 inches) deeper than the built-in frame that goes in there. Given the conditions, that just becomes too much. Therefore, the trend is toward a surface-mounted mirror cabinet, and everything stays as it is.
Similar topics